Thursday, July 22, 2021

The 10 Most Fun Outdoor Games For Kids

Remember those long summer days where every waking minute was spent outside playing? No one dared to complain about being bored for fear of being assigned chores by our parents. Instead, we played through our arsenal of outdoor games until every single game had been played over and over. When we exhausted our game options we just invented new ones. Those were the good ole days!


Unfortunately, the lure of (or addiction to), electronics keeps kids from venturing out to play games like their parents or grandparents used to play. With decreased outdoor playtime many kids don't even know what to do when they go outside to play! 

I've got an easy solution to this problem. It is time for you to re-live a little bit of your childhood and teach your kids the games you used to play when you were a kid. Throw on some flip-flops and join them in the backyard to get the fun started. 

The key to playing outside with your child is showing them how to play these fun outdoor games. My kids love learning the games I used to play when I was a kid and yours will too. 

These games might seem a bit retro to your modern kids but they are still a ton of fun to play. Be careful these games and the fun they will have playing them might become some of their fondest childhood memories! All of these games are easy to play and perfect for any age (including adults). 


This post was written in partnership with Zulily. Check out these other fun outdoor kids games at The Find By Zulily. For more great posts click here.


10 Fun Retro Outdoor Kid's Games 

1. Red Rover - This is the perfect outdoor game for a large group of kids. Divide kids into two teams spaced about twenty feet apart. Each team holds hands in a line facing the opposing team. Team One chants “Red Rover, Red Rover, let (name of one child from team two) come over!” The child whose name was called runs towards Team One’s line trying to break through a pair of holding hands. If they break the chain the child selects a player from Team Two to join their team, but if they don’t break through the chain, they join this team. Play continues until one person is left standing 

2. Duck, Duck Goose - a classic that never gets old and great for all ages. Players sit in a circle and one player, the “ducker” walks around the outside perimeter of the circle gently tapping each person’s head saying “duck”. When the ducker taps a player’s head and says “goose” the player stands up and chases the ducker around the circle trying to tag them before they reach the open space.  


3. Drip, Drip, Drop This game is just like a duck, duck, goose but with a wet sponge added. The “ducker” holds the sponge above each person’s head and when they want to select a player to chase them, they squeeze the sponge over their head to soak them. The person who gets soaked jumps up and chases the other player around the circle trying to tag them. 


4. Mother, May I? - A fun and easy game to play with your family and friends. Select one player to be “Mother” and have them stand about 20 feet away from the rest of the players who should line up shoulder to shoulder spaced a few feet apart. The “Mother” calls to one of the players giving them instructions to move forward like “bunny hop forward three times”. The player must ask “Mother, may I?” and if granted permission by the “Mother” may perform the instructed steps. If the player moves and forgets to ask “Mother, may I?” they must go all the way back to the starting spot. The first one to reach “Mother” wins! 


5.  Red Light, Green Light - All the players start on the far side of the yard or playground except for one person who is the caller. The caller turns his back to the group and shouts, “green light” and all the players try to run towards the caller. When the caller shouts, “red light” and faces the players, everyone must stop and freeze. Anyone caught moving is out. The first person to reach the caller wins. 


6. Hot / Cold - one player hides an object while the other players look away. Then while other players look for the hidden object the person who hid it says “hot” if they close to the object or “cold” if they are far away from it.  

7. Ghost in the Graveyard - One person, the ghost hides while the seekers sit in the free spot and count, singing: “one-o’clock, two-o’clock, three o’clock, four, five o’clock six o’clock seven o’clock more, eight o’clock, nine o’clock ten o’clock, eleven o’clock, noon, noon we’ll be searching for your soon.” (repeat) but this time when you get to twelve o’clock say “midnight”. The seekers look for the ghost. When the ghost is spotted, they yell “ghost in the graveyard” and try to run to the free spot without being tagged by the ghost. The first person tagged now becomes the new ghost.  


8. Hopscotch - This is the perfect retro game everyone loves to play. Using sidewalk chalk draw a steppingstone-shaped hopscotch path down the length of the sidewalk. Players take turns tossing a small stone onto the hopscotch then jumping from block-to-block hopping with only one foot allowed to land on a square at a time, avoiding the block with their stone on it. 

9. Spider in the Web - All players stand together on one side of the yard except for one person who is the spider. The spider stands in the middle of the yard and tries to tag other players as they run across the yard to the other side. Anyone tagged becomes a spider. The game continues until everyone is a spider.  

10. Slithering Snake Jump Rope - A jump rope is all that you need to bring this retro game to life. One child, the Snake holds one end of a jump rope while the rest of the children gather in a center around the Snake. The Snake spins around making a circular pattern with the jump rope while the other players hop over the jump rope as it approaches them. Anyone touched (bitten) by the rope is out.


More Fun Outdoor Games To Play

Looking for more fun retro outdoor games to play with your kids? Check out this post: 20 Fun Outdoor Games For Kids on the Zulily blog The Find. Have fun making great memories this summer with your children!


Games are so much fun! Here are some other great games & activities your kids will enjoy - 


10 Awesome Party Games For Kids 

10 Fun & Easy Toddler Activities To Keep Them Busy

Top 10 Family Board Games


Pin these awesome games & activities for later! 


5 Easy Meals To Make On Your Next Camping Trip

Over the last year, camping in the U.S. has grown in popularity, especially with first-time campers. The number of first-time campers in the U.S. from 2019 to 2020 has grown five-fold according to Kampgrounds of America. Thanks to the pandemic the boom in first-time campers spending their vacation time outdoors in nature at campgrounds around the country is a trend that doesn't appear to be slowing down anytime soon. 


Whether you are a seasoned camper or a newbie figuring out what to make for meals on your trip can be difficult. Cooking over a campfire is completely different than the oven or microwave cooking you do at home but that doesn't mean the quality of your meals should suffer. Campfire cooking takes a little practice and some pre-planning but the meals can be just as good, if not better than what you have been making at home. 

Making sure you have the right camping tools to cook over your campfire is important. Here are a few must-have basic tools I recommend you invest in (or borrow from a friend). 

Hot dog / Marshmallow Roasting Sticks


Pie Irons


Campfire Cooking Grate 


Cast Iron Skillet


Dutch Oven


Heat Resistant Grill Gloves 


Armed with the right tools for the job you are all set to prepare a tasty meal for your family. Building a campfire and waiting for the fire to burn down into hot coals is the perfect time to get the ingredients ready and prepped for cooking. 


5 Easy Meals To Make On Your Next Camping Trip


There are countless meals you can make over a campfire. Camping isn't all about eating just hot dogs and roasted marshmallows as many people think that is all they can cook over a campfire. There are so many great meals you can cook over a fire. As a new camper to help you get started with meal planning I am going to share 5 easy meals you can make on your first camping trip.


#1 PIE IRON PIZZA

Pizza is a popular meal that you can easily serve your family for dinner anytime. While the pie iron pizza isn't quite as fast as a Little Ceasar's Hot-n-Ready it is worth the wait. 

  • two slices of buttered bread buttered or Pillsbury pizza dough in a can cut to fit the pie iron
  • pizza sauce
  • toppings of your choice
  • mozzarella cheese
Place the buttered side of the bread against the pie iron then spread the pizza sauce over the bread. Spread your pizza toppings and cheese over the sauce then place the second piece of bread butter side up on top of the cheese. Close the pie iron and lock it in place. Scrape off any pieces of bread that are sticking outside of the pie iron. Place the pie iron into the hot campfire coals and let it cook for 3-5 minutes per side. Crack open the pie iron to check if the pizza is done. When the bread is golden brown you know the pizza is ready. 

#2 FOIL PACKET SALMON BAKE

Who says you can't have fine dining when camping? Baked salmon, especially if you catch your own out on the lake that day is a treat for anyone. Prepare your fish for the campfire by coating a piece of heavy-duty aluminum foil with cooking spray then lay your salmon skin side down in the center of the foil. Add any seasonings (Old Bay is my favorite) and a slice of lemon on top of the salmon then fold the foil around the salmon to seal it closed. Place the foil packet on a campfire grill grate over the hot coals of a campfire for indirect cooking. When the salmon is no longer pink it is ready for dinner! 

#3 CHICKEN & SAUSAGE SHISH-KABOB

If you have never made shish-kabob at home you are in for a real treat with this meal. Cut 2-3 chicken breasts and 4-5 smoked sausages (brats or kielbasa work well too) into 1-inch chunks. Thread the meat onto metal skewers then place them onto a metal cooking grate over hot campfire coals. While the meat is cooking cut up peppers, onions, mushrooms, potatoes, and zucchini into 2-inch pieces and thread them onto metal skewers then brush olive oil over the veggies. When the meat is about halfway done add the vegetables to the cooking grate. Make sure to turn and the meat and vegetable skewers regularly so they cook evenly on all sides. Slide the cooked meat and veggies off of the skewers into a serving dish and serve alongside a loaf of crusty bread. 

#4 CAST IRON SKILLET RIBEYE STEAK

The cast-iron skillet will do all the work for you to make this amazing dish. To prepare make sure your campfire coals are good and hot and that your cooking grate is placed just above the coals so the cast iron pan gets nice and hot. While you prepare the campfire season your steak with salt and pepper allowing the seasonings to marinate the meat.  Preheat your skillet, drizzle a little vegetable oil into the skillet and then place the steak into the hot pan. Let it cook for a few minutes per side until it is cooked to your liking. Remove the steak from the skillet and let it rest for 5-10 minutes covered.


#5 PORK CHOPS & POTATOES

Comfort food at the campfire is the best way to describe this meal. I recommend you get this meal going earlier in the afternoon since it will take about an hour to cook over the campfire before it is ready to serve for dinner. 

  • 4-5 pork chops (medium thickness)
  • olive oil
  • butter (melted)
  • 2 cups bread crumbs
  • 1 can cream of mushroom soup
  • 3/4 cup water
  • 3-4 potatoes cubed
  • salt & pepper 
Preheat the dutch oven on the hot coals of a campfire then drizzle 2-3 tablespoons of olive oil into the bottom of the pan. Season the chops with salt and pepper then once the oil is hot lightly brown the pork chops in the oil. Melt the butter in a small pan then mix it with the bread crumbs and 1/4 cup of water. Spread the bread crumb mixture over the pork chops. Cover the pork chops with the diced potatoes. Mix the soup with the rest of the water then pour it over the potatoes. Cover top of the dutch oven with hot coals and cook the chops for one hour ensuring the hot coals remain at 350 F. 

These tasty meals should get you started for your first week of camping. Once you get comfortable using these campfire cooking tools you can really get creative with your campfire meals. 


CAMPFIRE DESSERT

After a delicious hearty campfire meal, I know your kids are going to ask what is for dessert! No problem. Campfire desserts can be just as amazing as the meal you just cooked. Get those marshmallow roasting sticks ready because here are some mouthwatering gourmet s'more recipes you should try on your camping trip:

10 Gourmet Smore Recipes


Pie Iron Fruit Pies


Before you put your pie iron away why not bake a few fruit pies in it for dessert. Butter two slices of bread placing one slice buttered side down on the pie iron. Add a few spoonfuls of canned pie filling into the center then place the second piece of bread butter side up on top of the filling. Close the pie iron and cut off the extra bread. Place the pie iron on top of hot coals flipping it every few minutes to ensure even cooking. Once the bread is golden brown your pie is ready! 
Full bellies make for happy campers! I know you will enjoy these delicious recipes and so will your family. 


Is this your first time camping? I'd love to hear how your camping vacation went as well as what meals you made to feed your crew - please share your experience in the comments. 


Wednesday, July 14, 2021

How To Make A Yarn Wrapped Hoop Wall Hanging

During the pandemic, a lot of people, including me, focused on ways to update their homes. The first project I tackled was repainting our basement playroom. Our long-term goal was to turn the playroom into a family room where we could all watch movies together or play foosball together. 

Once the room was painted and new furniture (bye, bye futon!) arranged it was time to figure out what to hang on the walls. After scouring Pinterest for inspiration I came to the conclusion that: 

  1. The wall hangings I liked were WAY out of my price range and 
  2. If I wanted decorations like the ones I found online I was going to have to make it myself!  


This post was written in partnership with Zulily. For more great posts click here including 5 DIY Woodworking Projects To Tackle This Summer.


Before I show you how I made my yarn-wrapped wall hanging let me share where I got my inspiration from (thank you Pinterest!)


via: Etsy


via: Etsy

Can you see a pattern here-  Circles Shapes + Yarn. 

In our updated family room, there is a narrow wall on the left-hand side when you walk into the room that I thought would be a great place to hang a circular yarn-type decoration. All I had to do now was make it!  


I am very happy with how my end project turned out and wanted to share with you how I made it in a step-by-step tutorial.

Supplies:

8 - 8" wood embroidery hoops (here are the ones I purchased)
several skeins of chunky yarn in colors you like
hot glue & hot glue gun
wood stain (optional)


Step-by-Step Instructions:

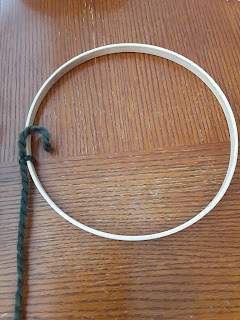
  • Separate the inner circle of each embroidery hoop from the outside section that has the metal adjuster on it. You will only be using the inner hoop for this project

  • Select one skein of yarn and securely tie the end of the yarn to one side of an embroidery hoop. Wrap the yarn across the hoop to the opposite side making sure to position the yarn across the middle of the hoop circle. Add a drop of hot glue to the outside of the hoop to secure the yarn. 


  • Continue wrapping the yarn over the hoop in even layers adding dots of hot glue to the outside of the hoop to secure the yarn. As you progress the yarn may begin to slide so be sure to hold the yarn into the hot glue until the glue cools. 


  • Once you reach the bottom of the hoop run a bead of hot glue along the wood and weave the yarn over the glue to hide any exposed wood on the hoop. Snit the end of the yarn with scissors and glue any pieces of yarn down so it lays flat. Go back to the starting spot and tuck the tail of the yarn into the hoop so it isn't visible. 


  • Repeat these steps for the remainder of the hoops. 

After I had finished wrapping the hoops with yarn I laid them all out on the floor and arranged them in the pattern I liked. Once I was satisfied with the placement of the hoops I hot-glued them together. Since they are quite light I wasn't worried about the weight of them pulling the hoops apart when it was hanging on the wall. 

I tried this project with a thinner yarn but in the end, I really liked the thick chunky yarn best. The thick yarn gave the project more texture and I love the flecks of color in the thicker yarn. Of course, you can use whatever yarn, twine, or thin rope you have on hand to keep the cost down!


I'm really happy with how this project turned out! Not only did it cost a small fraction of what I had shopped for online but I got to choose all the colors for the yarn that would look best in my room.


Here are some more great DIY projects you might enjoy -


What project have you been working on lately? Do you have any great DIY ideas - share your ideas in the comments!!


Tuesday, July 13, 2021

How To Take In The Waist On A Pair of Pants: Simple Sewing Alterations

Whether you have lost weight recently and your clothes seem a little roomier or maybe your child has outgrown the length of their pants but the waist is too big, a simple and easy alteration called taking a tuck is all you need to do to solve this problem. 


Before kid's pants had those nifty adjustable elastic waistbands, my mom would always need to take a tuck in our pants so the waist would fit properly. Buying the next size bigger was more economical too since a growth spurt could happen at any time! Since adding to the length of a pair of pants isn't worth the bother, adjusting the waist was a wiser option. 


This post was written in partnership with Zulily. Looking for more easy sewing projects? Check out this post I shared on The Find by Zulily: Easy At Home Alterations - Simple Ideas to Repurpose Your Jeans. 


Now that I'm a mom and in charge of clothing all the kids I learned quickly how to sew a tuck in order to save a little money and stretch out the useful life of a pair of kid's pants. I'm going to share with you how to do this simple alteration that you can easily do on almost any pair of pants, swimsuit bottoms, or even jeans. 

The best part of taking a tuck is that it is a temporary alteration and will not ruin the clothes. As your child grows or if you happen to add back a few pounds you can easily snip the stitches of the tuck and release the waist to the original size. 

How To Take A Tuck In A Pair of Pants

If you don't consider yourself a "sewer", no worries this is so simple anyone can do this. Follow along as I walk you through how to take a tuck.


Supplies 

  • Sewing machine (optional but handy!)
  • Sewing needle
  • Thread (in the same color as the piece of clothing)
  • Large butterfly clip (check your office drawer for this handy little guy!)
  • Pins


Step-by-step Instructions:

1. If this is a new pair of pants (or any other article of clothing) make sure to wash and dry it according to the label instructions prior to making any alterations. 

2. Try the pants on.  Starting at the back of the pants waistband, just to the right or left side of the center back seam pinch from the inside the waistband fabric together adjusting it to the fit you desire. Clamp the butterfly clip over the pinched section of fabric and take off the pants. Insert a few pins along the edge of the butterfly clip into the fabric making sure to pin through both layers of fabric. 

3. Turn the pants inside out taking care not to get pricked by the pins. With a sewing machine or by hand, stitch along the pins from the top of the waistband to the bottom of the waistband making sure to backstitch at the start and finish so the stitches can't come out. 

4. Turn the pants right side out and try them on to see if the waist fits comfortably. Make any adjustments if necessary. 

You will find that this simple alteration can save you lots of time and money since you can stop running to store after store looking for the perfect fitting pants every time your child hits a growth spurt or when your waist size fluctuates. 


Simple Repurposing Alterations 

Repurposing clothes is so rewarding and a great way to extend the life of your favorite piece of clothing. Looking for some more simple alterations that are easy to do check out this post I shared on The Find by Zulily -  Easy Alterations You Can Do At Home  


Sewing Tutorials For Beginners

If you are new to sewing make sure to check out these beginner sewing projects you are sure to enjoy making:

How To Make A Fabric Banner - Easy Sewing & No-Sew Tutorials

10 Must Have Sewing Supplies For The Beginner

How To Make A Rag Strip Quilt Sewing Tutorial


Saturday, July 10, 2021

Back To School Fashion Design Contest For Kids - And A Chance To Win Big Prizes

Calling All Aspiring Future Fashion Designers! Hey Mom - does your child love creating their own unique one-of-a-kind outfits? Maybe they like adding their personal touch to everything they wear? If I just described your child's fashion personality then why not give them a chance to share their fashion sense with the rest of the world!


Back-To-School Kid's Fashion Contest 

Zulily, the best online retailer for kid's fashion is sponsoring a contest for kids called the Back-to-School #UniquelyZu Contest that will give six kids a chance to become trendsetting fashion designers inspiring an exclusive capsule collection as well as a $6,000 Back-to-School prize package. 


This post was written in partnership with Zulily. For more great posts click here


How To Encourage Your Child's Sense of Fashion

With schools across the country getting ready to start the back-to-school shopping season for moms and kids has officially kicked off! For kids who love fashion, back-to-school shopping is their chance to find outfits that they feel confident and creative wearing. 

There are so many unique ways for kids to style their clothes to fit their amazing personalities. With the surge in DIY projects kid's clothing has not been the exception. Kids all over are embracing the chance to customize their clothes and they aren't holding back. Armed with basic sewing skills and notions or a glue gun, bedazzaler, and glitter nothing is safe from a little creative modification.   

Before your child runs wild through their closet snipping and modifying every piece of clothing why not encourage them to spend some time planning and thinking about their ideas (like real fashion designers do) before cutting up their wardrobe with a few of these helpful tools:

  • Sketch their designs on paper first. This goes along with the "think before acting" we moms always encourage our child to do before making any decision. Plus spending time drawing out their ideas will help them decide if their spur of the moment fashion inspiration is doable or not. Before they wreck a new pair of jeans or a shirt, which starts adding up fast make sure they slow down and think through their ideas.

  • Practice their fashion ideas on thrift store items. Thrift store prices are much more affordable than a brand new outfit so if your child has some ideas on how to customize their jeans why not let them try it out on something you pick up at a thrift store first. 

  • Study clothing construction with an experienced seamstress. The age-old home economic skills we moms had to take in high school might begin to pay off here. This is a great opportunity to teach your child some basic sewing skills and for them to learn about patterns, construction, and fabric which are all important things to learn if they are a budding future fashion designer. 

Sometimes it can be hard to give your child more and more ownership over what they wear. Start small so both of you can find your comfort zone. Encouraging your child and showing interest in their fashion taste can be a great way to grow your relationship with them too. 


Now Back To The Contest Details...

All kids love to show everyone what they made and that includes their customized clothes. The Zulily Back-to-School #UniquelyZu Contest is a great opportunity for your creative child to expand their audience and share their personalized fashion styles with the whole country! 

The contest is open to kids ages 5 - 14 years old and runs from July 7, 2021, through July 31, 2021. For complete contest details follow the following links:


Parents must submit a photo in an Instragram post on behalf of their child that reflects their child's unique sense of design and fashion.  The photo can consist of an outfit the child put together, a flat lay, a design sketch, a collage, a mood board or a similar photo or graphic. 

Make sure to include the hashtags" #ZulilyContest and #UniquelyZu in the post! After completing the Instragram photo post parents must visit the Zulily submission page and complete the entry form. 

Be sure to complete all of the steps to officially enter your child into this back-to-school contest. 

How does your child express themselves through fashion and their outfits? Leave a comment to share your child's unique fashion sense and ideas!