Monday, May 25, 2020

Bullet Journal For The Beginner

Have you heard of a bullet journal? Simply put a bullet journal is a creative organizational journal you get to design to keep track of anything you want to keep track of! Think of it as a blank canvas and the sky is the limit. For people who are visual a bullet journal can help them "see" what they are organizing or keeping track of. 


This post contains affiliate links which means if you click on a link and make a purchase I may receive a small commission at no additional cost to you. For more information please read my Disclaimer page. Thanks!

Bullet journals are so useful for almost anyone! A bullet journal is a place for you to let your imagination and creativity flow freely on each page of your journal. The possibilities for using a bullet journal are endless. 

Today I want to talk about some ideas you can use to start your first bullet journal and what kinds of things you could put in your very first bullet journal. I'll keep it very simple to start but once you get the hang of it and get going with your own you can make your bullet journal into anything you want. 

Grab your blank journal (here is my favorite), colored fine tip pens or pencils and let's get going!

TOP 5 BULLET JOURNAL PAGE IDEAS


#1    Goals For The Year

If you don't have any goals or maybe you have some vague ideas of what you want to accomplish this year a bullet journal is a great place to put those ideas down in writing. Don't worry if you can't fill a whole page, the more time you spend thinking about goals the more likely you are to come up with some more. Leave yourself some room in your journal and space to make changes or "tweaks" to the goals you write down. 

Putting your goals down on paper can be a bit scary at first especially since you might be afraid of not reaching the goal by the end of the year. That is not the point of this exercise. Really this is an accountability and organizational tool that is flexible and should be adjusted as needed. 

#2 Financial Tracker

Do you ever wonder what you have been spending your hard earned paycheck on? Creating a page in your bullet journal can help you monitor your finances more closely but in a less "accounting" kind of way. Instead of a checkbook style how about a calendar with cute pictures of what you bought! 

Maybe you love Starbucks so why not create a section in your bullet journal by month to track your trips to the coffee house. You could draw a cute little coffee cup for each purchase so you can see how often you spend money on your favorite coffee. You might be surprised how often each month you drop a few bucks on coffee.

Whatever your favorite splurge is you can use your bullet journal to track it each month. The result is a cute graphic visual to help you get an idea of where you are spending some of your money.

# 3 Mood or Activity Tracker

Tracking your mood and activities on a daily basis is a fun exercise. If you think you are feeling grumpy or down in the dumps more often than usual why not track your mood to see what is causing this slump. 

Maybe you are wondering if you are getting enough activity or variety of activity. Use your bullet journal to track your daily activity. Create a grid with the types of activities along one side and then each time you complete that activity color in one of the grid boxes. You can even color coordinate your activities to make the bullet journal page pretty.

#4 About Me Page

Who do you know the best? Yourself! Create a page dedicated completely to you with your favorite things, what you like to do and the special traits that make you who you are. Think favorite food, music, recreation or activities, favorite book and movie. 

#5 Calendar

Keep track of your busy schedule with a personalized calendar. Include space to jot down fun memories so as you go back over your monthly calendars you can remember the fun times you had and any momentous moments you experienced. 

Wait, there's more - 

My friends at Mint.com provided this FREE bullet journal stickers to help you get started with your first bullet journal. Check out these great downloadable stickers to add to your bullet journal.  Here are a few examples of the free printables:

Monthly Review Stickers:


Customizable Note Stickers


Wednesday, May 13, 2020

Kids Face Mask Sewing Tutorial

Sewing a face mask for your child is easy, even for a sewing beginner. Today I am going to walk you through the simple steps to make a fabric face mask for a child.


This post contains affiliate links which means if you click on a link and make a purchase I may receive a small commission at no additional cost to you. For more information please see my Disclaimer page. Thanks!

I have found, after making countless face masks that there isn't a one-size-fits-all mask for kids because they grow so quickly! What I have discovered is that adjusting the size of the fabric to certain measurements allows you to sew a mask that will fit a variety of age groups. 

Age is a good starting point for creating a child size face mask but if you aren't making the mask for your own child you should probably ask the parent if their child is small or large for their age and adjust your fabric sizes accordingly.

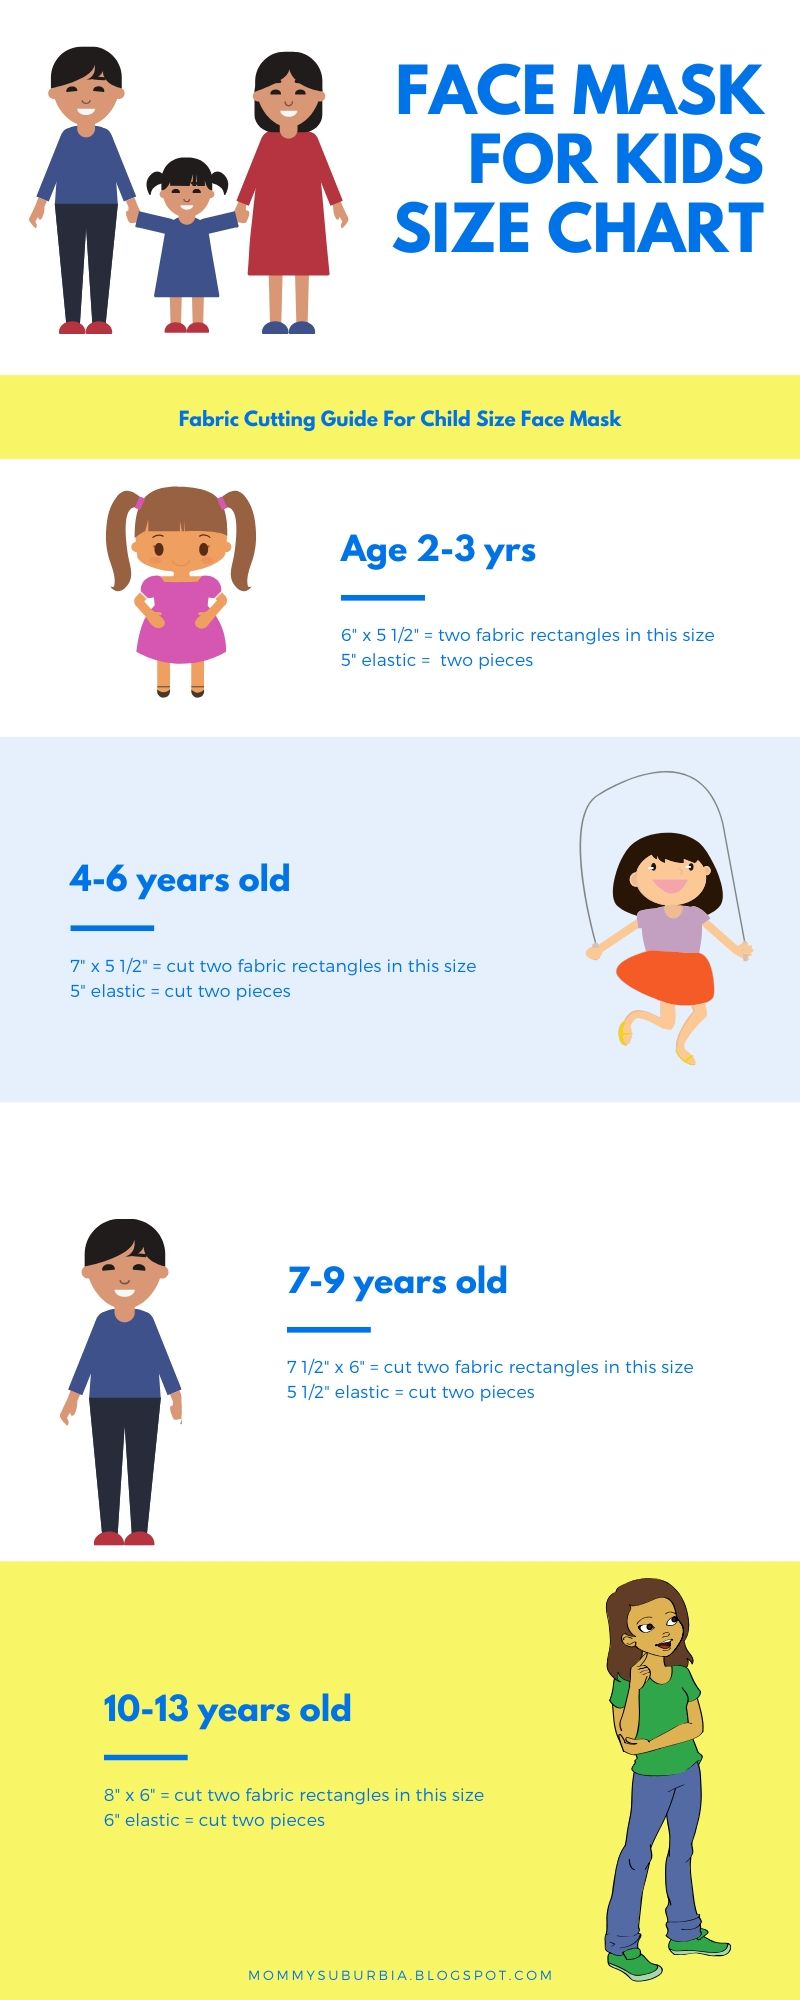
I've put together a chart to help you figure out the dimensions of the fabric to cut out will to make a fabric face mask for a child based on the child's age. 


Now all you have to do is cut out your fabric rectangles (2 per mask) and your elastic (2 per mask) and start sewing. If you are a sewing beginner don't worry, this mask only requires you to sew straight lines! 

The instructions to sew the child size mask are the same as the adult size mask. I've put together a complete tutorial showing you how to sew a face mask with pictures and detailed instructions. The tutorial below uses adult size fabric pieces however all the steps are the same for making a child size mask! Follow along to make your own child size face mask. 

Kids Face Mask Sewing Tutorial


Supplies Needed


Sewing Tutorial Directions:

1. Cut a rectangle from each of the fabrics in the proper dimensions based on the child's age (or size) from the above chart. The cotton fabric will be on the outside of the mask and the soft flannel fabric will be on the inside against your face. Using flannel is optional. If you choose to use cotton fabric for both the inside and outside of the mask that will work just fine too. Cut two pieces of elastic measuring based on the kid's mask size chart.

2. Place the cotton rectangle on the table with the right side facing up. Then lay the flannel rectangle on top of the cotton piece with the wrong size facing up.

3. Place a pin through both fabrics along one of the longer sides of the rectangle. Put a second pin about 1" away through both fabrics. Leave the space between the two pins open so you can turn the mask inside out when you are done sewing them together.


4. Begin sewing your fabrics together starting just after one of the pins. As you approach your first corner of the first short side stop sewing when you are about 1" away from the corner. Lift the top fabric and slide one of the elastic straps between the fabrics and line up one side of the elastic strap to the corner. Close the fabric and then sew over the elastic band several times to ensure it can't pull out. I suggest using a shorter stitch length.


5. Sew down the short side of the mask and again stop about 1" from the corner. Lift open the fabrics and pull the other end of the elastic band and line it up with the corner. Make sure the elastic strap won't be caught in your sewing. Your fabric will bunch up when you pull the elastic to the second corner - don't worry that is OK! Sew over the corner securing the elastic strap. Do the same for the second short side of the mask. Stop sewing around the perimeter of the mask when you get to the last pin marking the 1" opening making sure to back stitch a few stitches in place.


6. Turn the mask inside out through the 1" opening. Finger press or iron the mask flat. Make sure the opening you used to flip the mask inside out is lined up flat so when you sew around the perimeter of the mask it gets sewn shut.


7. We are now going to make three pleats along the short edges of each side of the mask. I find it is easiest to locate the center of each short side then make a 1/2" pleat and pin it in place. Make a another 1/2" pleat above the center pleat and another 1/2" one below the center pleat, pinning each pleat for a total of 3 pleats. Do the same to the other side making sure the pleats on both sides go the same way! The short side of the mask will now measure about 2 1/2 to 3 1/2 inches depending on which size mask you are making and now that you have added pleats.


8. Top stitch around the entire perimeter of the mask using a 1/4" seam allowance. Make sure you sew the 1" opening along the top edge closed too. Also, as you stitch over the pleats I recommend removing the pins as you go so you don't break a needle.

9. Sew a second top stitch about 1/4" away from the first row of top stitching around the perimeter of the mask.


That's it! You are all done - Congratulations! Easy wasn't it? Now you can feel more protected from the nasty germs, dust and other debris floating around the air.


Since your mask is 100% cotton you can wash it and dry it over and over so it can be used multiple times. I highly recommend air drying or drying the mask on low in a dryer since it will shrink due to being cotton.

Please note that this mask is not rated for disease control will not prevent you from getting the Corona Virus or other illnesses. This pattern is from the Turban Project through the Deaconess Health Systems.  According to the CDC, fabric masks are a crisis response option when other supplies have been exhausted. While it isn’t ideal it does offer some support to our communities.