Friday, May 26, 2023

10 Fun Kids Camping Crafts To Make On Your Next Camping Trip

Camping is a popular family vacation option because it is an age-friendly, budget-friendly, getaway everyone enjoys. When planning your next family camping trip be sure to bring along some craft supplies to make these simple and fun crafts to make your trip extra special.


This post contains affiliate links which means if you click on a link and make a purchase I may receive a small commission at no additional cost to you. For more information please see my Disclaimer page. Thanks!


Shop Fabric at Fat Quarter Shop

Being prepared for a rainy day while on a camping trip is key. Fill a small plastic tote with crafting supplies you can pull out on a rainy day to keep everyone occupied and happy. Here are a few things you will want to include in your tote:

Craft Tote Supplies

  • scissors
  • markers & crayons
  • tape & contact paper (clear)
  • craft glue & hot glue
  • twine / string / yarn
  • acrylic paint & paint brush
  • paper
  • googly eyes
The rest of the supplies you need can be found in nature! Sticks, stones, leaves, and wildflowers all make wonderful craft supplies. 

Once you have your supply tote ready and packed you are going to want to try out these 10 DIY camping crafts!

Camping Journal Logbook - a must have for all campers!


Before you head out on your next camping adventure make sure to take along a Camping Journal so you can jot down all the memories from your trip! If you have never used a Camping Journal Logbook this will soon become your favorite vacation tool. This journal has room for you to record your location, camp site #, weather, local attractions, site hook up amenities and much more!


10 DIY Fun & Easy Camping Crafts For Kids


Remember to Pin this post for later & be sure to follow me on Pinterest for more inspiring ideas!


#1    Leaf Rubbing Collage

This is a timeless craft kids have been doing for ages! Gather several different leaves and pine needles on your next outdoor hiking adventure. Let your child arrange the leaves on a flat surface then place a piece of paper on top of the leaves. Use the side of a crayon and firmly rub the crayon over the paper to capture the leaf shapes. 

Find the full tutorial at Mama Papa Bubba.
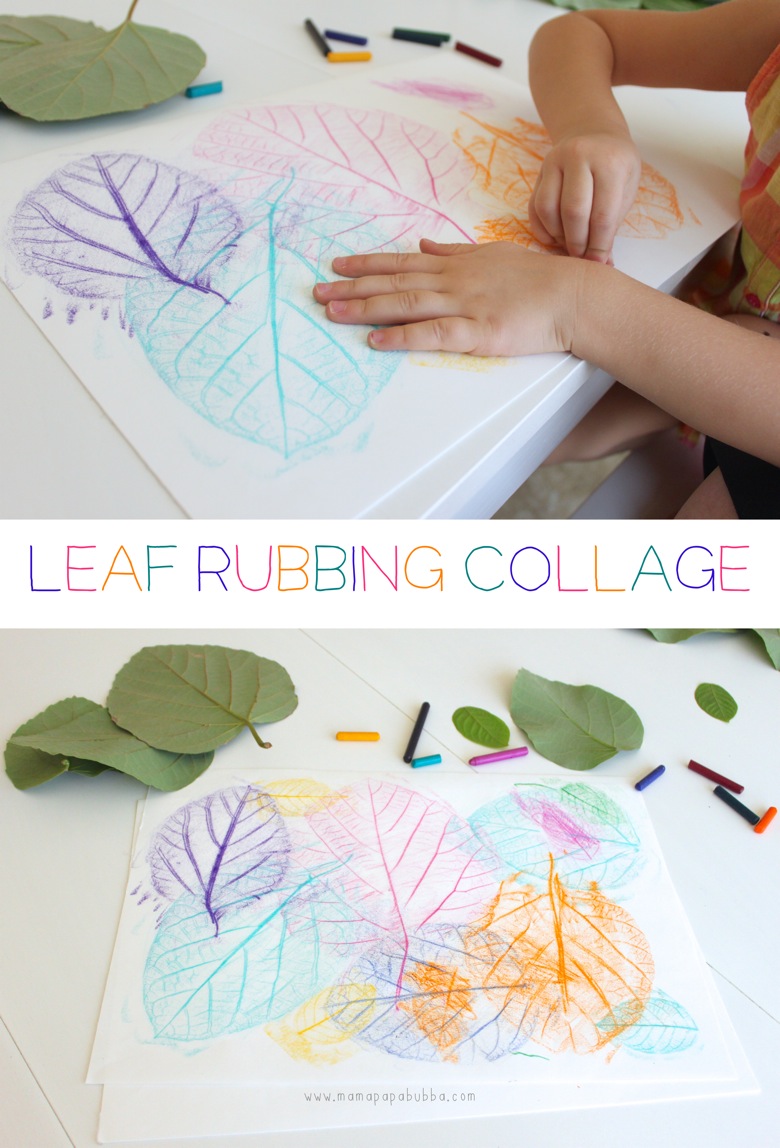
via: MamaPapaBubba


#2 Painted Rocks

Rocks of various sizes and shapes you find around the campground or on the beach become the perfect canvas for painted rock art. Find a rock that looks like the shape of a turtle shell? Paint it to look like a turtle! Turn your rocks into animals or paint patterns on them. 


#3 Pressed Flower Book Marks

Reading is a popular activity to do while camping so making a nature bookmark is the perfect craft project to do on your trip. Gather small leaves, flower petals, pine needles, and other small flat treasures to use for your bookmark. Cut a long rectangular piece of packing tape or contact paper then press the leaves, petals, and other flat objects onto half of the sticky side of one piece of the tape. Fold the other side of the tape over enclosing the objects inside. Press flat with your fingers then hole punch or cut a small slit at the top, insert a piece of yarn for a tassel and you are ready to mark the next chapter in your book.

Find the full tutorial at: Little Pine Learners

via: Little Pine Learners


#4    Luminary

Kids can create their own aluminum foil luminaries and make their very own night lights or a lantern for the picnic table! Follow this step-by-step tutorial: How To Make Aluminum Foil Lumnary to make your own today.


#5 Windchimes

Use supplies found on your camping trip with a few extra added supplies from your craft tote to make your very own windchimes. Metal chimes are replaced with sticks and beads to make these windchimes. To learn how to make these, download this Kindle book from Amazon 


#6 Wildflower Vase 

A fist full of picked dandelions looks amazing arranged in a cardboard flower vase! Your child will be so proud of their bouquet and you will enjoy the time spent crafting with them. Here is the tutorial to make a Wildflower Cardboard Vase!


#7 Painted Sticks Boquet

This is a really easy craft that is perfect for a rainy day camping or when your kids need an unsupervised activity to do while you prepare dinner. Encourage your child to gather a handful of sticks that vary in size and shape. Pour several different colors of paint on a paper plate and let them paint sections of each stick with paint all the way along the stick. Once dry display their colorful stick bouquet in a mason jar on the picnic table.

Find the full tutorial at the Homemade Ginger

via: Homemadeginger.com


#8 Triangle Stick & Wildflower Wreath

Decorate your campsite with these beautiful triangle-shaped wildflower wreaths. 

Find the full tutorial at: A Pretty Fix

via: A Pretty Fix


#9 Mini Twig Fairy Chairs

These little chairs will have your child's imagination going wild! Making their own mini chair from twigs is so much fun they might end up making enough for a family of imaginary fairies! 

Find the full tutorial at: One Inch World

#10 Pinecone Owls

Whooo wants to make a pinecone owl? This craft is a hoot that your child is sure to enjoy! Send your kids out to gather up a handful of pinecones then get the craft tote out to begin making owls. Don't worry if you didn't pack googly eyes, use stones, shells or even flower petals. 

Find the full tutorial at: Crafts by Amanda

More Fun Camping Activities For Kids


Here is another fun activity for your children to do while on a camping trip and all you have to do is print this free Scavenger hunt printable! If you have several kids divide them up into teams and see who can finish first. 

I hope you enjoy your next camping adventure! Please share your camping crafts with me in the comments.


Kid's Craft Kits Delivered!

Thursday, May 25, 2023

Learn How To Make Aluminum Foil Luminaries

Aluminum foil luminaries are simple and fun to make and the final project will have your kids in awe as they enjoy the beautiful light shining through the patterns they made! 


If you have always wanted to try to make a tin can lantern but thought your kids were too young to use tools like hammers and sharp nails this luminary project is for you! Aluminum foil replaces that tin can and no hammers are needed. 


This post contains affiliate links which means if you click on a link and make a purchase I may receive a small commission at no additional cost to you. For more information please read my Disclaimer page. Thanks!

The Perfect Craft For Kids

This is a great craft project for kids of all ages and makes for the perfect summer craft, birthday party craft or even something to do on a camping trip. Younger kids will probably need a little adult assistance but older kids can certainly do this craft all on their own.

Make sure to check out this post: 10 Awesome Camping Crafts To Make On Your Next Camping Trip

Since kids are going to be using this craft you may want to consider using a plastic jar like an empty peanut butter jar otherwise an empty glass jar like a pickle jar will work well too. 

How To Make An Aluminum Foil Luminary 


Supplies:


Step-by-step Tutorial

Step 1
Tear off a long sheet of aluminum foil then fold it in half to create a long narrow rectangle shape. Lay your empty jar next to the rectangle and adjust the height of the aluminum foil by folding it a little more if necessary so that the height is the same as the inside of the jar. 

Next, gently wrap the foil around the outside of your jar to measure how long your foil rectangle needs to be. Cut the foil where the cut edge meets the rest of the foil. 


Step 2
Lightly trace shapes or words along the length of the foil with a pencil. Use cookie cutters to gently press into the foil to make fun shapes. You can skip this step if you feel comfortable just free-handing your design. 


Place the foil on top of the styrofoam sheet and then use a toothpick to puncture the foil along the lines of your design.

Step 3
Carefully wrap the foil into a tube shape just slightly narrower than the outside of the jar. Then slide the aluminum foil tube inside the jar gently pressing the foil along the inside of the jar. 


Step 4
Insert a battery operated tea-light candle or activated glow stick inside the jar, screw on the lid, and enjoy your luminary!


For younger children, these luminaries make great night lights since they aren't too bright and are fun for sleepy eyes to watch. Make several to place on outdoor tables in the summer or inside on a shelf or fireplace mantel. 

Make sure to PIN this tutorial and follow me on Pinterest for more inspiring ideas!


If you loved this craft make sure to check out these other fun & easy crafts that are perfect for kids!


More Crafts For Kids 


Thursday, May 11, 2023

Amazing & Fun Science Experiments For Kids To Do This Summer

Are you looking for ways to get your kids excited about science? Sometimes all you need is a little extra help and a few amazing and fun experiments. 


One of the easiest, low-prep ways to accomplish this is by implementing your science lessons with a monthly science kit. These monthly kits contain ALL of the supplies and instructions so you don't have to do any special shopping or prepping beforehand. 

Disclosure: I am an affiliate for the Generation Genius science subscription kit and recently they sent me a kit to try out in our homeschool. Today I'm going to share with you what my 10-year-old 4th grader learned, what experiments he did, and his overall like/dislike of this kit. I did not receive any compensation, besides a free kit, and all opinions are mine.


MONTHLY SUBSCRIPTION BOXES WE HAVE TRIED IN THE PAST:

We have tried many different subscription kits over the years in our homeschool. In many cases, the kits have been a great addition to our school days by adding a little excitement or newness to our daily routine. There have been some monthly kits we really loved and some that were just OK. Here is a list of the kits we have used so far:

  • Kiwi Co - Kiwi Crate
  • Kiwi Co - Doodle Crate
  • Kiwi Co - Tinker Crate
  • Kiwi Co - Maker Crate
  • Kiwi Co - Eureka Crate
  • Let's Make Art - Watercolor Painting
  • Let's Make Art - Mixed Media
  • Annie's Kit Club - Young Woodworkers Kit
  • Raddish Kids Cooking Kit
Whew, that's a lot of kits! 

When the Generation Genius kit arrived I let my 10-year-old 4th grade son take a crack at it! I have to admit that at first, he was not very excited about a science kit because he thought it would be "baby-ish" and boring. Even though these were his initial feelings he still decided to open up the box and try it. 

Keep Nature Wild
After opening the box we found three separate and sealed individual experiments inside. Each experiment comes nicely labeled and ready to be used with all the supplies you need (except for tap water). 

Since my son is only 10 years old and still needs some help and adult supervision I fully expected to work on the kit alongside him. We pulled out experiment #1, cut open the bag, and got started. 


GETTING STARTED WITH THE GENERATION GENIUS SCIENCE KIT


I expected to find an instruction sheet inside the first bag like other kits we've done but there wasn't anything like that in the kit. After searching the rest of the box and its contents and not finding any instruction sheets I decided to check out the kit website to look for instructions. After a few minutes of searching, I discovered that instead of printed-out instructions Generation Genius uses video instructions taught by Dr. Jeff. 

After getting the video ready to play for experiment #1 my son was well on his way with the first experiment. 

Here are my thoughts on the Generation Genius Science Kit instruction video:
  • The video is a professional production that thoroughly explains the kit contents in detail and at an age-appropriate level. 
  • Dr. Jeff has a great teaching personality and does not "talk down" to his audience. He presents the scientific objectives of the experiment using real scientific terms and explains how the experiment student will see this lesson happen when they use the kit.
  • The video has automatic pauses built in so that students can stay on track and follow along with the instructions at a reasonable pace. The experiments are meant to be done while the student watches the video 


Get your kit today!

GENERATION GENIUS SCIENCE KIT EXPERIMENTS


As I mentioned before, each box comes with three full experiments! The three experiments in our kit were:

1 - Liquid Worms
2 - Light Painting
3 - The Countdown Reaction

Without explaining all the scientific details each experiment taught - I'll leave that to Dr. Jeff, I think telling you what my son and I thought about each one would be more helpful if you are looking for an educational science kit. I will just highlight a few things for each experiment as well as give you my son's rating of the experiment on a scale of 1 to 5 with 5 stars being the best.


LIQUID WORMS EXPERIMENT


This kit comes with this large, amazing, almost indestructible "splat" mat to keep any spills and messes contained and to protect the surface, a.k.a the kitchen table, from any potential harm. As a mom, this little detail within the kit was so very much appreciated! Honestly, none of the other types of kits we have tried had one of these protective mats included (bonus points for Generation Genius!!)

Little and Lively


At this point, my son was still very skeptical at this point but willing to do the first experiment. This first experiment includes two different activities to try. In the first activity, the student created liquid art and in the second activity, the student made liquid worms.

The science lessons from this experiment were to see how a chemical reaction between two natural resources can form new synthetic materials as well as learn what viscosity is. One of the chemicals used in this kit was sodium alginate. This is a thick liquid chemical that actually comes from seaweed, a fact my son thought was so cool! The second chemical is calcium lactate gluconate which is found in calcium vitamins.

My skeptical student tried both activities and to our surprise, this experiment blew our minds! As the saying goes, "A picture is worth a thousand words", and I think from this picture you can see how amazed and excited my little guy was with the liquid worms. 


Pros of this experiment:
  • unique - introduced something new!
  • comes with all supplies you need
  • has plenty of supplies to repeat this experiment over and over
  • allows the child to use their imagination 
  • splat mat keeps everything clean
  • rubber gloves & safety goggles that are kid size
  • included 2 activities
  • the video explains real-world uses for the chemicals used
Cons:
  • fairly messy (again, the splat mat is awesome)
  • the liquid worms get discarded when you are all done (this is my son's only disappointment)


LIGHT PAINTING EXPERIMENT


On to the second experiment which was light painting. This experiment allowed my son to learn about light and how ultraviolet light differs from other light like red and green light. Inside the experiment bag, there were three different colored lights, two sheets of special paper, and a spinning wheel covered in a special paper. 

This experiment requires your student to be in a dark room which for us is our pantry. After watching the video and then testing which of the three lights, red, green, or ultraviolet worked best on the special paper my son was ready to create his own designs with the UV light in our dark pantry. 

We taped both pieces of special paper to a wall in our pantry where he spent the next hour (yes, a full hour!) experimenting! He even cut out different shapes from a piece of paper, taped it to the special paper, and then used the UV light around the shape to create different prints. This experiment really encouraged him to use his imagination!


The second activity included a spinning disk covered in the special paper that when spun created amazing spiral patterns when the ultraviolet light tip was touched to the paper. 


Pros of this experiment:
  • student can do this experiment over and over!
  • good quality equipment is provided in the kit
  • an engaging video that explained the differences in light in an easy-to-understand way
  • allowed for imaginative discovery
  • no mess at all
Cons:
  • the special paper provided in the kit was small (8.5" x 11") - it would have been nice to have a larger size piece of paper to use
  • once the student "drew" on the paper it took quite a while for the light image to fade


CHEMICAL CLOCK REACTIONS


The last experiment from this kit was the iodine chemical reaction countdown. 

The chemicals used:
  • puffed starch 
  • sodium iodide
  • hydrogen peroxide
  • vitamin c pellet
  • destain

By the time my son got to this third experiment, he was a total fan of the Generation Genius science kit! Because this kit included chemicals (like the worm kit) he knew it was going to be cool before he even started it. There is just something cool about using chemicals so he opened up the bag, cued up the video, and got started. 

The main science lesson from this kit was about chemical clock reactions which is a process where a periodic change in color will be observed with the progress of a reaction. 

This kit really required the student to follow the directions exactly as Dr. Jeff explained to them so that it would work properly. As a parent, I appreciated the "following directions carefully" portion of this experiment since this seems to be a constant struggle with my ten-year-old. Because he was so into this science kit and he knew beforehand that he struggles with listening and following directions he suggested that we replay the video a few times so he could get everything right and not mess up the last experiment. (proud mom moment!!) 

There is plenty of chemicals supplied in this kit for the student to try this experiment over and over as well as allowing the student to try mixing the chemicals in different proportions and observe what happens. 

Oh, and did you see from the supply list that it included DESTAIN! Yep, Dr. Jeff thought of everything so dear ole mom doesn't need to scour the internet or even call Generation Genius to ask how to get the blue chemical stain out of your dear little one's favorite shirt! Thank you so much Generation Genius for covering all of the bases for us moms. And if you are wondering, yes, I did have to use a little destain on some of my son's clothing and yes, it did work!


Pros of this experiment:
  • plenty of chemicals were supplied to allow for lots of experimentation 
  • destain - need I say more!
  • an interesting and engaging experiment that is age appropriate
Cons:
  • a little messy but, again there is destain!

To say we are thrilled with Generation Genius is an understatement! My son absolutely loved this kit and is now begging for more. 

If you find teaching science in your homeschool a little lackluster consider adding the monthly Generation Genius science kit to help add some interest to your lessons! 

Generation Genius science kits can be used by individual students, in co-ops, public and private schools as well as a summer school option. Shipping is free with a 3-month subscription and the monthly price is very affordable too. To start your subscription or to just try out one month click here now!