Sunday, January 31, 2021

Simple Valentine's Day Cupid's Arrow Craft

Valentine's Day always puts me in the mood to craft! Traditionally Valentine's Day is meant to be a day to express your love to your significant other so why not get in the mood with a simple love-themed craft?

By the time February rolls around most of us are feeling a strong case of cabin fever and need a little boost to tide us over until spring arrives. Crafting can do just that - give you a winter blah boost! 

This post contains affiliate links which means if you click on a link and make a purchase I may receive a small commission at no additional cost to you. For more information please see my Disclaimer page. Thanks!

Today I'm sharing a really cute DIY Valentine's Day Cupid's Arrow craft. They can be used as table decorations, mounted on a canvas for wall art, or given as a candy-free gift. 

This craft is so super simple and would be fun to do with kids too. 


Cupid's Arrow Supply List:

Felt sheets (any color!)

hot glue & glue gun

8"-10" long skinny stick or twig

ribbon or baker's twine

scissors


Tutorial Instructions:

1. From the felt cut the following: 

  • cut two -  2" x  2" x 2" triangle for the arrowhead
  • cut two - 4" x 2" rectangles for the arrow fletching (these are the feather-like tails on an arrow)

2. Place one arrow piece face side down and then add a bead of hot glue down the middle of the triangle. Quickly place one end of the stick on the hot glue making sure the stick doesn't poke past the tip of the triangle. Then run another bead of hot glue along the top edge of the stick above the section that is glued to the bottom triangle. Place the second triangle on top of the stick, right side up making sure it is lined up with the bottom triangle. Put a dab of hot glue on the inside of each of the triangle points and press closed. 


3. Cut a triangle shape out of the long end of each rectangular piece of felt. On the other side of each rectangle felt piece cut off the top two corner edges. See the picture below for an example:


4. Place one piece of fletching face down and then run a bead of glue down the center. Quickly press the other end of the stick onto the glue. Run a bead of hot glue along the top side of the stick and put the second piece of felt fletching on top of the stick matching up the bottom piece of felt. Spread open the top and bottom edges of the felt along and run a bead of glue along the stick pressing the felt closed around the stick. Do this on both sides. 

5. Cut small upward-facing slits along both sides of the fletching to give it a feather-like appearance.

6. (optional) Tie a piece of ribbon or baker's twine around the stick just above the fletching.


Congratulations you are all done! Here are some great ideas to style your new Valentine Cupid Arrows:
  • stick them face-up/face-down into a large glass vase and display it on your mantel or as a centerpiece
  • tie a long piece of twine to each arrow and hang them in a window or along your mantel like a banner
  • hot glue each arrow in alternating patterns to a canvas for a piece of wall art
  • attach an arrow to the top of a gift instead of a bow


Valentine's Day Crafts


Since we are talking about Valentine's Day check out these great posts for more inspiration:


Thursday, January 28, 2021

5 Creative Ways To Welcome A New Baby

Are you looking for a unique way to congratulate a friend or a family member who just had a new baby? Sharing in their excitement as they welcome a new baby into the world is so much fun! 


This post contains affiliate links which means if you click on a link and make a purchase I may receive a small commission at no additional cost to you. For more information please see my disclaimer page. Thanks!


My sister recently had a baby and since we don't live close to her we decided to throw her a new baby welcome home party in a box. Our whole family got in on the welcoming party by sending her loads of cool cards, homemade quilt, origami folded paper treasures, and many more fun gifts. We enjoyed welcoming our new baby cousin (nephew) so much and know that these unique gifts made it even more special for her and her husband. 

I wanted to share the fun ideas we came up with for my sister's baby shower in a box with you so you can bless a family or friend with their own baby shower in a box party! 

Don't forget to PIN this for later and follow me on Pinterest for more great ideas!


5 Fun & Creative Ways To Welcome A New Baby


1. Matching Family T-Shirts:     

This idea is fun because everyone gets a gift including the new baby! When a new baby arrives older children sometimes feel left out or neglected. By giving a gift to everyone in the family no one has to feel left out anymore! Etsy is full of great ideas for custom matching family t-shirts! This set is made by CosmicRebelShop.


2 - Diaper Cake:     

Everyone knows newborns go through A LOT of diapers so why not help the parents get a little bit ahead of the upcoming diaper rush with a super cute diaper cake. For a great tutorial on how to make one check out The Craft Patch!


3. Housecleaning Certificate & Custom Card:     

A great way to welcome a new baby is to offer to help clean their house! A sleep-deprived new mom will be grateful for your help even if it is just helping her catch up on laundry. If you don't live close by how about hiring a service to come clean. It is probably best to ask before giving this to make sure the family is comfortable with a house cleaner. 

You could tuck the homemade house cleaning certificate into a custom card too! Check out these great FREE printable new baby cards from the FTD.com blog. Choose from one of the 8 designs to print, cut, and send and will work in any situation (simple, funny, baby boy and baby girl cars). No need to rush to the store to pick out a card - use one of these great printables instead. 

Oh, and if you aren't sure what to say to the new parents to congratulate them FTD.com has you covered with a ton of great new baby wishes that you can include inside the card too. For the complete set of printable cards and baby, wishes visit the FTD.com blog!


4. Edible Fruit Arrangement:     

When our youngest was born my husband's boss sent us an edible arrangement as a new baby gift. We LOVED it! A mixture of fresh fruit and chocolate-dipped fruit arranged on skewers in a cute pot really made us feel loved. 


5. Restaurant Gift Cards Bundle:    

It is pretty common for friends and family to make a meal for a family who just had a baby. Instead of making a meal how about giving a variety of restaurant gift cards to the new parents which are kind of the same as bringing them a meal but with a twist. You could even include take-out menus for each of the restaurants you get gift cards to make it just that much easier for the family. 

No matter how you choose to celebrate the new baby and welcome them home I'm sure the new parents will appreciate your thoughts and gifts! 

For more great baby gift ideas, baby blanket sewing tutorials, and fun kids projects check out these other posts:

More Baby Themed Ideas To Check Out

HOW TO MAKE A RAG STRIP QUILT - FULL TUTORIAL

AWESOME GENDER NEUTRAL BABY GIFT IDEAS

HOW A VINYL TABLECLOTH AND A PAIR OF SCISSORS SAVED MY DAY


How did your friends and family welcome home your newborn baby? I'd love to hear from you. Share your stories in the comments!

Thursday, January 14, 2021

How To Build A Wood Step Stool - Simple & Easy Beginner Woodworking Project

My boys and I love woodworking projects. I have a scrap box of wood that they regularly dig through dreaming up ideas of what to build. Because they are beginners and can get frustrated easily I like to find woodworking projects that are simple for them to do with help from me and result in a cool and useful finished project. 


This post contains affiliate links which means if you click on a link and make a purchase I may receive a small commission at no additional cost to you. For more information please see my Disclaimer page. Thanks

A few weeks ago while I was out running errands I decided to pick up a few 2 x 4's (8ft long) from Home Depot. When I got home I told the boys that I had a big surprise for them in the van! They were a little confused as they pulled the lumber out from the back of the minivan but figured I had a project in mind for them to do and they were soon pretty excited to get working. 

Of course I had a project in mind and today I wanted to share what my boys and I made. Hopefully this will encourage you and your children to get building! 

Our project was a small wood step stool! I found this super cool idea on Pinterest (don't forget to follow me!) and knew this was the project for us. 

Since we are just starting out on our woodworking adventures there are tools and supplies that we just haven't acquired yet. Because of this, we had to do a little more improvising to make things work in order to complete the project. It is totally OK if you don't have all the cool tools yet - don't let this stop you from building and doing that woodworking project! Adding tools to your collection may take awhile because they can be pretty expensive but when you do buy that next tool make sure you buy good quality tools that will last for years to come. 

Here is my short wish list of tools I'm saving up for: 


How To Build A Simple Wood Step Stool

Our project today is a simple wood stool that is made from one 2 x 4 x 8 board! Here are the supplies you will need to make your own wood stool:

Supplies List

- one 2 x 4 (8ft long)

- 2 1/2 inch wood screws

- wood glue

- tape measure

- pencil

- sandpaper (80 grit & 120 grit)

- drill & drill bits (here is the one I use)

- miter saw (if you don't have one a hand saw + miter box works too or a circular saw)

- saw horse (optional - I love this adjustable one)

- safety glasses


Cut List

3 - 12" pieces (steps)

2 - 10 1/2" pieces (base side bottom)

1 - 9" piece (back support)

2 - 7" pieces (base side top)


STEP 1: The first step is to measure and cut the 2 x 4 board into the smaller pieces according to the above cut list. A miter saw is ideal but can be an intimidating tool for a beginner. If you have one great, but if not a simple miter box and hand saw will do the trick. I actually cut the board down using a circular saw while my oldest used a miter box and hand saw. I used our adjustable saw horse to clamp down the boards as I cut them. 

Tip - Learning all about a tape measure is an important skill for a new woodworker to understand.  If you need a refresher on what all the little lines on a tape measure are here is a simple info graphic to help you out:


Pin for later!


STEP 2: Once the boards are cut sand all the edges so they are smooth and splinter free. You should start with rougher low grit number sandpaper (like 80 grit) and then use a higher grit paper like a 120 to really get your wood smooth. 

Tip - If you want your stool painted or stained now is the time to do that! Just make sure to let the wood dry for 24 hours so that the paint or stain is completely dry.

STEP 3: Take the two 7" pieces and you are going to drill two angled pilot holes on each piece making sure you drill the same direction for each hole. Pilot holes will help prevent the wood from splitting when you screw the wood to another piece of wood. Use a skinny drill bit that is smaller in diameter than your screws. 

I laid my board flat and marked up 1" from the long edge and about 2" from the short edge and that is where I drilled my first hole. I did the same for the second hole except I measured from the opposite side. The purpose of the pilot hole is to make a path for the screws you will be screwing into the board to attach it to another board. The path you are drilling should start from the long flat side of the board and protrude out through the 2" long side of the board at an angle. 

Tip - using a Kreg jig for this step would be ideal however since I didn't have one I improvised. 

STEP 4: Take the two 10 1/2" pieces and lay them flat their sides then place the two 7" pieces on top of each of the 10 1/2" pieces making sure to line up the ends. Spread a little wood glue on bottom of the 7" piece before screwing it to the larger piece of wood. Insert screws in the pilot holes and go ahead and secure the two boards together. The screws should penetrate through the bottom of the 7" board and into the top of the 10 1/2" piece.


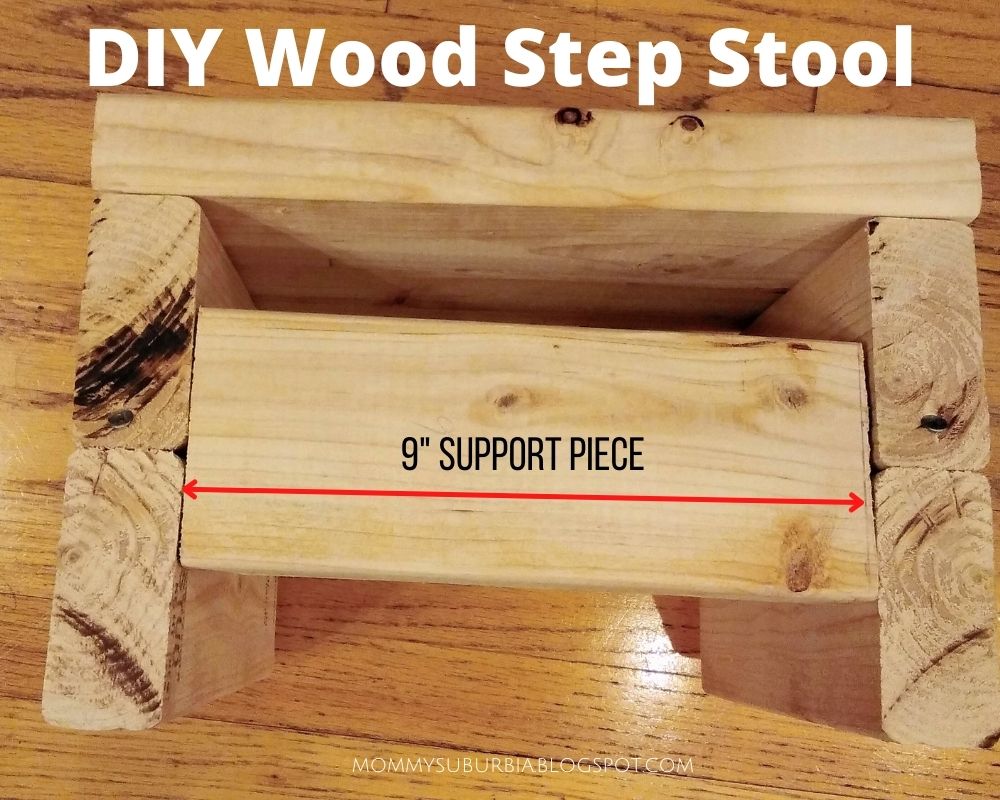
STEP 5: Now we are going to insert the 9" piece for support to our step stool. Prop up the two connected base pieces (7" & 10 1/2") you attached together in the previous step and place the 9" long piece between them placing the board evenly between where the two boards connect. Use a pencil and make two small pencil marks about 1" apart on the outside of each base where you will drill two pilot holes. Drill two pilot holes through each of the base pieces. Then screw in the 9" piece connecting it to both sides of the bases. 


STEP 6: Time to attach the steps! You should have three 12" pieces of wood left. These are the steps. Place two 12" pieces flat across the top of the base. Mark each board 1" from each side where you will drill pilot holes to connect the board to the base. Do this to each side for each board then drill pilot holes through the step pieces. 

After you attach the two top step pieces the next thing you will do is attach the bottom step. Follow the same process for marking and drilling pilot holes. Then screw on the board completing the last step.


That's it! You did it! My boys are loving their new step stools. One is using his as a step stool to stand on when he needs to feed his pet toads which are in an aquarium on top of a tall dresser. My oldest uses his step stool in his closet when he needs to reach toys and treasures that are stored on higher shelves. 


I love that this little step stool can be easily tucked away and isn't huge and bulky! My boys chose not to paint or stain their step stools but are thinking about "customizing" their stools using sharpie markers in the near future. Why not - these stools hardly cost anything and when will they ever get a chance to color on real furniture with markers! 


More fun & easy woodworking projects:

I hope you enjoyed making a simple and easy wood step stool as much as we did. If you are looking for more fun and easy projects to do with your children check out these great projects and tutorials:

Build Your Own Tabletop Hook & Ring Bimini Game

How To Make A Wood Growth Chart Ruler


I'd love to hear from you - what woodworking projects have you been crafting?