Wednesday, April 29, 2020

How to Make An Envelope From A Brown Paper Grocery Bag

Here is how to make an envelope from a brown paper grocery bag that you can use for shipping almost anything! Making these homemade shipping envelopes is easy and best of all cheap!


This post contains affiliate links which means if you click on the link and make a purchase I may receive a small commission at no additional cost to you. For more information please see my Disclaimer page. Thanks!
I seem to always have a growing pile of brown paper bags from the grocery store that I just can't bring myself to get rid of. Do you have the same problem? So I hang onto them and they just keep piling up. 

Recently I found myself short on shipping materials, mainly large envelopes. As orders for face masks in my Etsy shop started increasing, my need for more shipping envelopes skyrocketed! I started to panic a little until I remembered the growing pile of brown paper bags and I wondered if I now had a solution to fix both problems. 

I got to work creating a DIY envelope I could use to ship out my face masks (or anything else). Guess what? It worked! I could even alter the size of the homemade brown bag envelopes to fit whatever size I needed.


How To Make A Shipping Envelope From A Brown Paper Grocery Bag


Today I'm going to show you how to make an envelope from a brown paper grocery bag. Ready? Let's get started.

Materials List:
Brown paper grocery bag (in fairly good condition)
Scissors
Shipping / Packing tape
Ruler

Step 1
Lay the folded brown paper bag with the bag's bottom flap face up flat on a solid surface. Fold the bottom flap back matching it up with the underside bag bottom (see picture). Cut across the bag to remove the bottom of the bag completely. You should now have a large bag tube.


Step 2
Cut the paper bag "tube" open so that you now have one long continuous rectangle. My cut open bag measures 38" long! (See picture above)

Step 3
This step will vary depending on how big of an envelope you need to make. I am making an envelope that when finished, measures just over 6 1/2" to 7" wide by the height of the bag (minus the bottom) which in my case measured 13 1/2" tall. 

Cut a 14 to 14 1/2" long section of the paper bag. You should now have a 14" x 13 1/2" section of paper bag. 

Step 4
Pick one of the longer sides and make a 1/2" fold along the edge. Then along the bottom edge make a 1/2" fold. The two folded sides should intersect. 

Next, fold over the long side of the bag in half matching up side edges.


Step 5
Using your packing tape securely tape the bottom edge of the envelope and then tape along the side. 

It is optional but I like to take a small piece of tape and from the inside of the bag tape down the folded side and bottom flaps that you make in step 4 above. This just makes sure that whatever you are sending in the envelope won't get stuck to the tape that you used along the bottom and side edges. 


Step 6
Insert whatever you are shipping into your envelope, fold over the top edge and tape it securely closed. 


That's it! Can you believe how simple this whole process was? Not only is it easy to do but the cost to make your own envelope is so small! I buy my bags at Aldi for about 7 cents each and I can make 2-3 envelopes with one bag. The cost of tape is the only other cost which is quite inexpensive. 

I hope this tutorial was useful to you! Please let me know your thoughts in the comment section. Thanks!

Wednesday, April 15, 2020

How To Plant An Indoor Vegetable Garden With Your Kids

Staying mentally healthy is just as important as staying physically healthy for both parents and kids especially during this time of worldwide quarantine. 


This post may contain affiliate links which means if you click on a link and make a purchase I may receive a small commission at no additional cost to you. See my Disclaimer page for more info. Thanks!

As our weather transitions from winter to spring it might seem as though the days are more wet and gloomy than sunny which can have a big impact on your mental health. Spending some time outside in nature, at a safe distance from other people, can provide you with a big positive mental boost but what do you do when day after day it it is cold and rainy? 

How about bring a little of the outdoors inside! Let me show you what we are doing at our house as a way to bring nature inside in the form of an indoor vegetable garden.

Since it is difficult to get gardening supplies right now due to the Corona virus we have had to make due with what we have around the house and in some cases we had to get creative! I didn't have time to get seeds or soil before the quarantine and now in our area those departments in our local stores are closed. 

Instead I had to gather up the supplies we had on hand to get the kids started on making their indoor garden:


Plant An Indoor Garden - Fun Activity To Do With Kids This Spring


Supplies:
empty cardboard egg carton or milk carton
disposable foil pan
potting soil - we used some from an outside planter box
vegetable seeds

It might be hard to get seeds this time of year due to the circumstances but I'm going to bet that some of the produce you have in the refrigerator will provide some seeds for your indoor garden! 

While making dinner the other night I cut open a red pepper and took a few of the seeds and put them into a small pot that had soil in it. Guess what! The little seed germinated and we now have a small itty bitty pepper plant growing in the kitchen. 

Using seeds from vegetables like tomatoes, cucumbers and peppers that you have on hand can be such a fun activity for you and your kids. 

*Just a note when using seeds that are kind of slimy after you cut open a cucumber or tomato it is best to rinse off the seeds and set them on a paper towel to dry for a few days. This will prevent them from molding. Tomato seeds are hard to cultivate but it is fun to give it a try!

We have a small plot of land fenced off in our backyard for our vegetable garden so this year I'm hoping that the seeds we start growing indoors will eventually be planted in our outside garden once the threat of frost is past.

If you are looking for some quick germinating seeds try planing lettuce! We have been keeping track of the seeds we planted to see what ones start coming up first. The lettuce was the winner in our mini indoor foil pan garden! 

The kids LOVE seeing the growth in their mini garden and it seems that each morning when they get up and check their plants there is something new happening. I'm sure when we finally get to plant these baby plants outside the kids will have so much pride in their efforts knowing they cultivated these little plants from seed to fully producing vegetable plants!

Don't worry if you don't have any lettuce seeds. You can still grow lettuce inside! Don't throw away the leftover end of a head of romaine lettuce. Instead fill a small container or glass half full with water and put the end of the romaine lettuce in it. In a few days you will begin to see some exciting changed as new growth appears. 

Gardening is such a therapeutic activity, good for all who get their hands in the dirt and spend time planting seeds. 

It is also a great activity you can do with your kids that is full of opportunities to teach subjects like science, math and reading. If you find yourself suddenly a homeschool parent gardening with your children is an aswesome and effective way to start your homeschooling journey even if it is a short one due to the nationwide quarantine. 


For more great gardening ideas please check out these other posts!


1. DIY Mini-Greenhouse Tutorial


2. Rock Your Garden With A Painted Brick Paver

Tuesday, April 7, 2020

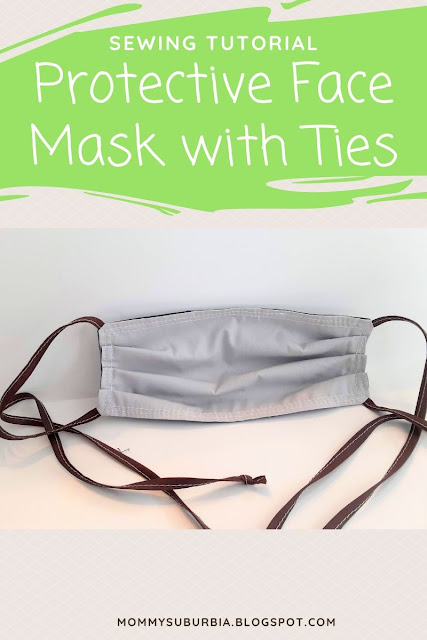
How To Make A Fabric Face Mask With Ties - Detailed Sewing Tutorial

With our national and local government recommending all citizens wear non-medical protective face masks it is helpful to be able to make your own. Making a protective fabric face mask is easy to do even for a beginning sewer. 


There are tons of different styles, patterns and ways to make a fabric face mask. In my previous post I put together a tutorial on how to make one with elastic bands that wrap around your ears to hold the mask on. You can see the full tutorial HERE. 

Today I am going to walk you through how to make a mask with fabric ties. It is nice to have the two options in case you don't have elastic available but still want to make a protective fabric face mask. 

This post contains affiliate links which means if you click on a link and make a purchase I may receive a small commission at no additional cost to you. For more information please see my Disclaimer page. Thanks!


Protective Fabric Face Mask With Ties Sewing Tutorial


Supplies 
cotton thread
cotton fabric
cotton flannel fabric (optional)
sewing machine
scissors (I recommend these)
ruler
rotary cutter & mat (optional but very helpful)
pins
iron
fabric pencil or regular pencil


Tutorial Instructions

1. To begin cut a 9" x 6" rectangle from each of the two fabrics. 

Note - I like to use cotton flannel on the inside layer of the face mask because it is softer than regular cotton fabric however this is a personal preference and can be skipped. You can use two layers of plain cotton fabric if you do not want to use flannel fabric.

2. Next cut 4 strips measuring 1" x 20" from the same cotton fabric as the top layer of the face mask. These strips will be made into the tie straps for the mask. To make the ties first lay the strip flat on your ironing board and fold it in half so you have a 1/2" x 20" long strip and iron. 


Open the strip back up then fold the outside raw edges towards the center fold line you just created with the iron. Do this on both the left side and right side of the strip. Iron as you go to keep these folded sides in place. (see pictures above)

Once you finish ironing the sides in fold the strip in half along the first ironed mark tucking the ironed edges inside. You should not have any raw edges along the side of your strip showing any more. 

Now sew along the strip down the entire length where the two edges meet. Repeat this step for all 4 straps. 

Tip - to speed up the fabric tie strap process double the length of the fabric strips (1" x 40") you cut so you only have to sew two long straps. Once you have the two long straps cut them in half to create a total of 4 straps that are 20" long. 

3. Place the cotton rectangle on the table with the right side facing up. Then lay the flannel rectangle on top of the cotton piece with the wrong size facing up.

4. Place a small mark with your fabric pencil or regular pencil along the top side of one of the longer sides of the rectangle. Put a second pencil mark about 1" away through both fabrics. Leave the space between the two marks open so you can turn the mask inside out when you are done sewing them together.

5. Begin sewing your fabrics together starting just after one of the pencil marks. As you approach your first corner of the first short side stop sewing when you are about 1" away from the corner. Lift the top fabric and slide one of the fabric tie straps between the fabrics and line up one side of the tie strap to the corner. Cl
ose the fabric and then sew over the tie strap to ensure it can't pull out. Let the other end of the tie poke out the opposite side of the mask.


Continue sewing around the perimeter of the mask inserting the ties into the corners and sewing over them as you go making sure not to catch the other ends of the ties in your stitching. I find it easiest to keep the loose ends of the ties gathered together, sticking out from the 1" pencil marks along the top of the mask. 

Stop sewing around the perimeter of the mask when you get to the last pencil mark marking the 1" opening making sure to back stitch a few stitches in place.


6. Turn the mask inside out through the 1" opening. Finger press or iron the mask flat. Make sure the opening you used to flip the mask inside out is lined up flat so when you sew around the perimeter of the mask it gets sewn shut.


7. We are now going to make three pleats along the short edges of each side of the mask. I find it is easiest to locate the center of each short side then make a 1/2" pleat and pin it in place. Make a another 1/2" pleat above the center pleat and another 1/2" one below the center pleat, pinning each pleat for a total of 3 pleats. Do the same to the other side making sure the pleats on both sides go the same way! The short side of the mask will now measure about 3 to 3 1/2 inches now that you have added pleats. (please note- the picture below has elastic ear loops not ties, however the process for both types of masks is the same)


8. Top stitch around the entire perimeter of the mask using a 1/4" seam allowance. Make sure you sew the 1" opening along the top edge closed too. Also, as you stitch over the pleats I recommend removing the pins as you go so you don't break a needle.

9. Sew a second top stitch about 1/4" away from the first row of top stitching around the perimeter of the mask.

Congratulations you have completed your protective face mask with tie closure! Now get busy making a bunch more for all of your friends and family!

If you would prefer to make a mask with elastic ear loops please see my post HERE for complete instructions. 

I pray you are staying safe and healthy during the time of the Corona virus (COVID-19) outbreak.