Sunday, November 21, 2021

How To Make A Birdseed Ornament Birdfeeder

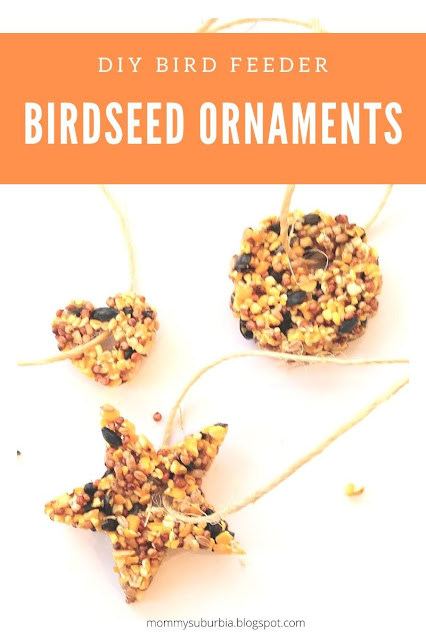
Looking for an easy activity to do with your kids to fight off winter's cabin fever? Birdseed ornaments are the perfect craft to make this fall or winter. Not only are they easy to make but they provide a delicious meal as a bird feeder for those cute little birds you see all winter long. 


The other day while driving in the car my youngest son noticed a tree on the side of the road packed full of little birds. He knew winter was around the corner and was concerned that these poor little birds wouldn't have anything to eat once the snow fell. The idea to make birdseed ornaments was hatched so when we got home we got busy making our first batch of ornaments. 


This post contains affiliate links which means if you click on a link and make a purchase I may receive a small commission at no additional cost to you. For more information please see my Disclaimer page. Thanks!


I have to say these ornaments make great outdoor decorations too! 

Their fun shapes hanging from the tree look so festive. My kids really enjoy watching different kinds of birds feed on the ornaments too. They have even started looking up what kinds of birds they see at their DIY bird feeders too. (If you are a homeschool family like us this totally counts as science !!)

How To Make A DIY Bird Feeder - Birdseed Ornaments

Today I am sharing with you how to make these easy birdseed ornaments. Gather the following supplies and let's get started. 


Supplies:

1 (.25 oz) packet unflavored gelatin 

measuring cups

1 - 1 1/2 cups birdseed

1/4 cup water

cookie cutters

aluminum baking sheet

spoon

twine

scissors

small saucepan

non-stick cooking spray 

plastic drinking straw


DIY Birdseed Ornament Recipe

  • In a small saucepan combine the water and unflavored gelatin. On medium-high heat bring the mixture to a simmer, stirring constantly until all of the gelatin is dissolved 


  • Remove the pan from the stove then stir in the birdseed. You want the birdseed to soak up the gelatin but not be too dry. Adjust the amount of birdseed you need based on this.


  • Spray your cooking cutters lightly with non-stick cooking spray then lay your cookie cutters on the baking sheet. 
  • While holding down the cookie-cutter add spoonfuls of the birdseed mixture into it until it is 3/4 full. Press down the seeds with the spoon to firmly pack the seeds into the cookie-cutter.


  • Use the plastic straw to create a hole at the top of each ornament by pressing (and wiggling/twisting) the straw through the ornament to create the small hole. 


  • Let the birdseed sit for several hours or overnight to allow the gelatin to set and dry. Then gently push the birdseed shapes out onto the baking tray. 
  • Cut a length of twine and insert it into the hole in the ornament for hanging on a tree branch. Go hang the ornaments in tree branches all over your yard and enjoy watching the birds! 


Now you don't have to worry about those little birds starving this winter! 


These birdseed ornaments also make great holiday gifts for family and friends! Or use a heart-shaped cookie cutter and give these as Valentine's Day gifts too. 

Upcycled Bird Feeder Tutorial

While we are all into feeding birds make sure to click on this other post I wrote on how to make a bird feeder using materials from your recycling bin! 

DIY Birdfeeder Tutorial


What simple crafts have you made with your family? I'm always inspired to hear your ideas! Thanks for visiting and please come again soon. 


Saturday, November 13, 2021

How To Make A Candy Cane Christmas Countdown Calendar

Counting down the number of days until Christmas is something every kid does so they know exactly how many days are left until the big day! With the month of December just around the corner, now is the time to start getting ready for Christmas because it will be here before you know it. 

When my kids were little they used to make the traditional construction paper chain to count down the days until Christmas. Each day they would tear off a paper link from their chain and count how many more days until December 25. I loved it because instead of asking me over, and over and over how many days until Christmas they could visually see and actually count all on their own. 


This post contains affiliate links which means if you click on a link and make a purchase I may receive a small commission at no additional cost to you. For more information please see my Disclaimer page. Thanks!

Recently my oldest son commented that he felt too old to make a paper chain countdown calendar and wanted to make something else that included a daily treat. This kid loves treats! To solve this problem I came up with this candy cane Christmas countdown calendar that I think you and your family will like just as much as ours does. 

This is a super easy craft that requires only a few supplies you probably already have around the house - plus it looks super festive for the holidays.


DIY Candy Cane Christmas Countdown Calendar

Gather up the following supplies to make your own candy cane countdown calendar for Christmas. 


Supplies:

24 Candy canes

Colorful baker's twine or plain twine

Craft staple gun

Wood board measuring: 24"long  x 5" wide x 1/2" thick

Sandpaper 

Acrylic craft paint

Paintbrush

Self-leveling picture hanging hardware (optional)


How To Make A Christmas Candy Cane Countdown Calendar

  • First, cut the wood to size. Most local hardware stores can cut the wood to size for you if you need help.  
  • Sand the wood to remove any jagged edges then wipe the wood with a damp cloth to remove any sawdust.   
  • Paint the wood with your favorite holiday color. You may need to add a second coat depending on the paint you use. Let the paint dry completely between coats.
  • Lay the painted board on a flat surface then measure and cut five pieces of baker's twine or regular twine that extends about 2 inches past each side of the board. Tie a small knot on both ends of each piece of twine. Space the twine out at even intervals down the length of the board making sure to measure a few inches down from the top before placing your first piece of twine. 
  • Staple one end of the twine to the backside of the board. Allow for the twine to bow slightly with slack and attach the other end to the back of the wood with the staple gun. Repeat this process for the remaining pieces of twine until all are attached. 
  • Finally, attach a self-leveling picture hanging hardware to the backside of the wood about one inch down from the top edge. If you don't want to use picture hanging hardware you could also attach a piece of twine to the top corners of the back of the board and hang it up from the loop too.  
  • Hang 24 candy canes from the pieces of twine across the front of the board. I like to divide up the candy canes to match the number of days per week in the month of December. This helps my kids see how many weeks and days are left before Christmas. 


How To Use Your Candy Cane Advent Calendar

Since we have four kids everyone takes turns starting December 1 to remove and eat one candy cane per day. Each day someone else gets a turn and this continues through December 24. I really didn't want each child eating a candy cane every day, especially when they are already overloaded with sweets from all the cookie baking and holiday parties we have to attend in December! 

Everyone in our family LOVED this new Christmas countdown calendar. And guess what? No one asked me how many days until Christmas!! Woohooo!

Does your family have a special tradition or Advent calendar to count down the days until Christmas? What is your favorite way to keep track of the number of days left before the "Big Day"? It is your turn to share your family's holiday traditions - I'd love to hear from you!

Bonus - Christmas Craft Tutorials

Here are some more fun Christmas crafts you and your family could make this holiday season. Be sure to click on these links to find the full tutorials and pictures.


Click Here For Full Tutorial


Click Here for Tutorial


Click here for complete tutorial


THANKSGIVING SALE,UP TO 30% OFF

Monday, November 8, 2021

10 Easy DIY Christmas Advent Countdown Calendars

Christmas or advent countdown calendars are a perfect way to help your little ones track how many days until Christmas. Spread the joy of the holiday season by making each day of December special and interactive with a countdown calendar. Make your own DIY Christmas advent calendar this year and enjoy counting down until December 25!


This post contains affiliate links which means if you click on a link and make a purchase I may receive a small commission at no additional cost to you. For more information please see my Disclaimer page. Thanks!

For years my kids have been making their own simple paper chains to track the number of days until Christmas. They love breaking off one link of chain each day throughout December and boy does the excitement start to rise when there are only a few paper chain links left.  Last year my oldest son said he was too old to make paper chains and asked if we could make a different kind of countdown calendar instead. I got busy searching for ideas on Pinterest for inspiration and thought I would share with you 10 easy DIY Christmas Advent countdown calendars I found. 


10 DIY Christmas Countdown Calendars


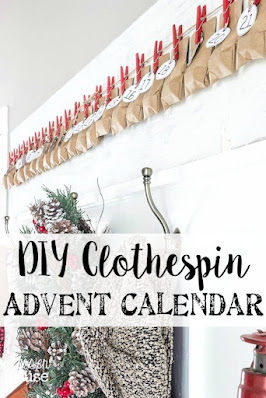
#1 Clothespin Advent Calendar

A little twine plus painted clothespin mounted on a wood board make for a simple advent calendar. Fill small paper bags with a few treats, number the bags and attach them to the clothespins. Display your new Christmas countdown calendar by hanging it on an empty wall or setting it on your fireplace mantel. For the full tutorial and supply list visit Blesserhouse.com. 


via: Blesserhouse.com

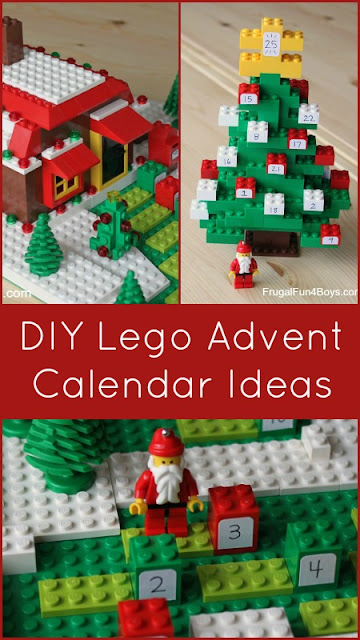
#2 Lego Advent Calendar

Do you have Lego lovers in your home? Show them these two amazing Lego Advent calendars and let their imaginations go wild as they build their own countdown calendar. Add some small numbered stickers to their creations so they can track the number of days left before Christmas morning. The Lego builds featured here can be found at Frugal Fun 4 Boys.com. Make sure to check out their super cool builds. 

via: Frugal Fun 4 Boys

#3 Toilet Paper Tube Christmas Countdown Calendar

Stop throwing away those empty toilet paper tubes and save them to use in this festive holiday calendar. Upcycling is so rewarding especially when you can make something so fun like this toilet paper tube Christmas countdown calendar. Whether you paint the toilet paper tubes or cover them with festive holiday scrapbooking paper both options will look amazing. Find a full tutorial at Smashed Peas and Carrots

via: Smashed Peas and Carrots

#4 Take-Out Box Advent Calendar 

If you are looking for a super easy DIY advent calendar that requires barely any crafting skills this is your jam! Find colorful (unused) paper take-out boxes at your local craft store, Amazon, or even restaurant supply store, number the boxes then add a treat or two to each box and stack them up in any shape you want. I know my kids would just be in awe seeing these boxes stacked up knowing there is a treat in every single one! Find the details and tutorial at Studio DIY. 


via: Studio DIY

#5 Rustic Christmas Advent Calendar

Bring a little bit of the outdoors inside to make this simple DIY Advent calendar. Gather a long (somewhat) straight branch that is about 2-3 inches thick. Take a long piece of twine and tie it to both ends of the stick for hanging. Fill 24 small gift bags or paper bags with a few treats or a special message, attach a piece of colorful baker's twine to the bag and then tie the other end around the branch. To see the full tutorial (it is in Norwegian) visit Godegrunner.com 


via: godegrunner.blogspot.com

#6 Muffin Tin Advent Calendar


Pick up two 12 cup muffin tins at your local dollar store as well as some festive scrapbooking paper to make this cute muffin tin advent calendar. Cut circles from the scrapbooking paper slightly larger than the muffin tin wells then use double side tape to cover them after adding a small treat to each well then number each circle. Carefully punch two holes at the top of each muffin tin and thread ribbon or a piece of twine through the holes for hanging. Find the easy-to-follow tutorial at Her View From Home

via: Her View From Home

#7 Craft Stick Christmas Countdown Calendar


This geometric faux fir craft stick Christmas calendar is so unique and super easy to make. Instead of small gifts each day this calendar allows you to write down special messages or activities to do each day with your family like singing a Christmas song, or baking Christmas cookies. Make your own by following this tutorial at The Merry Thought


via: The Merry Thought


#8 DIY Christmas Ornament Advent Calendar


Let your little ones help you create 24 individual numbered Christmas ornaments to count down the days until Christmas. Once the ornaments are done being decorated they are attached to a piece of string with a few wooden beads as embellishment then hung from hooks screwed into a wood picture frame. Have your child make a special picture to insert in the picture frame to finish the custom countdown calendar. Find the full tutorial with great instructions and pictures at Shrimp Salad Cirus

via: Shrimp Salad Circus

#9 Printable Treat Christmas Countdown Calendar


December 1st will be here before you know it and if you find yourself running out of time but still wanting to make a Christmas countdown calendar this is the perfect solution for you! First print out the free printable Christmas-themed calendar then attach a small treat like a Hershey's kiss to each day on the calendar. You could whip this one out on November 30 and be ready to count down to Christmas the next day! Find the printable and instructions at Moms Who Save.

via: Moms Who Save

#10 Magnetic Matchbook Christmas Calendar


Wrapped matchbox containers in festive wrapping paper to make a unique Christmas calendar. This project would be fun as a family holiday craft project to do together in an afternoon. Add a small magnetic strip to the back of each matchbox container and stick the finished boxes to a metal baking sheet or even the front of your refrigerator. Mom Always Finds Out provides the complete tutorial with a supply list and pictures on her blog. 

via: Mom Always Finds Out


For more fun Christmas crafts check out these other projects:


Happy Holidays and Merry Christmas! What special traditions does your family have during the Christmas season? Share your ideas in the comments.

I hope you and your kids enjoy counting down the days until December 25!! 


Friday, November 5, 2021

Handy Crockpot Size Guide - How to Know What Size Crockpot You Need & Which One To Buy

I have a confession that I need to get off my chest - I am a bit of a crockpot junkie! I'll admit that I own 4 crockpots (this is down from the 6 I used to have!). All four are different sizes and I use them for different recipes so I think that justifies my crockpot addiction, right? 


This post contains affiliate links which means if you click on a link and make a purchase I may receive a small commission at no additional cost to you. For more information please see my Disclaimer page. Thanks!

My accumulation of crockpots started long ago when I was a young professional just out of college working long hours and sick of eating take-out meals. I got my first crockpot as a gift and immediately fell in love with it. A beef stew was my first crockpot meal and it was AMAZING! My first crockpot was small in volume but it did the trick of feeding me and my roommate with leftovers for lunch to boot. 

Fast forward several years to life with a husband and a few kids (4 to be exact) and this little crockpot was no longer able to keep up with demand. Growing kids sure do eat a lot! That is when I knew it was time to upgrade to a bigger-size crockpot. The question I needed to answer was what size would work best for our family of 6. I did a lot of research and thought I would share with you what I learned.


Crockpot Size Guide - What Size Do I Need?

Knowing what you want to cook in your crockpot is a good place to start in determining what size crockpot to use.  If you are a seasoned cook or at least past serving ramen noodles or boxed mac & cheese for your main meal you probably have a good idea of how much food you need to make to feed your family. 

The most popular general standard-size crockpot to feed a 4-person family is between 5 and 6 quarts.  The more people you are feeding the larger size crockpot you will need. Here is a quick guide to help you determine what size crockpot to use:


QuartsServing SizeFood to Prepare
1-2 qt.1 - 2 peopleoats, dips, dessert
3-4 qt3-4 people / small familysoup, stew, casserole, breakfast, dessert
5-6 qt5 people / lg. familysoup, step, casserole, roasts, whole chicken, breakfast, dessert
7+ qt6-7 people / entertaining a crowdroast (5+ lbs), chicken (7 lbs), large cuts of meat, lasagne
10 qt8+ people / large crowdroast (12 lbs), turkey (10 lbs), large cuts of meat


Does Crockpot Size Matter?

Of course, knowing how many people you are cooking for helps you determine how much food to prepare but it is pretty important to make sure you use the properly sized equipment to make your meal. 

The space inside your crockpot or the crockpot size relates to the number of hours needed to cook the food. Generally speaking, smaller crockpots take less time while larger crockpots will need more time. Remember to always test the food's temperature to make sure it is safe to consume no matter what size crockpot you use. 


The Most Common Size Crockpot

A 5-6 quart crockpot is by far the most popular size owned by the home chef. This size crockpot usually fits nicely into a kitchen cabinet without taking up too much room. It can easily feed a medium-sized family too. 

If you are looking for the perfect gift for a wedding shower, housewarming gift or even a Christmas present a 5-6 quart crockpot is a sure winner! 


Important Things To Consider Before Purchasing A Crockpot

Today's crockpot has come a long way from the first crockpots on the market! They still make the same great meals but today's crockpots offer so many more useful options. Here are some things to consider when getting ready to buy a new crockpot:

  • If you already have a crockpot is this new one a replacement or an upgrade in size? Consider the shape of the new crockpot. If you already have a wide-shaped crockpot that you use for casseroles or a whole chicken get a new one that is tall and great for soups, stews, or sauce. 
  • Will you be traveling with the crockpot? If you are you definitely want a lid that locks to prevent any spills on your trip. 
  • Do you have enough storage space in your kitchen or pantry for another crockpot? Think about where you will be keeping it when not in use. 
  • Manual or high tech? If a traditional type of slow cooker with a few simple settings is all you need then go ahead and get one but if you are looking for something with a few more bells and whistles you will be amazed at how technologically savvy crockpots have become. From programmable digital crockpots to Wi-Fi-enabled ones that allow you to adjust temperature and cooking time remotely you will have no problem finding one with the options you want. 

How Long Does A Crockpot Last?

A good quality crockpot that is well taken care of can last between six to ten years before needing to be replaced! 

It is a good idea to regularly check the cord to make sure it is in good working condition. If you notice any damage to the cord DO NOT USE the crockpot and dispose of it right away. Also, if grandma gave you her crockpot that has an electric cord wrapped in fabric it is definitely time to replace it. 

When you notice your crockpot not heating up food like it used or taking longer to cook to it might be time to replace it. Making sure your food reaches food-safe temperatures (185F / 85C) is important and if your crockpot no longer can do the job it is time to replace it.


Since you make it this far, I think you are well on your way to finding the right size crockpot to fit your needs. With all of the choices of size, shape, and functions there is literally a crockpot for everyone! Let me know what your favorite crockpot meals are by sharing them in the comments! 

The Best Crockpot to Buy


After years of using many different types of crockpots for tons of different recipes, I have narrowed down my favorites to two choices, both of which I highly recommend.

I like to use a large oval-shaped crockpot for meals like lasagna, pulled pork or chicken because there is a lot of room horizontally for the food to be placed inside and cooked. I like simple so I don't really care for the programmable kind but this feature is optional and doesn't really affect the taste of the food anyway. Here is my favorite, highly recommended crockpot with the simple dial function and programmable:


 

Tip - Don't forget to use those handy slow cooker liners to make clean-up a snap!