
Butterflies, though small and delicate, have become a symbol of new life, transformation, and beauty captivating the hearts of both children and adults alike. Their colorful wings and graceful movement are the inspiration for crafters of all ages and abilities.
Butterfly crafts are the perfect way to kickstart your spring and summer kid’s craft projects.

This post was written in partnership with Zulily. For more great posts click here
Every Spring my kids and I visit our local conservatory during their annual butterfly exhibit. The exhibit has hundreds of butterflies floating and flying through the indoor garden as well as butterflies hatching from their chrysalis. I always know that once we get home the kids will want to break out the craft supplies and make their own butterflies in order to mark this memorable field trip.
10 Easy and Fun Butterfly Kids Craft Projects To Make This Summer
If you have a butterfly-loving child and are looking for a fun and easy butterfly-themed craft to do with them I made your job easy by putting together a list of 10 easy-to-make and fun butterfly crafts for kids.
PIPE CLEANER BEADED BUTTERFLY

Kids practice their fine motor skills as they string beads onto a pipe cleaner to make these butterflies. My kids love to make color-coordinated butterfly wings so we also use this craft to discuss patterns, color coordination, and counting.
String colorful pony beads on two of the pipe cleaners leaving one inch empty at both ends of the pipe cleaners.
Twist the empty ends of the pipe cleaner together creating a circle. With your fingers separate the beads in half dividing them onto opposite sides of the pipe cleaner circle.
Next Twist the beaded pipe cleaner into a figure 8 shape. Repeat this step with the second pipe cleaner.
Cut the third pipe cleaner in half then bend one of the shorter pieces in half matching cut end to cut end. Put one bead on each of the cut ends and twist the pipe cleaner around the bead to secure it in order to make the butterfly’s antenna.
Spread craft glue onto one flat side of the clothespin then sprinkle glitter over the glue. Let the glue dry completely.
Pinch open the clothespin and insert both beaded figure-eight-shaped pipe cleaners into the clothespin at the center twisted section of the pipe cleaner. Before closing the pipe cleaner insert the bend side of the beaded antenna at the end of the clothespin.
You may want to add a dab of hot glue to securely close the clothespin if your child will be playing with their butterfly. Add a small button magnet to the backside of the clothespin to turn your butterfly into a magnet to display proudly on the refrigerator.
COFFEE FILTER TYE DIE BUTTERFLY

Your child is going to love watching the marker colors mix and spread on the coffee filter once they spritz it with water. Once dried they will have a beautiful and delicate-looking butterfly. I highly recommend doing this craft on a protected work surface so the markers don’t stain your table.
Lay the coffee filters flat then color all over the coffee filters with markers then lightly spray them with water so that the entire surface is damp. The colors will begin to blend together. Let the coffee filter air dry completely.
Fold the coffee filters accordion style and stack them one on top of the other
Fold the pipe cleaner in half then place the center of the stacked coffee filter on the fold. Twist the pipe cleaner around the center of the coffee filters a few times to create the butterfly body. Gently curl the ends of the pipe cleaners into the butterfly antennae
Open the coffee filters to create butterfly wings

Once your child has made one of these colorful butterflies they won’t want to stop crafting! Insert a wooden skewer into the pipe cleaner and stick the butterfly in a houseplant to make an indoor butterfly garden.
WOVEN YARN WRAPPED BUTTERFLY
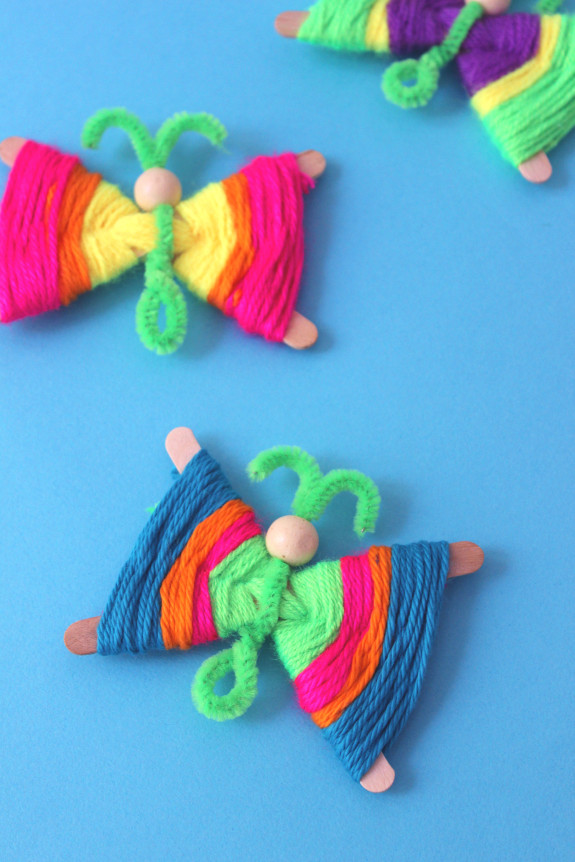
Yarn woven around a few craft sticks topped off with some beads results in a fabulous butterfly cute enough to give as a gift.
Place one craft stick on top of another in an uneven “x” shape. Select one color of yarn and tape the end to the center of the craft sticks where they cross.
Begin wrapping the yarn around the center of the craft sticks weaving around the sides so that they no longer can move. Start weaving outwards along the craft sticks in a figure-eight pattern.
To add another color of yarn to your butterfly wings, cut the yarn of the first color then take the second color yarn and begin wrapping it where the cut piece is left off making sure to overlap the cut yarn to prevent it from unraveling. To tie off your weaving tie a double knot around the last woven loop, cut the yarn and tuck it into the weaving.
To create the butterfly body fold the pipe cleaner in half and twice the fold around itself two times. Place the center of the woven butterfly into the center of the folded pipe cleaner above the twist.
Thread 2-3 beads onto the bottom of the pipe cleaner and one large bead onto the top. Curl the two long ends of the pipe cleaner to make the antenna.
My girls always drew faces onto the larger top bead of their butterflies and of course named them. These little insects flew with us all over town visiting the grocery store, friend’s houses, and even a quick trip to the ice cream parlor.
BUTTERFLY WINDSOCK

Time to raid your recycle bin for this craft. Empty toilet paper rolls star in this easy craft for kids.
Paint the outside of the toilet paper roll and let it dry
To make the butterfly wings, fold a piece of construction paper in half and cut out a capital “B” shape along the fold. Next, using a different color cut out a skinny oval shape for the body. Glue the body onto the center of the wing. Cut out two circle shapes from two different colors of paper. Glue the circles in each section of the wings.
Glue the butterfly body to the middle of the painted toilet paper roll.
Attach lengths of the crepe paper streamer with glue to the inside bottom of the toilet paper roll. Cut the crepe paper streamers to all the same length.
At the top of the toilet paper roll punch two holes on opposite sides and thread the yarn through the holes. Tie the ends of the yarn together.
Hang your finished butterfly windsock near an open window and watch the streamers flutter in the breeze.
CLAY BUTTERFLY ORNAMENTS

Introduce your children to homemade clay as an art medium for this craft project. The finished clay butterfly can be displayed as outdoor garden art if you seal it with a water-based sealer once the paint is dry.
Prepare a batch of clay using this 3 ingredient clay recipe.
Roll out the clay until it is ¼” thick. Use your plastic knife to cut out a butterfly shape. Press the straw into the top of one wing to create a small hole. Place the clay on a baking sheet and let it dry.
Paint the dry clay butterfly in multiple colors and let the paint dry. Thread a piece of yarn through the hole for hanging.
(Optional) Spray the front and back of the painted butterfly with a water-based spray sealer and let it dry completely.
String your clay butterflies onto a length of twine to display around your garden this summer. Rain or shine these fun crafts will keep your child entertained and engaged as they make their very own butterfly.
Handprint Butterfly
 |
| via: One Little Project |
A beautiful craft project that turns into a family keepsake of your little one’s handprint!
Fold a piece of colorful construction paper in half then trace your child’s hand onto the paper lining up the palm of their hand with the folded edge of the paper. Cut out the traced handprint, to reveal the wings.
Decorate the wings with markers, sequins, and glitter.
Glue a wood craft stick down the center of the wings then hot-glue small pom-pom balls down the center of the craft stick to form the butterfly body.
Fold a 4-inch long pipe cleaner in half, tuck the folded end under the top of the craft stick and glue it in place then curl the ends of the pipe cleaner to form the butterfly’s antenna.
Nature Craft Butterfly
 |
| via: Crafts on Sea |
Venture outside to gather up all the materials for this project. Bring nature into your home with this “green” butterfly craft.
On a sheet of paper draw the outline of a butterfly shape leaving the center empty.
Gather large and small leaves, twigs, and wildflowers. Glue a small twig down the center of the butterfly shape to make the body.
Next, fill in the wings with the large and small leaves gluing them down to the paper.
Decorate the wings with wildflowers, petals, and other natural treasures making sure to glue them to the leaves.
Egg Carton Butterfly
 |
| via: Crafty Morning |
A fun upcycling project your kids will love to craft.
Cut a cardboard egg carton into a 2 cup by 2 cup shape making sure to snip off the edges making them round around the cups.
Paint the egg carton with bright colors making sure to cover all of the cardboard cups.
Once the paint is dry take a long pipe cleaner, fold it in half, wrap it around the bottom center between the cups then twist it closed at the top center to make the butterfly’s antenna.
Poke a hole through the top two egg cups and insert a string, knot it and hang up your beautiful butterfly.
Make several of these beauties and hang them along the top of a window as a spring or summer decoration.
Sponge Butterfly Print
 |
| via: The Keeper Of The Cheerios |
A sponge isn’t just for cleaning! This project is proof of that. Rinse out the sponge and try new colors to create a family of colorful butterflies.
Tightly wrap a rubber band around the center of a regular-sized household cleaning sponge.
Squeeze dabs of colorful paint along one side of the sponge then press both sides of the sponge together folding it at the center.
Press both sides of the sponge onto a piece of paper, carefully lift up the sponge to reveal your symmetrically painted butterfly.
With a marker draw a body down the center between the wings and add the antenna.
10. Bowtie Pasta Butterflies
 |
These cute little butterflies would look great attached to a homemade card for someone special.
Paint several pieces of bowtie pasta in bright colors with craft paint. Allow the paint to dry completely.
Fold a piece of heavy cardstock paper in half to make a blank card. Then hot-glue three or four pasta pieces to the front of the card.
With a marker draw the butterfly’s antenna as well as dotted looped lines behind each butterfly showing the path they are flying.

Not only are these craft projects easy and fun but they also provide an opportunity for your children to improve their fine motor skills. Rain or shine, make great memories this summer with your children creating a beautiful butterfly.
Did you know Zulily offers a huge selection of good quality arts and crafts supplies, kits, and books? Unlock your creativity at the Craft & DIY Shop!


