Tuesday, December 21, 2021

Gourmet Chocolate Popcorn Recipe

Do you love popcorn but are getting tired of the basic butter and salt combo? Popcorn doesn't have to be boring! Take your popcorn from boring to gourmet with a few simple ingredients. Go grab your favorite popcorn machine (mine is the Whirley Pop popcorn popper) and meet me here for an easy and delicious gourmet popcorn recipe you are going to love!


This post contains affiliate links which means if you click on a link and make a purchase I may receive a small commission at no additional cost to you. For more information please see my Disclaimer page. Thanks!

Decadent Chocolate Drizzle

Plain popcorn is actually a pretty healthy snack when you don't douse it in butter and salt but every now and then a little indulgence is ok. Gourmet chocolate popcorn combines the crunchy, flavorful goodness of salted popcorn with a sweet drizzle of chocolate. Speaking of chocolate, feel free to use semi-sweet, dark, white, or whatever kind of chocolate you have on hand to make this delicious recipe. 

Gourmet Mix-Ins

You could stop after adding the chocolate but why do that when you looking to indulge a little! Here are some great mix-in ideas to give this gourmet popcorn that extra boost to make it even more amazing -


The Best Gourmet Chocolate Popcorn


What You Will Need:

8 cups popped popcorn
sea salt
1/2 cup each dark , semi-sweet, milk, and white chocolate
mix-ins 
parchment paper
air-tight plastic container


How To Make:

1 - Make 8 cups popped popcorn lightly salted - or 2 bags microwave popcorn. Spread the popcorn out on a baking sheet covered with parchment paper. 

2 - Sprinkle the mix-in toppings into the popcorn to distribute it evenly. 

3 - Melt the chocolate in a double boiler or microwave safe bowl. If you are using several different kinds of chocolate melt it in different bowls.

4 - Drizzle the chocolate over the popcorn / mix-in mixture. Sprinkle a little sea salt all over the popcorn and chocolate. Allow the chocolate to completely cool. Using a big spatula gently flip the chocolate covered popcorn over then drizzle chocolate over it to coat this side too. Allow the chocolate to once again cool and harden. 

5 - Break up the gourmet chocolate covered popcorn into small bite-sized chunks and ENJOY! If you have any leftover, which I seriously doubt, make sure to store the chocolate covered popcorn in an air-tight container. 

Gourmet chocolate covered popcorn not only makes for a decadent dessert or snack but a great gift! Fill a clear celophane bag with it, add a ribbon and small card, then gift it to family and friends for birthdays, Christmas, or any other special occasion. 


More Popcorn Recipes To Check Out!

Make sure to check out my popular Caramel Corn and Homemade Kettle Corn recipes too! These recipes are not only delicious but very easy to make.


What kinds of popcorn recipes have you tried? Share your favorite popcorn mix-ins, recipes and ideas with me today!


Monday, December 20, 2021

How To Make A Coin Quilt - An Easy Quilt For The Beginner

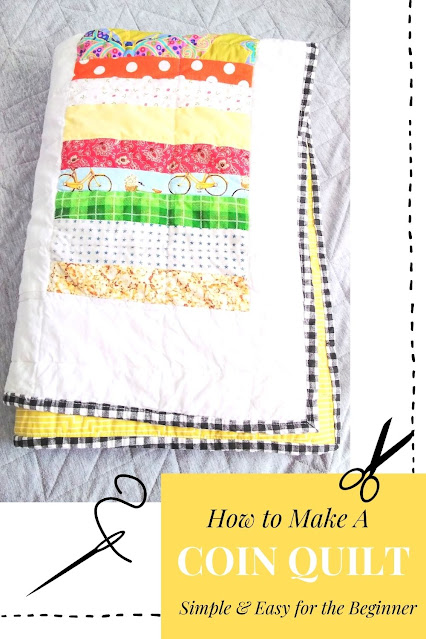
What is a coin quilt you ask? A coin quilt is a very simple quilt pattern that uses stacked rectangular-shaped pieces of fabric to mimic a stack of coins. Coin quilts are a great beginner quilting pattern because of their simplicity.  

The coin stacks are colorful and completely customizable too allowing you to mix solids with small print fabrics. They are also the perfect solution to an out-of-control fabric stash! I love projects that use up those smaller pieces of fabric from other projects that I just couldn't throw away. 


This post contains affiliate links which means if you click on a link and make a purchase I may receive a small commission at no additional cost to you. For more information please see my Disclaimer page. Thanks!

Choosing Fabric For Your Quilt

Another fabric option if your fabric stash doesn't have the colors you need is to use a jelly roll. Jelly rolls are precut strips of fabric that measure 2 1/2" x WOF (width of fabric). Most fabric shops (I love the Fat Quarter Shop!) as well as Amazon, carry a variety of jelly roll packs that are color coordinated so you don't have to do the hard work figuring out what fabrics match. 

Coin quilts can be made into any size quilt. The number of rows of coin stacks can be adjusted to meet your needs along with the sashing size. Sashing is the solid fabric pieces sewn between each long coin row. On my quilt, I used solid white for the sashing. 

Easy DIY Coin Quilt Tutorial

Today I am going to show you how to make a baby-size coin quilt. This is one of the easiest quilt patterns to make, perfect for a beginner, and still lots of fun for a seasoned quilter. Gather up the following supplies and follow the instructions below to get started.


Supplies:

Here's How To Make A Coin Quilt:

1 - Cut your fabric into strips that measure 2 1/2" x WOF. If using your stash fabrics then you might have a variety of lengths - that is OK as long as the strips are 2 1/2" wide! If you use jelly roll fabric cut the strips in half which will make them easier to work with. 

Tip - you might notice from the pictures of my quilt that my "coins" are not all 2 1/2" wide. I wanted the "coins" within the strips to be a little different for this quilt. This is another fun variation option you can play with on a coin quilt!

2 - Pick 4 strips of fabric and sew them together along the length of the strip using a 1/4" seam allowance alternating fabrics between dark and light-colored strips. Press the seams to one side with an iron. Repeat this step until all of your fabric strips are sewn into sets.


3 -  Next, use your rotary cutter to cut the strip sets into the desired length you want the coin stack to be. For the baby quilt I made, I cut my strip sets 8 1/2 inches wide. 

On a large flat surface like a table or the floor, lay the cut coin sets into rows until it is the length you want the coin strips to be for your quilt. Make sure to alternate the stack sets so the color combinations look good. Sew the coin sets together into several long rows and iron the seams flat. My quilt has 4 coin stack rows that measure about 30 1/2" long.

4 - For the sashing cut your solid fabric into strips the length of your coin stack rows. The width of your sashing will depend on how much space you want between your coin stack rows. I cut my sashing 3 1/2" wide by the length of my coin stack rows. Sew the sashing onto the coin stack rows with a 1/4" seam allowance then press the seams towards the coin stack rows. 

After the rows are sewn together measure and cut two pieces of sashing to sew to the top and bottom of the quilt. Congrats! Your quilt top is done!! My finished quilt top measured 36" x 51".


5 - Are you hungry  - because it is time to make a quilt sandwich! Cut your backing fabric and batting the same size as your quilt top. Place the backing fabric right side down on the floor. Then put the batting on top of the backing and finally put the quilt top on top of the batting right side facing up so you can see your pretty quilt top. I like to use big safety pins to pin the three layers together all over the quilt top so the layers stay put when I start quilting them. 

To keep this quilt simple I quilted the layers together with straight lines making sure to quilt in the ditch around the perimeter of the coin stack rows. If you like curvy squiggly quilting you might want to quilt with a stippling stitch.  To learn how to stipple a quilt check out Leah Day's video on Youtube.


6 - Lastly, to finish the quilt you need to bind it. I like to make my own binding because it is so easy to make and I can use whatever colorful cotton fabric I want (or have on hand!). If you don't have time to make your own you can purchase precut and folded binding at your local fabric store too. 

When I first started making quilts I found this amazing tutorial on how to bind a quilt with step-by-step instructions from Diary Of A Quilter. I highly recommend it! 

Congratulations! You just make a coin quilt! I'd love to hear how it turned out. 


Easy Beginner Quilts You Are Going To Want To Make


Friday, December 10, 2021

10 Festive Christmas Quilt Blocks

Decorating for Christmas is so much fun! My most precious holiday decorations are the handmade ones my children, family, and friends have created and given to me. A handmade Christmas quilt, table runner, or quilted wall hanging all make treasured presents to give to those you love. The problem is finding the perfect holiday quilt pattern that fits your level of skill. 


The problem of finding the right Christmas quilt block pattern has been solved! I scoured Pinterest looking for a variety of Christmas quilt patterns and I want to share what I found with you. Hopefully, this will save you time so you can get started sewing and quilting a handmade Christmas gift for the ones you love.

This post contains affiliate links which means if you click on a link and make a purchase I may receive a small commission at no additional cost to you. For more information please see my Disclaimer page. Thanks!


10 Festive Christmas Quilt Blocks


1. Christmas Tree Quilt Block

A Christmas tree, the most iconic symbol of this special holiday season makes for a wonderful quilt block. There are so many different ways to make a quilted Christmas tree but the one I liked best offers a simple tree pattern with swirling quilted stitches. I made this quilted Christmas tree into holiday ornaments that I gifted to friends and family. Find my complete tutorial for this project here: How To Make An Easy Quilted Christmas Tree Ornament


2. Santa Belly Quilted Pillow 

Give a gift your loved one can cuddle with all winter long - a Santa Belly Quilted Pillow! This Christmas quilt pattern by My Quilt Infatuation is clearly Santa's belly - belt, beard, and red coat. Use a fun Christmas print for the backside of the pillow to keep the holiday cheer coming. 


My Quilt Infatuation

3. Christmas Wreath Quilt Pattern

Mini quilts make the best wall hanging. This Christmas wreath quilt is a great addition to your annual holiday decor. This pattern is simple to follow and easy to make. Find the full tutorial at Kelli Fanning Quilts. 


via: Kelli Fanning Quilts

4. Gift Box Quilt Block


Make this holiday-themed quilt and give a present for a present 😀. This is a great beginner quilt since it is just squares sewn together and a few half-square triangles for the bow. Sew several of these blocks together to make the perfect Christmas table runner! The pattern for this block can be found at Scattered Thoughts of A Crafty Mom


via: scattered thoughts of a crafty mom

5.  Candy Cane Quilt Block


Half square triangles in holiday colors make this candy cane extra special. Whether you use white and red or red and green fabric, your candy cane quilt block is sure to look amazing. The finished block is 6" x 12" but you can adjust the size as you need for your project. Find the complete instructions at Inspired by Fabric. 


via: Inspired by Fabric

6. Angel Paper Pieced Quilt Block


This is a paper-pieced block that makes the most beautiful angel design. If you have never tried paper piecing don't let it scare you away! Once you start you are not going to want to stop! The Featherweight shop offers this pattern as an instant download after purchase that comes with complete easy to follow instructions. I wouldn't recommend this pattern for a beginner but once you have a few quilts under your belt give it a shot!  


via: Singer-Featherweight Shop


7. Gnome Mini Quilt  


Gnomes are all the rage at Christmas! Cute and adorable with an attitude everyone loves Christmas gnomes. Make this adorable gnome into a mug rug this holiday season to give as a gift - but don't forget to make one for yourself! The full pattern and tutorial can be found at Sew Can She


via: Sew Can She


8. Christmas Ornament Quilt Pattern


This fun pattern can be made as an individual ornament and turned into a holiday wall hanging or make several and make a beautiful lap quilt. Colorful Christmas themed fabric make this ornament the perfect holiday quilt pattern. The full tutorial for this quilt block can be found at My Quilt Infatuation.

via: My Quilt Infatuation

9. Christmas Candy Star


Here is a sweet treat for your Christmas decor - a Christmas Candy Star quilt block. Customize the colors to fit your decor. You can use this quilt block to make a lap quilt, wall hanging, pillow, or even a holiday table runner to display at your Christmas dinner party. The full tutorial can be found at Moda Fabrics.


via: Moda Fabrics

10. Christmas Candles Quilt Block


Candles make the holiday more festive and bright. This quilt block will not disappoint. You could even make this into an advent quilt block by making four candles, three in purple and one in pink. Follow the tutorial from Bonjour Quilts to make your own Christmas Candles quilt blocks. 


via; Bonjour Quilts


I wish you and your family a very merry and blessed Christmas! I hope you have some fun making these holiday quilts to give as gifts this Christmas season. Let me know which quilt block is your favorite!

More Fun Quilting & Sewing Projects


Check out these other fun quilting and sewing tutorials:


Sunday, November 21, 2021

How To Make A Birdseed Ornament Birdfeeder

Looking for an easy activity to do with your kids to fight off winter's cabin fever? Birdseed ornaments are the perfect craft to make this fall or winter. Not only are they easy to make but they provide a delicious meal as a bird feeder for those cute little birds you see all winter long. 


The other day while driving in the car my youngest son noticed a tree on the side of the road packed full of little birds. He knew winter was around the corner and was concerned that these poor little birds wouldn't have anything to eat once the snow fell. The idea to make birdseed ornaments was hatched so when we got home we got busy making our first batch of ornaments. 


This post contains affiliate links which means if you click on a link and make a purchase I may receive a small commission at no additional cost to you. For more information please see my Disclaimer page. Thanks!


I have to say these ornaments make great outdoor decorations too! 

Their fun shapes hanging from the tree look so festive. My kids really enjoy watching different kinds of birds feed on the ornaments too. They have even started looking up what kinds of birds they see at their DIY bird feeders too. (If you are a homeschool family like us this totally counts as science !!)

How To Make A DIY Bird Feeder - Birdseed Ornaments

Today I am sharing with you how to make these easy birdseed ornaments. Gather the following supplies and let's get started. 


Supplies:

1 (.25 oz) packet unflavored gelatin 

measuring cups

1 - 1 1/2 cups birdseed

1/4 cup water

cookie cutters

aluminum baking sheet

spoon

twine

scissors

small saucepan

non-stick cooking spray 

plastic drinking straw


DIY Birdseed Ornament Recipe

  • In a small saucepan combine the water and unflavored gelatin. On medium-high heat bring the mixture to a simmer, stirring constantly until all of the gelatin is dissolved 


  • Remove the pan from the stove then stir in the birdseed. You want the birdseed to soak up the gelatin but not be too dry. Adjust the amount of birdseed you need based on this.


  • Spray your cooking cutters lightly with non-stick cooking spray then lay your cookie cutters on the baking sheet. 
  • While holding down the cookie-cutter add spoonfuls of the birdseed mixture into it until it is 3/4 full. Press down the seeds with the spoon to firmly pack the seeds into the cookie-cutter.


  • Use the plastic straw to create a hole at the top of each ornament by pressing (and wiggling/twisting) the straw through the ornament to create the small hole. 


  • Let the birdseed sit for several hours or overnight to allow the gelatin to set and dry. Then gently push the birdseed shapes out onto the baking tray. 
  • Cut a length of twine and insert it into the hole in the ornament for hanging on a tree branch. Go hang the ornaments in tree branches all over your yard and enjoy watching the birds! 


Now you don't have to worry about those little birds starving this winter! 


These birdseed ornaments also make great holiday gifts for family and friends! Or use a heart-shaped cookie cutter and give these as Valentine's Day gifts too. 

Upcycled Bird Feeder Tutorial

While we are all into feeding birds make sure to click on this other post I wrote on how to make a bird feeder using materials from your recycling bin! 

DIY Birdfeeder Tutorial


What simple crafts have you made with your family? I'm always inspired to hear your ideas! Thanks for visiting and please come again soon. 


Saturday, November 13, 2021

How To Make A Candy Cane Christmas Countdown Calendar

Counting down the number of days until Christmas is something every kid does so they know exactly how many days are left until the big day! With the month of December just around the corner, now is the time to start getting ready for Christmas because it will be here before you know it. 

When my kids were little they used to make the traditional construction paper chain to count down the days until Christmas. Each day they would tear off a paper link from their chain and count how many more days until December 25. I loved it because instead of asking me over, and over and over how many days until Christmas they could visually see and actually count all on their own. 


This post contains affiliate links which means if you click on a link and make a purchase I may receive a small commission at no additional cost to you. For more information please see my Disclaimer page. Thanks!

Recently my oldest son commented that he felt too old to make a paper chain countdown calendar and wanted to make something else that included a daily treat. This kid loves treats! To solve this problem I came up with this candy cane Christmas countdown calendar that I think you and your family will like just as much as ours does. 

This is a super easy craft that requires only a few supplies you probably already have around the house - plus it looks super festive for the holidays.


DIY Candy Cane Christmas Countdown Calendar

Gather up the following supplies to make your own candy cane countdown calendar for Christmas. 


Supplies:

24 Candy canes

Colorful baker's twine or plain twine

Craft staple gun

Wood board measuring: 24"long  x 5" wide x 1/2" thick

Sandpaper 

Acrylic craft paint

Paintbrush

Self-leveling picture hanging hardware (optional)


How To Make A Christmas Candy Cane Countdown Calendar

  • First, cut the wood to size. Most local hardware stores can cut the wood to size for you if you need help.  
  • Sand the wood to remove any jagged edges then wipe the wood with a damp cloth to remove any sawdust.   
  • Paint the wood with your favorite holiday color. You may need to add a second coat depending on the paint you use. Let the paint dry completely between coats.
  • Lay the painted board on a flat surface then measure and cut five pieces of baker's twine or regular twine that extends about 2 inches past each side of the board. Tie a small knot on both ends of each piece of twine. Space the twine out at even intervals down the length of the board making sure to measure a few inches down from the top before placing your first piece of twine. 
  • Staple one end of the twine to the backside of the board. Allow for the twine to bow slightly with slack and attach the other end to the back of the wood with the staple gun. Repeat this process for the remaining pieces of twine until all are attached. 
  • Finally, attach a self-leveling picture hanging hardware to the backside of the wood about one inch down from the top edge. If you don't want to use picture hanging hardware you could also attach a piece of twine to the top corners of the back of the board and hang it up from the loop too.  
  • Hang 24 candy canes from the pieces of twine across the front of the board. I like to divide up the candy canes to match the number of days per week in the month of December. This helps my kids see how many weeks and days are left before Christmas. 


How To Use Your Candy Cane Advent Calendar

Since we have four kids everyone takes turns starting December 1 to remove and eat one candy cane per day. Each day someone else gets a turn and this continues through December 24. I really didn't want each child eating a candy cane every day, especially when they are already overloaded with sweets from all the cookie baking and holiday parties we have to attend in December! 

Everyone in our family LOVED this new Christmas countdown calendar. And guess what? No one asked me how many days until Christmas!! Woohooo!

Does your family have a special tradition or Advent calendar to count down the days until Christmas? What is your favorite way to keep track of the number of days left before the "Big Day"? It is your turn to share your family's holiday traditions - I'd love to hear from you!

Bonus - Christmas Craft Tutorials

Here are some more fun Christmas crafts you and your family could make this holiday season. Be sure to click on these links to find the full tutorials and pictures.


Click Here For Full Tutorial


Click Here for Tutorial


Click here for complete tutorial


THANKSGIVING SALE,UP TO 30% OFF