
Are you looking for an easy and fun art project to do with your kids?

Splatter painting is not only easy to do but just about anyone can enjoy creating a colorful splatter paint masterpiece! The best part is no two paintings are alike and they always turn out amazing (really, you can't mess this up!)
This post contains affiliate links which means I receive a commission from purchases you make through these links at no additional cost to you. For more information please see my Disclaimer page. Thanks!
My boys just recently finished a study on Jackson Pollack and couldn't wait to try to replicate his splatter art process. They learned that he used all sorts of tools to create his art so, of course, they wanted to find their own "tools" to make splatter art too.
How To Make A Splatter Painting
Today I wanted to share with you how we did our splatter art so you can try it with your kids too. Make sure to watch and read the easy tips & tricks I sprinkle (hehe...catch that pun!) throughout the instructions to help make your splatter painting more enjoyable.

Here is the supply list to get you started:
- Paint - any of these will work: acrylic craft paint, tempera paint, watercolors
- Art paper, canvas, or cardboard
- "Tools" - paintbrushes, pipettes, egg beaters (the manual kind), spoons, old toothbrush
- Small paper cups
- Water
- Large empty box (if you do this craft indoors)
- Drop cloth (optional)
Tips & Tricks - we did this art project inside during the middle of winter and used a large empty box to put our blank art paper inside to keep the splatter paint from getting on my kitchen floor.
Step 1 - Allow your child to choose the paint colors they want for their painting. If you are using tempera or acrylic craft paint pour a little bit of paint into an empty paper cup then water the paint down and mix it well.
Tips & Tricks - use watered down paint for more successful splatter painting results
Step 2 - If you are painting outside just simply lay your paper or canvas in your yard on top of dry grass. However, if you are painting inside you might want to spread out a drop cloth then put your big box on top of the drop cloth. This is definitely a messy art project so take steps beforehand to prevent a HUGE mess!

Step 3 - To start splatter painting, dip a "tool" of choice into the paint then flick your wrist or wave your arm over the paper to get the splatter effect started. Continue adding more splatters in whatever color paint you want to make your one-of-a-kind splatter art painting. (yes, that is my handheld electric mixer - used under my careful supervision of course!)
Tips & Tricks - allow your child to experiment with a variety of "tools" as well as different arm and body motions to create their art.

Step 4 - Make sure to let your artwork dry completely!
What To Do With Your Splatter Art Painting
There are a lot of creative ideas you can do with your finished (and dry) splatter art painting. Here is a list of the different things we have done with our artwork:
- Cut out shapes from the splatter painting (done on paper) and glued them to a piece of twine for a custom bunting
- Homemade greeting card
- Folded it into an origami shape (check out this resource to make origami)
- Picture frame mat
- Framed it and hung it on the wall
- Book cover
- Homemade wrapping paper for gifts
Art Resources For Your Homeschool
As a homeschool parent, I like to set aside time on a regular basis during our school weeks for art. Whether it is time spent reading about an artist, looking at famous paintings from different time periods, or creating our own artwork my kids always love this time.
I've been asked many times what I use to teach my kids art and I wanted to share with you the resources I found and love to use for our art class.
This is the perfect art unit study to do with kids ages Kindergarten through 6th grade. This resource includes a series of art studies focusing on eight of the world's greatest artists. Each series exposes kids to the style, methods, and process each artist used when making their artwork. With several hands-on activities included kids will put together a wonderful Greatest Artists lapbook to refer to.
In addition to the resource created by Confessions of a Homeschooler, this program also requires the use of the books by Mike Venezia called Getting To Know The World's Greatest Artists. These are GREAT books! You can find these books in your local library or purchase them on Amazon like I did because my kids love to read them over and over!
- Resource #2 How To Teach Art To Children
Let me just start off by saying that I LOVE this book! Why do I love it? Because is easy to use as a homeschooling mom! It requires very little pre-prep work. Written to be used for grades 1st through 6th your child will learn about the seven elements of art through examples from various fine art in the world as well as get an opportunity to practice each element through the 96 hands-on art projects.
Not only did my kids learn a lot from this art book but I did too!
More Art Activities For Kids
- Easy DIY Upcycling Art Project To Make With Kids
- Easy Process Watercolor Art Project For Kids
- How To Make Watercolor Postcards
- How To Make A Unicorn Dreamcatcher
I hope this fun tutorial for creating a splatter painting helps inspire you to make art a part of your homeschool day! Let me know how your splatter painting turned out!


- Buzz Lightyear Kid's High Top Shoes
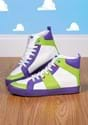
- Price: $49.99
- Pokemon Pikachu High Top Adult Shoes
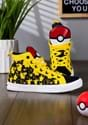
- Price: $49.99
- Super Mario Kids Shoes
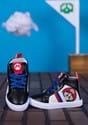
- Price: $29.99
- Adult Marvel Thor God of Thunder Shoes
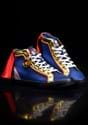
- Price: $49.99
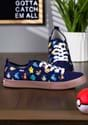
- Pokemon Low Top Adult Shoe
- Price: $49.99
- Adult Marvel Loki God of Mischief Shoes
- Price: $49.99
No comments:
Post a Comment
Your comments are appreciated! Thanks for your suggestions, questions and feedback.