Showing posts with label tutorial. Show all posts

Wednesday, April 5, 2023

Make An Easy DIY Mini Potted Faux Cactus

Succulents are always in style! This cute little potted plastic egg cactus is fun to make and looks great displayed year-round. Follow along to make your own unique little cactus! 


This post contains affiliate links which means if you click on a link and make a purchase I may receive a small commission at no additional cost to you. Thanks!


By the way, check out my Pinterest boards for more inspiring craft ideas!


Mini Easter Egg Cactus


Supplies you will need:


Mini Potted Cactus Craft Tutorial


Step 1  

Paint the styrofoam egg with one coat of acrylic paint in any shade of green you prefer. I used three shades of green: light, medium, and dark on each egg. 


My styrofoam eggs had wood skewers attached, making it very easy to paint all sides of my egg at once. If your egg does not have this feature you might have to paint one side at a time so that the paint does not get smudged. Let the paint dry completely between coats.


Step 2 

Paint or draw with a paint pen with small "cactus needles" using dots, x's, or "v" shapes all over the painted egg. Let the paint dry completely.


Step 3

Cut a piece of floral foam into a small square and make sure it sits about 1/2" below the lip of the pot, then press it down into the inside of the small pot. Secure the cactus egg onto the foam with hot glue. 

Step 4

Next hot glue decorative stones around the egg to cover up the floral foam.


Step 5

Cut a small 3" square of tissue paper, fold it in half diagonally then fold the opposite sides together. Use hot glue to attach the tissue flower to the top of your cactus. Trim away any protruding edges of the tissue until you are satisfied with the shape of the flower. 


Crafts For Teens

Sometimes it is hard to find fun & easy crafts for teens but these little cacti are a super easy craft your teen will love making! 

Whether looking for a "grown-up" way to decorate Easter eggs or a simple southwest theme craft this easy-to-make mini cactus is so much fun. There are so many ways you can use these cacti too! They will make the perfect place-setting marker if you are hosting a dinner or adding to your tablescape decor. 

How do you decorate your Easter eggs? Have you tried any new ideas like shaving cream dye or decoupage? Leave a comment and let me know your ideas. 


More DIY Crafts

Here are some more easy craft tutorials you (and your teen) should try!

How To Make Hydro Dipped Pencils

Colorful Layered Salt Jar Art

Awesome Rock & Wire Picture Holder


Are you looking for new crafts to try? Make sure to click the link below! Annie's monthly kit club has everything you need to create amazing new projects every month! (Affiliate link)


Monthly Science Kit for Kids - Lots of FUN!


Saturday, April 1, 2023

How To Make A Mosaic Tile Coaster

Coasters are so handy to have around! Not only do they protect surfaces from water marks and scuffs but they come in many different colors and patterns adding a small decorative pop of color to your room. Making your own tile mosaic coaster is super easy and a fun project you can do with your kids!


This project will take a few days from start to finish but the end results are sure to please! I had the perfect helper to work with me on this project, my ten-year-old son. He enjoyed creating his pattern and placing the tiles on the board base. 

We were both blown away by the finished result and I'm sure you will be just as happy with your own DIY mosaic tile coaster too. 


This post contains affiliate links, which means if you click on a link and make a purchase I may receive a small commission at no additional cost to you. Thanks!


Materials To Make A Tile Coaster


Do not let tile and grout intimidate you! For this project I used pre-cut tiles I purchased from Amazon so I didn't have to do any cutting with any specialty tile-cutting tools. 

Also, for this project, I recommend using pre-mixed grout instead of the powdered version. Premixed grout is available in a variety of different colors and comes in a small resealable container so you can use it on future tiling projects. Powder grout is very dusty and needs to be mixed with water in order to use it making it a little more difficult to use if you have never used grout before. 

Another important tool for this project is a small plastic or metal putty knife. If you don't have a putty knife you could use a plastic ruler or even a large popsicle stick to wipe and smooth out the grout over the surface of your tile. Anything with a smooth flat edge could be used too if you don't have a putty knife.


DIY Mosaic Tile Coaster


Materials needed to make a tile coaster:


How To Make A Mosaic Tile Coaster


Step 1:
It is completely optional, but if you choose to paint the wooden base make sure to do this before you start the next step. Let the paint dry completely before continuing.

Step 2:
Lay out the tiles on the surface of the wood base in the pattern you like. You can get creative with your tiles and design a special shape or pattern or just wing it and place them in a random order.


Step 3:
Carefully slide the tiles off of the wood base so they remain in the pattern you just placed them in. 


Then spread a layer of glue over the surface of the wood coaster base. Begin placing the tiles back onto the coaster, leaving a small gap between each tile. 


Toothpicks are a helpful tool to use to space the tiles out and to gently nudge them into place making sure they aren't crooked. 


After all your tiles are glued onto the coaster base let the glue dry completely before moving to the next step.

Step 4:
Put on a pair of rubber or latex gloves then scoop out a small amount of pre-mixed grout and pour it over the tiles. 


With a putty knife or a large craft stick with a flat edge scrape the grout across the tiles gently pressing the grout into the gaps between the tiles. 


Continue applying the grout until all of the gaps are filled evenly. Then let the grout dry slightly according to the grout directions before wiping off the tiles.

Step 5: 
Once the grout has slightly dried and set for a short period of time use a damp sponge to wipe off the excess grout that is covering the tiles. Rinse off the sponge regularly and continue cleaning off the tiles until they are no longer cloudy from the grout. Then let the grout finish curing completely.


Step 6: 
Apply small pieces of stick-on felt squares (or circles) to the bottom of the coaster to prevent it from scratching your table.


Congratulations! Now that the grout is completely cured and your coster bottom has an anti-scratch surface you are ready to start using your coaster! 

Shop at Quarter Shop

Make a set of four to give to someone special for a housewarming or holiday present or make them to match your home decor and use them for yourself. Once you learn how to make these tile coasters you aren't going to want to stop making them!


More Easy DIY Projects You Are Going To Love!


Tuesday, March 14, 2023

Easy DIY - How To Make Fabric Yarn Drink Coasters

Recently, I was looking for birthday gift ideas for my sister that would be useful, unique, and look cool. I really wanted to make her something but I wasn't sure what, so I started searching on Pinterest looking for inspiration. My search led me to fabric yarn/twine coasters and I knew this would make the perfect gift!

This post contains affiliate links which means if you click on a link and make a purchase I may receive a small commission at no additional cost to you. For more information please see my Disclaimer page. Thanks!


I've made regular fabric coasters before, check out this tutorial, but this time I was looking for a "twist" (pun intended) to the common fabric coaster. I found the answer to my coaster dilemma with these easy-to-make fabric yarn coasters. 

I love fabric coasters because they can be customized, are washable, and are fairly inexpensive (if you make them yourself). 


Shop Fabric at Fat Quarter Shop

What is Fabric Yarn

What is fabric yarn or fabric twine and where do you get it? Fabric yarn isn't actually yarn like the skeins of yarn you can buy in the store, instead, it's made from long skinny strips of fabric twisted together into any length you need. It is a great way to use up leftover scraps of fabric since you can add shorter lengths of fabrics together to make a long strand of fabric yarn. Fabric yarn is also customizable too because you control the colors of the yarn by using different colors of fabric.


Make sure to follow me on Pinterest for more inspiring ideas!


How To Make Fabric Twine Drink Coasters

Using fabric yarn to make drink coasters is an easy sewing project for beginners and can be done as a no-sew option too if you don't know how to sew. 

Now that you have some fabric yarn it is time to make a coaster!

Supplies Needed:

* Optional: hot glue & hot glue gun (for the no-sew version)


Fabric Twine Drink Coaster Tutorial

1 - Take one end of the fabric twine and start to coil it into a small circle using a pin to hold it together. Set your sewing machine to the largest zig zag stitch setting so that the thread will catch both sides of the fabric twine. 


tip - use a heavy-duty sewing needle like a denim/jeans needle to help prevent your needle from breaking as you sew through the thicker fabric twine. 

2 - Place the small coil on the machine, insert the sewing needle into the center of the coil, and slowly start sewing the twine into a flat circle. Continue wrapping the twine around the circle as you slowly stitch it together. 


3 - When your coaster is to the size you want it cut the fabric twine and tuck the ends underneath the circle stitching over the cut ends a few times to secure them. 


Optional No-Sew Method 

Instead of sewing the twine into a circle, you can use a hot glue gun and hot glue to secure the edges of the fabric twine as you wrap it into a circle. When your coaster reaches the size you want, cut the twine then tuck the ends under the twine and secure them with more hot glue. 


Fabric coasters make a great gift for any occasion like a housewarming gift, birthday present, or Christmas gift. There are so many creative ways to use fabric twine besides making it into a drink coaster. 


I'd love to hear from you and what you made with your fabric twine! Please leave me a comment or follow me on Facebook to share your finished project with me!

Looking for good quality fabric?

You can find quilting fabric and quilting supplies for your project at Fat Quarter Shop.


Bountiful Charity Quilt & Stitch Along

Sunday, January 29, 2023

How To Hydro-Dip Pencils With Nail Polish

Looking for a way to add a little bling to your school supplies? Hydro-dipped pencils are the perfect way to add some color to your school day and bring a smile to your face! This is a fun craft anyone can make that’s budget-friendly and easy to do. This would be a great craft project to do with friends at your next sleepover party! 


This post contains affiliate links which means if you click on a link and make a purchase I may receive a small commission at no additional cost to you. Thanks!

One of my teen daughters did this craft project with me and we had a blast! She wanted the paint to look chunky and colorful on her dipped pencils whereas I went for the marbled look.

Both styles turned out cool and we had a great time just spending time together.


How To Hydro-Dip Pencils With Nail Polish

The key to a successful nail polish hydro-dipped pencil is to have all your supplies ready before you dip the pencils.

Supply List 


Step-by-Step Tutorial


Step 1 - Fill the disposable plastic container with hot water about an inch from the top. I used a large disposable foam coffee cup for this part. 


Step 2 - Pick out 3 or 4 different nail polish colors, remove the bottles' tops, and set them aside. Place the styrofoam cups upside down on your covered work surface and poke 2-3 holes through the bottom of each cup. The styrofoam cups will be used to hold the pencils while they are drying.


Step 3 - Stir the hot water then quickly pour a few drops of each color of nail polish into the hot water. The drops will swirl around since the water is moving. Hold your pencil at a slight angle then dip it lead side first into the nail polish. Twist the pencil a little then pull it out of the water.


Slide the pencils, eraser side first, into a hole in the upside-down styrofoam cup so that it can dry.


Step 4 - Once the nail polish is completely dry brush a topcoat layer of Modge podge over the polish to seal it and to prevent the colors from rubbing off as you use it.


Tip - before you pour out the hot water take a paper towel and drag it across the top of the water to catch any excess nail polish. I don't recommend putting nail polish down the sink!


Making these nail polish hydro-dipped pencils is so much fun! I love that the final product is useful too. You could give these hydro-dipped pencils as holiday gifts even:

  • red, pink & white for Valentine's Day,
  • red, green, and gold for Christmas
  • orange, black, and yellow for Halloween
  • pastel colors for Easter
  • varied shades of green for St. Patrick's Day
  • multi-color for a birthday party


If you need some more easy & fun craft project ideas check out these other great tutorials:

Easy Craft Tutorials


Tuesday, January 10, 2023

How To Make Colorful Layered Salt Jar Art

Sand art jars have been popular for a long time. Layers of various colored sand fill up the jar to create a beautiful piece of art. 

Have you ever wanted to make your own jar of sand art? Colored sand is expensive and sometimes hard to find but did you know you can use a budget-friendly alternative - SALT - to make your own colorful jar of sand art? 


This post contains affiliate links which means if you click on a link and make a purchase I may receive a small commission at no additional cost to you. For more information please see my Disclaimer page. Thanks

This craft activity is fun for all ages! You can enjoy this activity outside during summer break, inside for a staycation activity, with friends for a birthday party craft, or even during a family fun night.


How To Make Colorful Layered Salt Jar Art


Follow these simple steps in order to make your own beautiful jar of colored salt art. Here are the supplies you will need to make this craft:


Supplies


Easy Step-By-Step Salt Art Tutorial


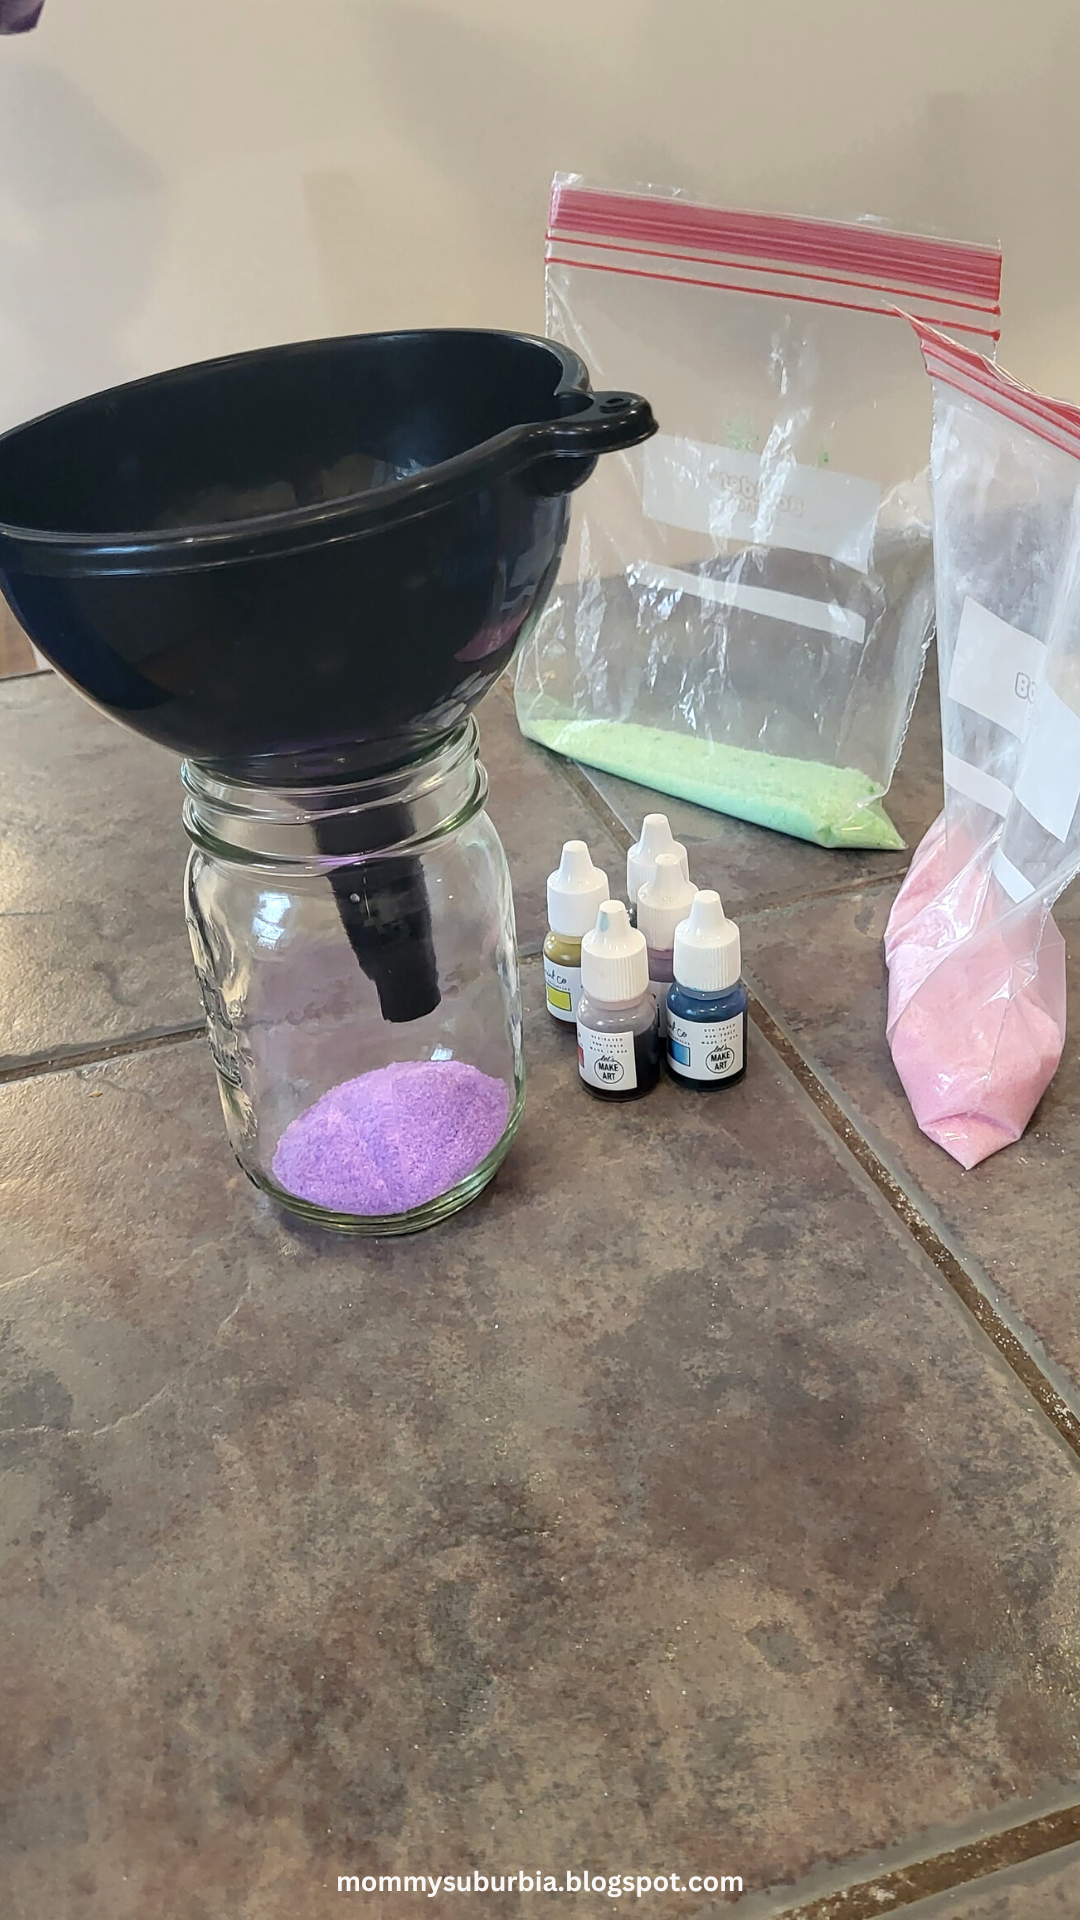
Step 1 - Pour ½ cup of salt into a resealable plastic bag. Add 3 - 4 drops of food coloring or watercolor paint to the bag then seal it. Gently squish the bag to mix the food coloring into the salt. Then shake the bag until the color is fully distributed into the salt.


Make sure you don't add too many drops of liquid food coloring - you don't want the salt to get wet. If the salt appears too wet add a few teaspoons of additional salt to the Ziploc bag, and shake it gently so that the new salt can absorb some of the extra liquid.


Tip: we experimented with both food coloring and liquid watercolor paint. The food coloring tended to create wetter salt than the watercolor however the overall color was more vibrant. Both watercolors and food coloring work for this project so use what you have on hand!


Repeat this process for each color you need for your salt art jar. Feel free to mix a few colors together to make new colors and shades.


Step 2 - Insert the funnel into the glass jar then pour a small amount of colored salt into the funnel to make the first layer in the jar. You can tip the jar slightly to create angled layers of colored salt.


Continue layering the colored salt into the jar until the jar is completely full. Put the lid on the jar and secure it tightly.


Make sure not to shake the jar with colored salt otherwise the layers will disappear.


Use a variety of different-shaped glass jars to create a collection of colorful art jars. These beautiful salt art jars look great displayed on a bookshelf or even on your bathroom counter as a cool decoration


Fill up a clear empty plastic ornament to make a custom Christmas gift this year too! The ideas are endless!


More Crafts and Activities


See how to make colored pasta noodles to use for crafts! This is another fun activity your kids will enjoy. Not only is this activity fun but you can totally use it to teach colors, counting, sorting, basic math skills, art, and science! 


Splatter painting is an easy, fun, and exciting activity for kids of all ages! Encourage your child (of any age) to mix colors and use different tools to make splatters to make their one-of-a-kind piece of art.