Showing posts with label science. Show all posts

Thursday, May 11, 2023

Amazing & Fun Science Experiments For Kids To Do This Summer

Are you looking for ways to get your kids excited about science? Sometimes all you need is a little extra help and a few amazing and fun experiments. 


One of the easiest, low-prep ways to accomplish this is by implementing your science lessons with a monthly science kit. These monthly kits contain ALL of the supplies and instructions so you don't have to do any special shopping or prepping beforehand. 

Disclosure: I am an affiliate for the Generation Genius science subscription kit and recently they sent me a kit to try out in our homeschool. Today I'm going to share with you what my 10-year-old 4th grader learned, what experiments he did, and his overall like/dislike of this kit. I did not receive any compensation, besides a free kit, and all opinions are mine.


MONTHLY SUBSCRIPTION BOXES WE HAVE TRIED IN THE PAST:

We have tried many different subscription kits over the years in our homeschool. In many cases, the kits have been a great addition to our school days by adding a little excitement or newness to our daily routine. There have been some monthly kits we really loved and some that were just OK. Here is a list of the kits we have used so far:

  • Kiwi Co - Kiwi Crate
  • Kiwi Co - Doodle Crate
  • Kiwi Co - Tinker Crate
  • Kiwi Co - Maker Crate
  • Kiwi Co - Eureka Crate
  • Let's Make Art - Watercolor Painting
  • Let's Make Art - Mixed Media
  • Annie's Kit Club - Young Woodworkers Kit
  • Raddish Kids Cooking Kit
Whew, that's a lot of kits! 

When the Generation Genius kit arrived I let my 10-year-old 4th grade son take a crack at it! I have to admit that at first, he was not very excited about a science kit because he thought it would be "baby-ish" and boring. Even though these were his initial feelings he still decided to open up the box and try it. 

Keep Nature Wild
After opening the box we found three separate and sealed individual experiments inside. Each experiment comes nicely labeled and ready to be used with all the supplies you need (except for tap water). 

Since my son is only 10 years old and still needs some help and adult supervision I fully expected to work on the kit alongside him. We pulled out experiment #1, cut open the bag, and got started. 


GETTING STARTED WITH THE GENERATION GENIUS SCIENCE KIT


I expected to find an instruction sheet inside the first bag like other kits we've done but there wasn't anything like that in the kit. After searching the rest of the box and its contents and not finding any instruction sheets I decided to check out the kit website to look for instructions. After a few minutes of searching, I discovered that instead of printed-out instructions Generation Genius uses video instructions taught by Dr. Jeff. 

After getting the video ready to play for experiment #1 my son was well on his way with the first experiment. 

Here are my thoughts on the Generation Genius Science Kit instruction video:
  • The video is a professional production that thoroughly explains the kit contents in detail and at an age-appropriate level. 
  • Dr. Jeff has a great teaching personality and does not "talk down" to his audience. He presents the scientific objectives of the experiment using real scientific terms and explains how the experiment student will see this lesson happen when they use the kit.
  • The video has automatic pauses built in so that students can stay on track and follow along with the instructions at a reasonable pace. The experiments are meant to be done while the student watches the video 


Get your kit today!

GENERATION GENIUS SCIENCE KIT EXPERIMENTS


As I mentioned before, each box comes with three full experiments! The three experiments in our kit were:

1 - Liquid Worms
2 - Light Painting
3 - The Countdown Reaction

Without explaining all the scientific details each experiment taught - I'll leave that to Dr. Jeff, I think telling you what my son and I thought about each one would be more helpful if you are looking for an educational science kit. I will just highlight a few things for each experiment as well as give you my son's rating of the experiment on a scale of 1 to 5 with 5 stars being the best.


LIQUID WORMS EXPERIMENT


This kit comes with this large, amazing, almost indestructible "splat" mat to keep any spills and messes contained and to protect the surface, a.k.a the kitchen table, from any potential harm. As a mom, this little detail within the kit was so very much appreciated! Honestly, none of the other types of kits we have tried had one of these protective mats included (bonus points for Generation Genius!!)

Little and Lively


At this point, my son was still very skeptical at this point but willing to do the first experiment. This first experiment includes two different activities to try. In the first activity, the student created liquid art and in the second activity, the student made liquid worms.

The science lessons from this experiment were to see how a chemical reaction between two natural resources can form new synthetic materials as well as learn what viscosity is. One of the chemicals used in this kit was sodium alginate. This is a thick liquid chemical that actually comes from seaweed, a fact my son thought was so cool! The second chemical is calcium lactate gluconate which is found in calcium vitamins.

My skeptical student tried both activities and to our surprise, this experiment blew our minds! As the saying goes, "A picture is worth a thousand words", and I think from this picture you can see how amazed and excited my little guy was with the liquid worms. 


Pros of this experiment:
  • unique - introduced something new!
  • comes with all supplies you need
  • has plenty of supplies to repeat this experiment over and over
  • allows the child to use their imagination 
  • splat mat keeps everything clean
  • rubber gloves & safety goggles that are kid size
  • included 2 activities
  • the video explains real-world uses for the chemicals used
Cons:
  • fairly messy (again, the splat mat is awesome)
  • the liquid worms get discarded when you are all done (this is my son's only disappointment)


LIGHT PAINTING EXPERIMENT


On to the second experiment which was light painting. This experiment allowed my son to learn about light and how ultraviolet light differs from other light like red and green light. Inside the experiment bag, there were three different colored lights, two sheets of special paper, and a spinning wheel covered in a special paper. 

This experiment requires your student to be in a dark room which for us is our pantry. After watching the video and then testing which of the three lights, red, green, or ultraviolet worked best on the special paper my son was ready to create his own designs with the UV light in our dark pantry. 

We taped both pieces of special paper to a wall in our pantry where he spent the next hour (yes, a full hour!) experimenting! He even cut out different shapes from a piece of paper, taped it to the special paper, and then used the UV light around the shape to create different prints. This experiment really encouraged him to use his imagination!


The second activity included a spinning disk covered in the special paper that when spun created amazing spiral patterns when the ultraviolet light tip was touched to the paper. 


Pros of this experiment:
  • student can do this experiment over and over!
  • good quality equipment is provided in the kit
  • an engaging video that explained the differences in light in an easy-to-understand way
  • allowed for imaginative discovery
  • no mess at all
Cons:
  • the special paper provided in the kit was small (8.5" x 11") - it would have been nice to have a larger size piece of paper to use
  • once the student "drew" on the paper it took quite a while for the light image to fade


CHEMICAL CLOCK REACTIONS


The last experiment from this kit was the iodine chemical reaction countdown. 

The chemicals used:
  • puffed starch 
  • sodium iodide
  • hydrogen peroxide
  • vitamin c pellet
  • destain

By the time my son got to this third experiment, he was a total fan of the Generation Genius science kit! Because this kit included chemicals (like the worm kit) he knew it was going to be cool before he even started it. There is just something cool about using chemicals so he opened up the bag, cued up the video, and got started. 

The main science lesson from this kit was about chemical clock reactions which is a process where a periodic change in color will be observed with the progress of a reaction. 

This kit really required the student to follow the directions exactly as Dr. Jeff explained to them so that it would work properly. As a parent, I appreciated the "following directions carefully" portion of this experiment since this seems to be a constant struggle with my ten-year-old. Because he was so into this science kit and he knew beforehand that he struggles with listening and following directions he suggested that we replay the video a few times so he could get everything right and not mess up the last experiment. (proud mom moment!!) 

There is plenty of chemicals supplied in this kit for the student to try this experiment over and over as well as allowing the student to try mixing the chemicals in different proportions and observe what happens. 

Oh, and did you see from the supply list that it included DESTAIN! Yep, Dr. Jeff thought of everything so dear ole mom doesn't need to scour the internet or even call Generation Genius to ask how to get the blue chemical stain out of your dear little one's favorite shirt! Thank you so much Generation Genius for covering all of the bases for us moms. And if you are wondering, yes, I did have to use a little destain on some of my son's clothing and yes, it did work!


Pros of this experiment:
  • plenty of chemicals were supplied to allow for lots of experimentation 
  • destain - need I say more!
  • an interesting and engaging experiment that is age appropriate
Cons:
  • a little messy but, again there is destain!

To say we are thrilled with Generation Genius is an understatement! My son absolutely loved this kit and is now begging for more. 

If you find teaching science in your homeschool a little lackluster consider adding the monthly Generation Genius science kit to help add some interest to your lessons! 

Generation Genius science kits can be used by individual students, in co-ops, public and private schools as well as a summer school option. Shipping is free with a 3-month subscription and the monthly price is very affordable too. To start your subscription or to just try out one month click here now! 

Wednesday, April 15, 2020

How To Plant An Indoor Vegetable Garden With Your Kids

Staying mentally healthy is just as important as staying physically healthy for both parents and kids especially during this time of worldwide quarantine. 


This post may contain affiliate links which means if you click on a link and make a purchase I may receive a small commission at no additional cost to you. See my Disclaimer page for more info. Thanks!

As our weather transitions from winter to spring it might seem as though the days are more wet and gloomy than sunny which can have a big impact on your mental health. Spending some time outside in nature, at a safe distance from other people, can provide you with a big positive mental boost but what do you do when day after day it it is cold and rainy? 

How about bring a little of the outdoors inside! Let me show you what we are doing at our house as a way to bring nature inside in the form of an indoor vegetable garden.

Since it is difficult to get gardening supplies right now due to the Corona virus we have had to make due with what we have around the house and in some cases we had to get creative! I didn't have time to get seeds or soil before the quarantine and now in our area those departments in our local stores are closed. 

Instead I had to gather up the supplies we had on hand to get the kids started on making their indoor garden:


Plant An Indoor Garden - Fun Activity To Do With Kids This Spring


Supplies:
empty cardboard egg carton or milk carton
disposable foil pan
potting soil - we used some from an outside planter box
vegetable seeds

It might be hard to get seeds this time of year due to the circumstances but I'm going to bet that some of the produce you have in the refrigerator will provide some seeds for your indoor garden! 

While making dinner the other night I cut open a red pepper and took a few of the seeds and put them into a small pot that had soil in it. Guess what! The little seed germinated and we now have a small itty bitty pepper plant growing in the kitchen. 

Using seeds from vegetables like tomatoes, cucumbers and peppers that you have on hand can be such a fun activity for you and your kids. 

*Just a note when using seeds that are kind of slimy after you cut open a cucumber or tomato it is best to rinse off the seeds and set them on a paper towel to dry for a few days. This will prevent them from molding. Tomato seeds are hard to cultivate but it is fun to give it a try!

We have a small plot of land fenced off in our backyard for our vegetable garden so this year I'm hoping that the seeds we start growing indoors will eventually be planted in our outside garden once the threat of frost is past.

If you are looking for some quick germinating seeds try planing lettuce! We have been keeping track of the seeds we planted to see what ones start coming up first. The lettuce was the winner in our mini indoor foil pan garden! 

The kids LOVE seeing the growth in their mini garden and it seems that each morning when they get up and check their plants there is something new happening. I'm sure when we finally get to plant these baby plants outside the kids will have so much pride in their efforts knowing they cultivated these little plants from seed to fully producing vegetable plants!

Don't worry if you don't have any lettuce seeds. You can still grow lettuce inside! Don't throw away the leftover end of a head of romaine lettuce. Instead fill a small container or glass half full with water and put the end of the romaine lettuce in it. In a few days you will begin to see some exciting changed as new growth appears. 

Gardening is such a therapeutic activity, good for all who get their hands in the dirt and spend time planting seeds. 

It is also a great activity you can do with your kids that is full of opportunities to teach subjects like science, math and reading. If you find yourself suddenly a homeschool parent gardening with your children is an aswesome and effective way to start your homeschooling journey even if it is a short one due to the nationwide quarantine. 


For more great gardening ideas please check out these other posts!


1. DIY Mini-Greenhouse Tutorial


2. Rock Your Garden With A Painted Brick Paver

Wednesday, September 12, 2018

Awesome Science Craft Project For Boys - The Bird Kite

This year my 9 year old son is studying science using the Apologia Young Explorers Series Flying Creatures of the Fifth Day book. We are just getting started and already just after a few pages the creative juices started flowing. The book is full of great experiments, which is my son's favorite part about science but I wanted to throw in a simple arts & craft project to go along with the science theme.

mommysuburbia.blogspot.com


In an effort to kill two birds with one stone (couldn't help myself!) the idea of making kites that look like birds began to form in my head. I wanted to incorporate a craft that used some of the science he had studied. The first chapter explains how the shape of a bird's wings contributes to its ability to fly. We had a lot of great discussion about this and how the study of birds has helped humans learn to fly airplanes.

I found a great tutorial on Krokotak and we went to town making a flock of seagulls....kites (ok, I'm sorry, it just slipped out!). This project required a minimal amount of supplies that you probably already have handy which makes it so easy to pull together last minute.

Now because my youngest, who just started kindergarten wanted to participate in the crafting I used this time to teach shapes, follow directions and measure the length of yarn. Cutting skills, coloring, folding and measuring are great skills for your little one to practice.

Here is what you need to make your own bird kite (a list of where I got my supplies is at the end of the post)

mommysuburbia.blogspot.com

KITE INSTRUCTIONS:

8 1/2 x 11 piece of construction paper (white copy paper works fine too)
1 small scrap of orange paper cut into a triangle for the beak
3-4 small scraps of other colored paper for tail feathers (approximately 2" x 3")
scissors
stapler & staples
glue stick
18"- 24" piece of yarn
black crayon or marker to draw on eyes
hold punch

Fold the 8 1/2  x 11 in half matching the short sides together. The fold becomes the belly of the bird.

Next take the two of the corners at the top of the folded paper and bend them backwards towards the fold. As you fold them back until the tips of the paper meet at the fold. Staple the folded back tips right at the fold (belly of the bird body) to make the wings.

Next make a hole with the hole punch just behind where you stapled the wing down. Thread the yarn through the hole and tie it securely to the belly of the bird.

Now take the triangle shaped piece of orange paper and put a little glue on both sides of one of the triangle bases. Slip the glued edges into the narrow end of the folded paper where the bird's head is. It should now start to look like a bird with a beak.

With the marker draw eyes on both sides of the head just behind where you glued the beak.

Lastly, cute 3-4 long feather shapes from the small scraps of colored paper and glue the ends together one on top of the other. Put a dab of glue along both outsides of the stack of feathers and insert them at the back of the bird inside the fold to give your bird tail feathers.

Take the completed kite outside (or in a big open space inside) and gently pull the kite along with the yarn. The bird kite should fly even if there isn't any wind. Shorten the yarn to make the flying bird kite even easier to handle for younger children.

For the full video from Krokotak click here:

Of course this awesome craft project isn't limited to just boys! Girls are welcome to make these kites too. I just happened to make these fun kites with my two boys and thought it would be fun to write a post specifically for boys.

Supplies Found Here:


This post contains affiliate links which means if you make a purchase I may receive a small commission at no additional cost to you. For more information please read my Disclaimer page.

Here are some of the supplies we used to make our kites:

Walmart


hole puncher from Walmart

yarn from Amazon

via: Amazon


Friday, August 18, 2017

Five Awesome Solar Eclipse Activities for Kids


Hey, have you heard there is going to be a total solar eclipse on August 21, 2017?

What is a total solar eclipse you ask - let me explain.  A solar eclipse occurs when the moon comes in between the earth and the sun causing a shadow of the moon to fall on certain portions of the earth. Here is a link to a great video you and your kids can watch to learn more about the solar eclipse:


What a great opportunity to teach and experience something astronomical all at once! My kids love crafts and I think the crafts below help reinforce the concepts taught in the video and they are just plain fun to do.

Here are some great craft ideas all about the solar eclipse you can do with your kids:

1 - Solar Eclipse Chalk Art

Requires minimal supplies and is simple enough for young children to participate in. Find complete instructions and a list of materials at Books and Giggles.

2 - Solar Eclipse Pin Hole Camera


Stay safe and still enjoy the sun's stellar shows by creating your very own pinhole camera. It's easy! All the instructions and pictures showing a step by step process can be found here : JPL NASA

3 - Solar Eclipse Coffee Filter Craft


Here is a great craft to do with your kids to teach them about the solar eclipse. For the complete tutorial check out this site - Look We're Learning.

4 - Solar and Lunar Eclipse Model


Recreating a model of the solar (and lunar) eclipse for your kids to touch, play with and just experiment with will help your kids understand what an eclipse is and how it works. Follow the pictures at Arvin Gupta Toys to make your own.

5 - Solar Eclipse Cookies


Sun shaped cookie cutter and a circle cookie cutter along with some frosting and sugar cookie dough make for a sweet and educational solar eclipse. Need a great sugar cookie recipe? My favorite recipe for sugar cookies can be found at Sallys Baking Addiction

If you get a chance to step outside on the day of the eclipse please make sure you tell your kids how dangerous it is to look directly at the sun. Keep those little (and grown up ) eyes protected properly.


Wednesday, March 1, 2017

10 Fun & Easy Toddler Activities to Keep Them Busy


Short attention span + inexhaustible curiosity = TODDLER. So how do you handle this situation so your little sweetie pie isn't getting into things that will hurt them or cause a massive amount of work for you? This seems to be a regular challenge here at our home. 

This post contains affiliate links which means if you click on the link and make a purchase I may receive a small commission at no additional cost to you. For more information please see my Disclaimer page. Thanks!

We homeschool our oldest three children so that leaves the three year old on his own to entertain himself. He isn't really on his own but in his eyes when he sees his older siblings working and not playing with him he feels left out and bored. We all know the next step - he will start to get into everything. His curiosity is just so big and hard to control he just can't help but get into anything and everything in his path.

Here is a peek at some of the things he gets into: big sister's lip gloss that tastes like candy, older brother's Lego Star Wars creation that he spent hours working on, the guitar, and the fish's food (doesn't it look pretty scattered over the carpeting?), the list is endless! He just can't help himself. 

You're probably asking what his mommy is doing while he is exploring? More than likely the two minutes I turned around to load some dirty dishes into the dishwasher, or do a little laundry or help one of the other kids with school he saw his chance and made a beeline for trouble. 

So how do I keep him engaged and busy while other activities and school is happening all around him? It isn't easy but I have some tricks in my bag that have helped provide him with some great activities that he can do on his own or with me or a sibling. These special activities always make him feel included and special since these activities are just for him and I make it a point to tell him that these little activities are "just his". 

It's tough being the fourth child - everything is handed down and not much is just yours. 

10 Toddler Activities To Keep Them Busy


Here is a list of 10 activities I use with my toddler to keep him busy and I hope there is something here that will give you a little inspiration and help provide your toddler with an activity that promotes fine motor skills, learning and fun:

#1 Felt Fishing Game

via: Sapucha on Etsy
So this felt fishing game is something I made for my kids to help spur on their imagination, improve their fine motor skills and help them identify colors. 

I've seen lots of different versions of this game but they all used magnets and my kids were notorious for putting EVERYTHING in their mouths. I was worried they would swallow the magnets so I came up with my own version of this game with Velcro. The Velcro on the "hook" sticks to any spot on the felt fish making the challenge a little less frustrating for a new angler. 

My kids love to stand on a big pillow boat with the fish scattered around the floor and try to catch them. Lots of fun!

#2 Pom Pom Push

via: engaging toddler activities
Simple supplies easily turn into a fun and challenging activity for toddlers. Not only can they do this at home but you can bring this fun activity along in the car, church, doctor appointments or wherever you may need to keep a toddler quiet and busy.

I've used empty margerine or yogurt containers and a variety of different size colored pom poms to make ours. Just be sure to trim away any jagged edges on the holes you cut into the lid. The best part is after they are done playing you just gather up the pom pom balls, put them into the container and snap on the lid. 

#3 Beaded Pipe Cleaners

via: childhood 101.com
This activity is something that should be done under supervision as it does contain small pieces. My little one loves doing this activity! The texture of the pipe cleaners along with a variety of colorful pony beads gives him something exciting to explore with his hands. 

As he has gotten older I have asked him to start matching the beads to the color of the pipe cleaners or creating a pattern. Recently, we have started twisting his finished creations into jewelry for him to give as gifts to grandmothers, sister and of course him momma! 

Lots of fun with little to no pre-planning on the part of you.

#3 Rubberband Soup Can

via: hands on as we grow
A pile of colorful rubber bands and an unopened soup can is all you need for little hands to get busy. As you child gets older you can add sorting the rubber bands by color and using a bigger can to keep them interested. I also taught my little one how to snap the bands once they are on the can so that the sound becomes part of the fun. He thinks he has his own tin can instrument.

#4 Lock and Key

via: No Time For Flashcards.com
Like me I'm sure you have a few locks and keys sitting around in a cupboard somewhere. I had a bunch of small luggage locks with keys stashed in a suitcase as well as some larger padlocks in our hardware bin. All of my kids love to play with these! It is hard for them to let their little brother have this activity all to himself since this isn't something most kids get to play with. He loves to put the lock around something and then figure out how to unlock it with the key. Again, supervision is required since there are small parts.

#5 Muffin Tin Color Sorting


via: play to learn preschool
Using colorful objects you have on hand like pom pom balls, beads or even making your own colored pasta is a great tool to teach kids colors and keep them busy sorting these objects into the muffin tins. 

Recently we read a book about kings and queens and how they usually had all sorts of jewels that came in many different colors. I happen to find some "jewels" (colored plastic gems) at the dollar store and we played this fun sorting game with them. My little guy loved playing with the gems dividing them into the tin sections, pretending he was giving his riches to his siblings. This created a lot of imaginative play along with the fun of sorting by color or size.

#6 Painting in a Ziploc Bag

via: feeling love some
Mushy, colorful and just plain fun is how I would describe this activity. You can pour the craft paint directly into the bag or what I do is pour small drops onto a piece of tinfoil or wax paper and then insert it into the bag. To keep the bag in one spot I usually tape two sides of it down to the table - the Ziploc side is a good side to tape (wink, wink). 

My son is working on learning his letters so I encourage him to use his fingers and practice writing the alphabet. Mixing the colors is a fun part of this activity too! If you put primary colors into the bag and ask your child to mix certain colors (yellow + red or blue + yellow or red + blue) they are amazed at the new colors they just made all by themselves. 

Clean up is a breeze too - just peel up the tape and toss out the bag of paint. No messy hands, brushes or wet painted paper. 

#7 Coloring in a BIG Box

via: I Heart Arts n Crafts
Don't throw away that big box you have taking up space somewhere in your house, not yet at least! This could be just the thing you need to keep your child engaged and busy. Grab that big box and a handful of crayons and stickers and put your little one inside the box so that can get busy creating their own house/space ship/car....possibilities are endless. 

Sometimes I like to tip the box on its side so the child can crawl in/out by themselves. If their box becomes a house you can cut a window out of one of the sides but just cut three sides so they can open and close the window. Maybe your child thinks they are making a spaceship....you can get really creative for them and poke holes in the top of their space ship and stick a strand of Christmas lights through the holes. Plug them in and watch their faces light up, literally!

#8 Styrofoam Construction Blocks

via: teachingmama
For this activity you need a block or two of Styrofoam, a plastic toy hammer and a bunch of golf tees. Since the Styrofoam is so easily punctured your child can start the golf tee nail by pushing it into the Styrofoam block then use their toy hammer to pound it the rest of the way down. The golf tees have a pointy end so please watch your child (and your feet when you walk) so no one gets injured. 

This is a great hand-eye coordination activity that can really do a good job keeping your child busy. It can be a little noise too but noisy is fun, right?

#9 Pool Noodle Marble Run

via: apartment therapy
We have a pool so we have a TON of pool noodles and if you have ever had pool noodles you know they don't last very long. Many times they get broken in half since they are not made out of sturdy, high quality materials. They are also inexpensive and can even be found at the dollar store! This activity requires a pool noodle that you slice in half (just use a sharp serrated knife), empty box or plastic container and some small marbles. *if your child puts toys in their mouths please supervise this activity or wait until they are older. Rest one side of the pool noodle on an elevated surface like steps, furniture or bed so your child can put a marble down the center groove. Place the box or plastic bin at the end to catch the marbles

What a fun activity to play with your child or let them play by themselves. 

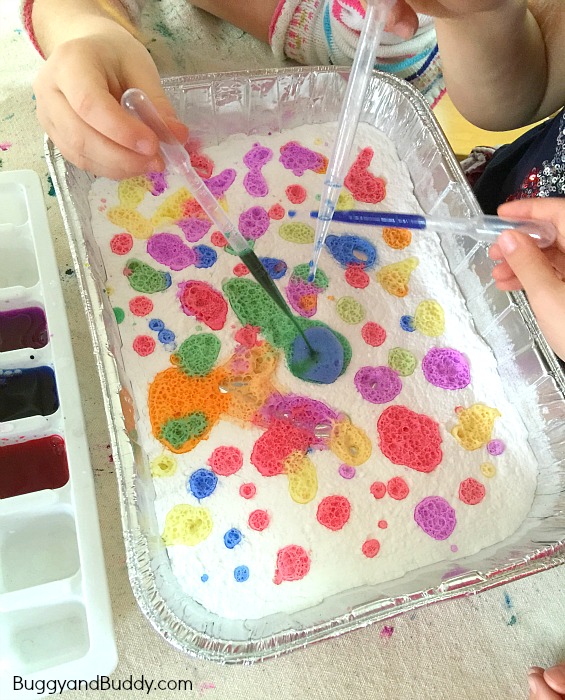
#10 Baking Soda and Vinegar "Experiment"

via: buggy and buddy
This activity lets your child play and learn at the same time. A simple chemical reaction between the baking soda and vinegar is exciting to watch and hear - lots of great sensory stuff here momma! 

I fill up the spaces in a muffin tin with regular vinegar and add a drop or two of food coloring to each. Then I put a good amount of baking soda into a disposable metal pan (you can even use a large plastic container) and spread it into an even layer. With a small squeezable medicine dropper teach the child how to squeeze the end so the colored vinegar gets sucked up into the dropper. Then let the child drip the colored vinegar into the pan of baking soda. 

Watch and hear it fizz! Mixing the colors is fun to see as well. The chemical reaction just keeps going and going each time they drop more vinegar into the pan. 

We really love this one!

I hope you get a chance to try out some of these fun ideas. I know your kids will love them just as much as mine do! If you have other ideas to add I'd love to hear from you so please leave a comment with your ideas


More Fun Activities To Do With Your Child


Do your children love puzzles? I put together a tutorial on how to make your own puzzle using an empty cereal box I recommend you check out! This is a great activity that can be modified to fit their age and abilities, plus it is budget friendly! To learn how to make your own cereal box puzzles click HERE.