Thursday, January 28, 2021

5 Creative Ways To Welcome A New Baby

Are you looking for a unique way to congratulate a friend or a family member who just had a new baby? Sharing in their excitement as they welcome a new baby into the world is so much fun! 


This post contains affiliate links which means if you click on a link and make a purchase I may receive a small commission at no additional cost to you. For more information please see my disclaimer page. Thanks!


My sister recently had a baby and since we don't live close to her we decided to throw her a new baby welcome home party in a box. Our whole family got in on the welcoming party by sending her loads of cool cards, homemade quilt, origami folded paper treasures, and many more fun gifts. We enjoyed welcoming our new baby cousin (nephew) so much and know that these unique gifts made it even more special for her and her husband. 

I wanted to share the fun ideas we came up with for my sister's baby shower in a box with you so you can bless a family or friend with their own baby shower in a box party! 

Don't forget to PIN this for later and follow me on Pinterest for more great ideas!


5 Fun & Creative Ways To Welcome A New Baby


1. Matching Family T-Shirts:     

This idea is fun because everyone gets a gift including the new baby! When a new baby arrives older children sometimes feel left out or neglected. By giving a gift to everyone in the family no one has to feel left out anymore! Etsy is full of great ideas for custom matching family t-shirts! This set is made by CosmicRebelShop.


2 - Diaper Cake:     

Everyone knows newborns go through A LOT of diapers so why not help the parents get a little bit ahead of the upcoming diaper rush with a super cute diaper cake. For a great tutorial on how to make one check out The Craft Patch!


3. Housecleaning Certificate & Custom Card:     

A great way to welcome a new baby is to offer to help clean their house! A sleep-deprived new mom will be grateful for your help even if it is just helping her catch up on laundry. If you don't live close by how about hiring a service to come clean. It is probably best to ask before giving this to make sure the family is comfortable with a house cleaner. 

You could tuck the homemade house cleaning certificate into a custom card too! Check out these great FREE printable new baby cards from the FTD.com blog. Choose from one of the 8 designs to print, cut, and send and will work in any situation (simple, funny, baby boy and baby girl cars). No need to rush to the store to pick out a card - use one of these great printables instead. 

Oh, and if you aren't sure what to say to the new parents to congratulate them FTD.com has you covered with a ton of great new baby wishes that you can include inside the card too. For the complete set of printable cards and baby, wishes visit the FTD.com blog!


4. Edible Fruit Arrangement:     

When our youngest was born my husband's boss sent us an edible arrangement as a new baby gift. We LOVED it! A mixture of fresh fruit and chocolate-dipped fruit arranged on skewers in a cute pot really made us feel loved. 


5. Restaurant Gift Cards Bundle:    

It is pretty common for friends and family to make a meal for a family who just had a baby. Instead of making a meal how about giving a variety of restaurant gift cards to the new parents which are kind of the same as bringing them a meal but with a twist. You could even include take-out menus for each of the restaurants you get gift cards to make it just that much easier for the family. 

No matter how you choose to celebrate the new baby and welcome them home I'm sure the new parents will appreciate your thoughts and gifts! 

For more great baby gift ideas, baby blanket sewing tutorials, and fun kids projects check out these other posts:

More Baby Themed Ideas To Check Out

HOW TO MAKE A RAG STRIP QUILT - FULL TUTORIAL

AWESOME GENDER NEUTRAL BABY GIFT IDEAS

HOW A VINYL TABLECLOTH AND A PAIR OF SCISSORS SAVED MY DAY


How did your friends and family welcome home your newborn baby? I'd love to hear from you. Share your stories in the comments!

Thursday, January 14, 2021

How To Build A Wood Step Stool - Simple & Easy Beginner Woodworking Project

My boys and I love woodworking projects. I have a scrap box of wood that they regularly dig through dreaming up ideas of what to build. Because they are beginners and can get frustrated easily I like to find woodworking projects that are simple for them to do with help from me and result in a cool and useful finished project. 


This post contains affiliate links which means if you click on a link and make a purchase I may receive a small commission at no additional cost to you. For more information please see my Disclaimer page. Thanks

A few weeks ago while I was out running errands I decided to pick up a few 2 x 4's (8ft long) from Home Depot. When I got home I told the boys that I had a big surprise for them in the van! They were a little confused as they pulled the lumber out from the back of the minivan but figured I had a project in mind for them to do and they were soon pretty excited to get working. 

Of course I had a project in mind and today I wanted to share what my boys and I made. Hopefully this will encourage you and your children to get building! 

Our project was a small wood step stool! I found this super cool idea on Pinterest (don't forget to follow me!) and knew this was the project for us. 

Since we are just starting out on our woodworking adventures there are tools and supplies that we just haven't acquired yet. Because of this, we had to do a little more improvising to make things work in order to complete the project. It is totally OK if you don't have all the cool tools yet - don't let this stop you from building and doing that woodworking project! Adding tools to your collection may take awhile because they can be pretty expensive but when you do buy that next tool make sure you buy good quality tools that will last for years to come. 

Here is my short wish list of tools I'm saving up for: 


How To Build A Simple Wood Step Stool

Our project today is a simple wood stool that is made from one 2 x 4 x 8 board! Here are the supplies you will need to make your own wood stool:

Supplies List

- one 2 x 4 (8ft long)

- 2 1/2 inch wood screws

- wood glue

- tape measure

- pencil

- sandpaper (80 grit & 120 grit)

- drill & drill bits (here is the one I use)

- miter saw (if you don't have one a hand saw + miter box works too or a circular saw)

- saw horse (optional - I love this adjustable one)

- safety glasses


Cut List

3 - 12" pieces (steps)

2 - 10 1/2" pieces (base side bottom)

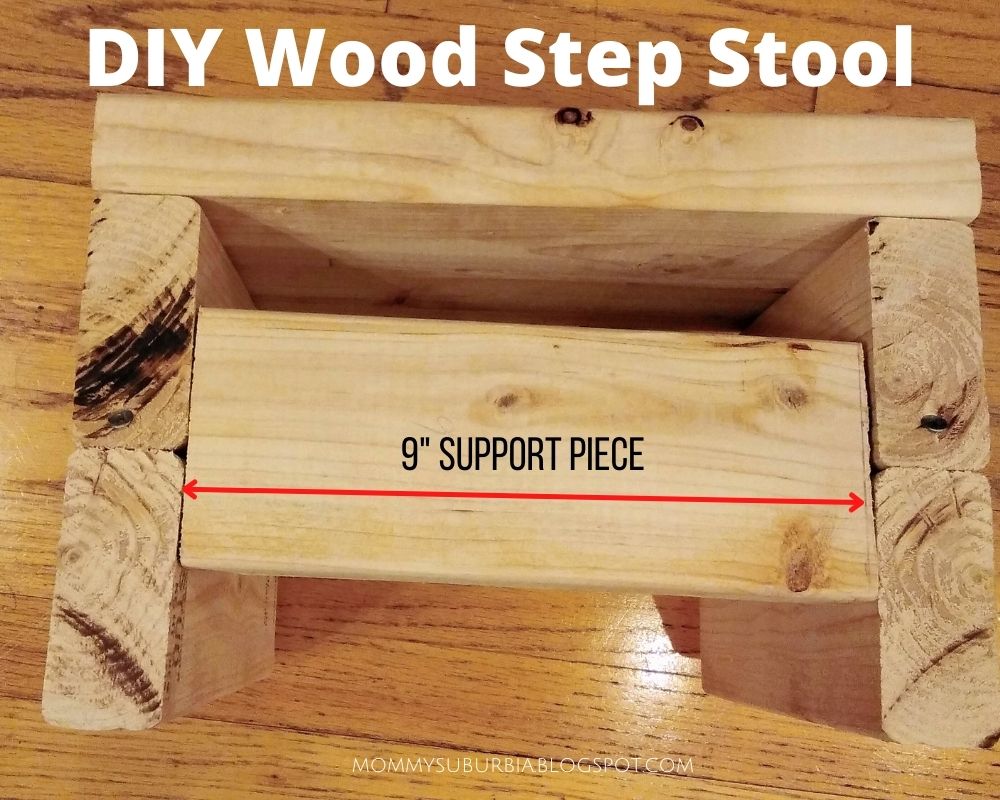
1 - 9" piece (back support)

2 - 7" pieces (base side top)


STEP 1: The first step is to measure and cut the 2 x 4 board into the smaller pieces according to the above cut list. A miter saw is ideal but can be an intimidating tool for a beginner. If you have one great, but if not a simple miter box and hand saw will do the trick. I actually cut the board down using a circular saw while my oldest used a miter box and hand saw. I used our adjustable saw horse to clamp down the boards as I cut them. 

Tip - Learning all about a tape measure is an important skill for a new woodworker to understand.  If you need a refresher on what all the little lines on a tape measure are here is a simple info graphic to help you out:


Pin for later!


STEP 2: Once the boards are cut sand all the edges so they are smooth and splinter free. You should start with rougher low grit number sandpaper (like 80 grit) and then use a higher grit paper like a 120 to really get your wood smooth. 

Tip - If you want your stool painted or stained now is the time to do that! Just make sure to let the wood dry for 24 hours so that the paint or stain is completely dry.

STEP 3: Take the two 7" pieces and you are going to drill two angled pilot holes on each piece making sure you drill the same direction for each hole. Pilot holes will help prevent the wood from splitting when you screw the wood to another piece of wood. Use a skinny drill bit that is smaller in diameter than your screws. 

I laid my board flat and marked up 1" from the long edge and about 2" from the short edge and that is where I drilled my first hole. I did the same for the second hole except I measured from the opposite side. The purpose of the pilot hole is to make a path for the screws you will be screwing into the board to attach it to another board. The path you are drilling should start from the long flat side of the board and protrude out through the 2" long side of the board at an angle. 

Tip - using a Kreg jig for this step would be ideal however since I didn't have one I improvised. 

STEP 4: Take the two 10 1/2" pieces and lay them flat their sides then place the two 7" pieces on top of each of the 10 1/2" pieces making sure to line up the ends. Spread a little wood glue on bottom of the 7" piece before screwing it to the larger piece of wood. Insert screws in the pilot holes and go ahead and secure the two boards together. The screws should penetrate through the bottom of the 7" board and into the top of the 10 1/2" piece.


STEP 5: Now we are going to insert the 9" piece for support to our step stool. Prop up the two connected base pieces (7" & 10 1/2") you attached together in the previous step and place the 9" long piece between them placing the board evenly between where the two boards connect. Use a pencil and make two small pencil marks about 1" apart on the outside of each base where you will drill two pilot holes. Drill two pilot holes through each of the base pieces. Then screw in the 9" piece connecting it to both sides of the bases. 


STEP 6: Time to attach the steps! You should have three 12" pieces of wood left. These are the steps. Place two 12" pieces flat across the top of the base. Mark each board 1" from each side where you will drill pilot holes to connect the board to the base. Do this to each side for each board then drill pilot holes through the step pieces. 

After you attach the two top step pieces the next thing you will do is attach the bottom step. Follow the same process for marking and drilling pilot holes. Then screw on the board completing the last step.


That's it! You did it! My boys are loving their new step stools. One is using his as a step stool to stand on when he needs to feed his pet toads which are in an aquarium on top of a tall dresser. My oldest uses his step stool in his closet when he needs to reach toys and treasures that are stored on higher shelves. 


I love that this little step stool can be easily tucked away and isn't huge and bulky! My boys chose not to paint or stain their step stools but are thinking about "customizing" their stools using sharpie markers in the near future. Why not - these stools hardly cost anything and when will they ever get a chance to color on real furniture with markers! 


More fun & easy woodworking projects:

I hope you enjoyed making a simple and easy wood step stool as much as we did. If you are looking for more fun and easy projects to do with your children check out these great projects and tutorials:

Build Your Own Tabletop Hook & Ring Bimini Game

How To Make A Wood Growth Chart Ruler


I'd love to hear from you - what woodworking projects have you been crafting? 

Thursday, December 24, 2020

The Improv Spinners and Hourglass Quilt - Easy Beginner Quilt

A handmade baby quilt is the perfect way to welcome a new baby into the family. My youngest sister just had her third baby and I was excited to have another opportunity to make a baby quilt to give as a gift to the new little one. 


This post contains affiliate links which means if you click on a link and make a purchase I may receive a small commission at no additional cost to you. For more information please see my Disclaimer page. Thanks!


I got started making this quilt before she had the baby but the only thing we didn't know was the baby's gender so I had to make it gender neutral. 


Of course before I settled on the quilt block pattern I wanted to use I scoured my favorite place for inspiration - Pinterest! Don't forget to follow me on Pinterest to see all of my other inspiring pins!  


Here are the quilts I found on Pinterest I was considering making for this baby quilt I wanted to share with you. I really wanted to make a gender neutral quilt that had little bits or blocks of color, which all of these quilts have. 


Baby Quilt Inspiration From Pinterest


Stacked Coins Pattern (via: sew-handmade.blogspot.com)


Modern Patchwork Baby Quilt (via: Etsy (DonnaWesterkamp)


Charm Pack Quilt (via: Sew Me


Spinners & Hourglasses (via: Stash Bee)


I love the pops of color each quilt offers and the texture the quilting brings out too. It was a tough decision but in the end I went with the Improv Spinners and Hourglass! 


Easy DIY Improv Spinners & Hourglass Baby Quilt


As someone who loves sewing and quilting I have an overflowing and growing fabric scrap bin and I knew this quilt would help me use up some of these scraps of fabric that I already have on hand. 


What I discovered while using the fabric from my scrap bin was the small bits of leftover fabric I used for this baby quilt were from the fabric I had used when making two baby quilts for my sister's first two kids. I love how each child's quilt has some of the same fabric bits in them. It kind of ties them all together - like a little sibling quilt family!


I followed the instructions for the improv spinners and hourglass block pattern from the Stash Bee  and I found her tutorial to be super easy and fun and I totally recommend it if you want to give this quilt block a try! 


The biggest tip, which the tutorial mentions is to make sure you sew your spinner fabric (the colorful long piece) to the same side of your base fabric on each square of the base fabric. This ensures that each spinner comes together and you don't have a random spinner blade facing the wrong way! 


I found that the most handy sewing tools, besides a sewing machine, to have on hand when making this quilt is a rotary cutter, self healing cutting mat and a straight edge like a quilting ruler (I couldn't find mine!!) or a wood ruler. There will be a ton of trimming for each block and it went really fast using a rotary cutter! I also used my iron and ironing board a lot to iron down the spinners and hourglasses as I made the blocks. 


For my base squares I used three different neutral color fabrics - white, oatmeal and light gray cut into 5" squares. The tutorial from Stash bee recommends using four but I didn't have an extra neutral color on hand. I also made extra white squares so that each quilt block of four squares had two whites that I sewed diagonal to each other.


While making each square I did not make each spinner blade or hourglass triangle the same size. I kind of eye-balled it depending on the print fabric I was using. I wanted that "wonky" look for each of the spinners and hourglasses. 


After I was done sewing the long spinner side an the small hourglass sides onto the base squares, I sewed four completed squares together into one full quilt block making sure the spinners and hourglasses all had mismatched fabric touching each other. Then I laid out all the completed blocks on my floor and placed them into the pattern I wanted for the final quilt. 


I had to do a lot of rearranging to get it just right but once I was satisfied with the placement of the blocks I began sewing the blocks together. I ended up with 5 full blocks across by 5 blocks down. 


After the blocks were done and all sewn together, I decided last minute to add some white sashing all around the border of the quilt sides. I wanted to make sure my binding stood out from the quilt blocks and the only way I could do this was to use plain white sashing.  


The back of my quilt is a print I found in a gender neutral mustard yellow color with white geometric lines that form mini crosses all over. I love the subtle cross theme because this is a child I will be praying for regularly and I like knowing that he or she will be covered in little crosses when they are sleeping. Sweet dreams baby!


Because there are lots of colorful spinners and hourglasses all over the quilt I wanted to make sure the quilting didn't distract from the design so I decided to quilt just a few diagonal lines through the squares and then I also quilted in the ditch around the perimeter of the quilt sashing. 


For the border I really wanted to give the quilt a pop of pattern so I used a black and white gingham print fabric. I cut the fabric into 2 1/2" long strips and made my own binding. I followed the tutorial from Simple Simon and Company  for making your own quilt binding. Their tutorial is easy to follow and has a ton of pictures! 


Here is my finished quilt!!


The finished quilt measured 50" x 50". I am super happy how it turned out! It was such a fun project that whipped together in no time at all. This certainly has become one of my favorite baby quilts and I'm sure I will be using it again in the future when I need to make another baby quilt. 


More Great Beginner Quilt Projects

New hobbies are fun but sometimes they can feel a little overwhelming. If you are new to sewing and quilting but not sure what you need to really get started I put together a super helpful post with the 10 Must Have Sewing Supplies For The Beginner you should check out. 

Are you looking for a simple beginner sewing or quilting project? I have the best beginner projects just for you! 

This rag strip baby quilt is fun to make and very forgiving especially if you are new to sewing and quilting (check out the full tutorial by clicking on the link below the picture) 


Here is another great beginner quilting project that is super forgiving too! The end result is beautiful and makes for a great gift. I keep a bunch of ready made blank quilted patchwork notecards on hand for those times when I need a simple little gift for a friend or I need to write a short thank you note. 


I love this little Christmas tree quilt block. I used mine to make little Christmas ornaments to give to my sisters as gifts but they could also be used to make a full quilt. Just increase the block size and then sew them together for a full quilt top. This would look nice on a guest bed during the winter!


Happy sewing & quilting my friends. I look forward to your amazing creations. Please share your favorite quilt block ideas with me in the comments. Also, if you have any questions about my Improve Spinners and Hourglass quilt please leave a comment and I will get back to you right away. 


Saturday, December 19, 2020

4 Super Cool STEM Project Kits For Middle Schoolers

Hands on learning can be one of the best ways to inspire, teach and reinforce concepts your child is learning at school. Simple projects that are fun to do make learning seem like...FUN! 


STEM (science, technology, engineering and mathematics) may sound a bit boring to your middle schooler but it doesn't have to be especially when they can make something cool all on their own! 


This post contains affiliate links which means if you click on a link and make a purchase I may receive a small commission at no additional cost to you. For more information please see my Disclaimer page. Thanks!


Don't worry Momma, pulling together some easy STEM learning activities for your middle schooler doesn't require you to be an expert. Even if you don't consider yourself "math-y" or a science gu-ru you can enjoy these cool activities right along with your kid - you might even learn something too! 


Here is a little secret I discovered that helps me introduce STEM projects to my curious middle schooler - monthly subscription boxes! If you have never used a monthly subscription box before let me tell you our experience and encourage you to try one for your child too.


My oldest son gets a monthly STEM kit with a new project every month. The box is full of all the supplies needed to complete the project (except for things like water, if needed). In addition to the supplies there is an easy to follow instruction booklet that walks him step by step through the entire project or experiment. 


He is in 6th grade and is able to build or assemble most monthly projects on his own. The kit usually has a magazine specifically discussing how the STEM project he learned about is useful in everyday life. For example if he builds something with a circuit board then the magazine will highlight how circuit boards are used by engineers or scientists in the "real world". 


The kit always comes with video links for him to watch too so he can observe the project being assembled as well as other video clips to teach more about the specific topic he is learning about that month. 


The monthly kit has become a springboard for my son's curiosity and many times the kit also has some "on your own" experiments he can do in addition to the project he already built with the kit. This is the only time I might have to add a few items to my weekly shopping list so that he can work on the additional projects. 


By now you are probably asking yourself what is the best monthly subscription box to get my middle schooler? The good news is that there are so many options and most subscription box companies offer a one time purchase option so you don’t have to commit to a longer period of time in case the kit isn’t the right “fit” for your child.


I recommend giving a few different companies a try that way your child and you can get a good feel for how projects are presented and what works best for your child. 


I want to share with you my top 3 recommendations for monthly subscription box STEM kits we use for our homeschool and for fun. 


Hopefully this will inspire you to introduce STEM concepts to your children and encourage them to learn something new and exciting!

4 Super Cool STEM Subscription Box Projects For Middle Schoolers


1.    CREATION CRATE (ages 12+)


Build your own Tech! Each project teaches new lessons in electronics and C++ programming. Projects get more challenging as you learn new commands and components.


What You Get: 


All of the electronic kits are going to be different depending on the project, but the 3 main things you will receive are:


  • An UNO R3 microcontroller, which is like a pocket-sized computer (and is also Arduino compatible)

  • Various electronic components

  • Access to online courses

Each kit encourages hands on learning experience with UNO R3 (arduino compatible) Microcontrollers, Breadboards, Piezo Buzzers, Light Emitting Diodes (LED), Ultrasonic Sensors, Accelerometers, 7-Segment Displays, LCD screens, Microphone Modules, Temperature Humidity Sensors, LED Matrix’s, Photoresistors, Buttons, and Jumper Wires.

Whew! Doesn't that sound like an amazing STEM kit? Great for a beginner and just as fun for anyone with some experience too. You won't go wrong with this subscription box.

2. TINKER CRATE (ages 9-16)


These STEM kits help develop learning and inspire the next generation of innovators - your child! All types of learners will benefit and have FUN from the concepts presented in each crate through enriching projects and activities. 


My kids love that each awesome project has a detailed step-by-step blueprint instructions they find easy to follow. The online tutorials contain many tips & tricks to help them along the way too! 


After the main project is completed the Tinker Zine (magazine) has additional science experiments and activities for your child to do. 


3. EUREKA CRATE (ages 14+)


Science + Engineering = Amazing Projects and that is exactly what your child will get each month with the Eureka crate by KiwiCo. This kit will encourage your tween/teen to think about the design and the engineering behind everyday objects and allow them to explore the science principles behind real-world problems. Enspire your young innovator to get busy building their next chapter with creative confidence!


Awesome robot kits for everyone!! This is the perfect robot kit for your middle schooler or high schooler who wants to experiment with robotics. Building and learning with this kit will inspire and encourage your child to go further with robotics.

Three different robots with three different levels of difficulty provide plenty of challenge for your child as they work their way through the curriculum.

STEM Kits - What Is Your Favorite?


I hope you now have some great STEM kit ideas for your middle schooler (or high schooler). These kits make great gift ideas for Christmas or birthdays too! I'd love to hear which kit your middle schooler loves - leave a comment and join the conversation.


Saturday, December 5, 2020

How to Make Round Fabric Coasters - Quick & Easy Sewing Tutorial

Looking for a quick and easy sewing project that is actually useful? Then you should make some fabric coasters a.k.a mug rugs! They are not only cute and cozy but super practical too! 

The best part is they whip up really fast and are easy to make. 


This post contains affiliate links which means if you click on a link and make a purchase I may receive a small commission at no additional cost to you. For more information please see my Disclaimer page. 


Since these coasters are fabric they won't scratch your table and because they are three layers thick, you won't have to worry about those awful rings left behind on your wood table from a sweaty glass. 


The coasters I made are reversible too so you can mix up the fabrics you like to match your room decor. 


This project is perfect for an experienced sewer or a beginner so let's get sewing shall we?


Quick & Easy Fabric Coaster Sewing Tutorial


Supplies Needed:


* home decor or upholstery fabric is a sturdy fabric that is used to cover furniture or to make throw pillows with. Make sure it is cotton so that you can iron it.


Step 1 - We need to create a perfect circle in order to make our circle coasters so the first step is to create a circle template using the paper, pencil and string or yarn. I like the size of my coasters to be about 4" in diameter so that most cups or mugs I use will fit nicely on the coaster. 

We need to make our own homemade compass tool (remember those things from middle & high school!!). To make a perfect circle template tape one end of the yarn to the pencil close to the sharp lead tip end. Then put a mark on the yarn at about 2 1/4" to 2 1/2" from the pencil. Put the marked spot of the yarn in the middle of the paper and hold it down with your finger. Take the pencil, pulling the yarn somewhat taught and trace in a circular motion with the pencil on the paper. Do this all the way round until you have a complete circle pattern. 

Cut out the circle and use this as your template for the fabric.


Step 2 - On the wrong side of fabric piece A of the home decor fabric trace the circle pattern and then cut it out. (The template already has a 1/4" seam allowance built into it). Next make a fabric sandwich (see above picture for example) with the remaining pieces as follows:


bottom layer - piece B home decor fabric right side facing UP

middle layer - piece A home decor fabric (cut into a circle) right side facing DOWN

top layer - cotton flannel fabric


Step 3 - On the wrong side of fabric piece A make two marks that are 1" apart along the outside edge of the circle. This will be the spot you do not sew so that you can turn your coaster inside out! 

Bring your fabric sandwich over to your machine, place the needle at the first mark you made and sew all the way around the circle using a 1/4" seam allowance. Stop sewing when you get to the second mark. You should have a 1" spot that is not sewn. 

Trim the excess fabric all around the sewn circle making sure not to cut through the stitches. Then turn your sewn circle inside out by gently pushing the fabric through the opening.


Step 4 - Gently iron the coaster, tucking the un-sewn opening back towards the inside of the coaster shaping it as you go.


Step 5 - Sew a top stitch all the way around the perimeter of the coaster making sure to sew the 1" opening closed. 


Step 6 - *optional - I like to quilt (sew stitching) all around the entire area of the coaster to give it lots of stability. This is completely optional. From the picture you can see I used a continuous spiral pattern on mine. To do this I just started sewing about 1/4" from the topstitching, turning the coaster as I sewed continuing to sew 1/4" from all stitches the entire way through the coaster until I got to the center. 


If you don't want a swirl pattern you could just sew across the coaster in several different spots too. Let the fabric print inspire you!


Ta-da! You are all done! Wasn't that so quick and easy. Now you can go make a few more. 


Fabric coasters make a great house warming gift, birthday present or Christmas present for that hard to shop for friend or relative. Plus who doesn't love getting a handmade gift?


If you aren't able to make your own fabric coasters you can find some that I made in my Etsy shop Sapucha! I love custom orders too  - so if you don't see a pattern or fabric that you like shoot me a message and we can chat about finding just the right pattern for your needs. 


More Fun & Easy Sewing Tutorials and Projects


Have you caught the sewing bug yet? If you did here are some more easy sewing tutorials I'm sure you will like too:


Remember to PIN This Project For Later - and FOLLOW me on Pinterest for more great tutorials, crafts and DIY's