Friday, October 18, 2019

Preparing For a Family Road Trip: Must Have DIY Travel Binder For Kids With Free Printables


When you think back to some of the road trips you took as a kid, do you remember playing the license plate game or guess what animal I'm thinking of or getting a special snacks at the next gas station pit stop? These are the kind of childhood memories you have treasured forever and want your children to have too! Why not give your little ones the same fun experience on your next road trip and watch their love for travel grow. 


I participate in the Amazon affiliate program which means if you click on an affiliate link and make a purchase I may receive a small commission at no additional cost to you. For more information please see my Disclaimer page. Thanks!


Traveling can throw the whole family out of routine and bring on unplanned challenges that you
don’t normally face at home. Whether you’re traveling by car or plane, you’re often confined to a
small space with little freedom to move around which can be torturous to a young child. Keeping
your kids entertained with a movie, snacks or some screen time on the iPad can only last so long
before they start asking "Are we there yet?"


Custom Travel Binder Kit For Kids


To solve this problem and keep the travel "blahs" to a minimum why not create a travel binder for
each child full of fun and engaging activities they can do while you’re driving or flying. 


An individualized travel binder can easily be customized for each of your kids by age and interests.
If you have a little one that likes to color, add plenty of coloring pages. If your kid enjoys puzzles,
add mazes and word scrambles. With special travel-themed printables, your kids can even track
the details of their trip and record their memories. The travel binder can become a homemade
souvenier for each trip you take!


To get started on your custom travel binder, you’ll need:


Pick which printables will appeal to your kids, print them off, hole punch them and stick them in your
kid’s travel binder before the trip. Keep supplies like pencils, crayons, colored pencils and markers
within arms reach of your child whether they are buckled into the car or airplane. Backpacks, zipper
pencils cases or even a portable kids travel desk are great ways to store supplies. If your child finishes all
the activities on the trip you can give them a reward like a special treat or even a certificate of
completion coupon good for a date with mom/dad or trip to the ice cream parlor.

Your kids will enjoy these so much and will ask you for another travel binder for your next trip.
All you have to do is print and add more to their binder for the next adventure. 


To help you gather up some fun printable activities, check out these travel-themed printables from The Zebra. They created printables for kids from preschool through fifth grade and included some additional resources to fill your binders. It includes pages of tic-tac-toe squares, car coupons, a coloring map, and loads of activities for your kids.

Make sure to grab a few clipboards too so that your child has a hard surface to use when filling out their road-trip printables.

Road Trip Ideas - Fun Places To Visit This Summer

Check out these other posts that include more road trip ideas you won't want to miss out on! Don't forget to Pin for later.

30 Waterfalls You Won't Want To Miss

click HERE to read more

17 Road Signs That Will Crack You UP!

click HERE to read more


12 Kid-Friendly Podcasts To Listen To In The Car

click HERE to read more


Wednesday, October 9, 2019

Age Appropriate Screen Time Guidelines for Kids

Screen time for kids can be a very sensitive topic especially when parents start imposing limits on the amount of daily screen time exposure.


As a mom of four kids I am not immune to this issue which seems to be a regular topic of discussion at our house.

Since my kids' ages range from elementary age to teen there are definitely different screen time limits based on age and maturity level. Of course the younger children don't think this is fair! Which can lead to whining and complaining and sometimes begging for more screen time.

Sound familiar? 

As a parent my job is to care for my children, teach them and help raise them to become healthy (mind, body and spirit) young adults. To do this I have to make decisions about what is best for them, even if they don't like it or agree with my decision. This kind of stuff really makes parenting hard but I know that the long term payoff of a healthy independent young adult is worth it.

This post contains affiliate links which means if you click on a link and make a purchase I may receive a small commission at no additional cost to you. I am a participant in the Amazon affiliate program. For more information please see my disclaimer page. Thanks!

The battle over the amount of screen time will probably never go away since new and more powerful gadgets and gaming systems are constantly being advertised but establishing healthy limits around electronics can protect your children from the dangers too much screen time can have.

Let's start with what I would consider screen time. I want to be clear here because what I may identify as screen time may differ from what you think. In our family screen time or "electronics" includes: tablets, phones, computer, video games and TV. Basically if it runs on electricity (or battery) and has a screen, it is considered a screen time device.

What are healthy screen time boundaries? Should they vary by age? What short and long term impact does screen time have on my child? All great questions, but what is the right answer?

Healthy Media Diet - Age Appropriate Screen Time Guidelines For Kids


I am by no means an expert on this topic however, I am a mom who loves her children dearly and wants what is best for them even if it means imposing solid boundaries to protect them. I did a little research on this issue to see what the experts had to say and feel much more educated and prepared as a parent now. I'd like to share with you what I found so that you too can make an educated decision regarding screen time and your child. 

How Much Is Too Much?

The following tips, published by the American Academy of Pediatrics not only provide advice for parents but an interactive tool to create a family media plan. Here is what the AAP has to say:

* the following excerpt was used with permission from the AAP. To read the entire report click HERE.


Children and Media Tips from the American Academy of Pediatrics


In a world where children are "growing up digital," it's important to help them learn healthy concepts of digital use and citizenship. Parents play an important role in teaching these skills. Here are a few tips from the AAP to help families manage the ever-changing digital landscape.
  • Make your own family media use plan. Media should work for you and within your family values and parenting style. When used thoughtfully and appropriately, media can enhance daily life. But when used inappropriately or without thought, media can displace many important activities such as face-to-face interaction, family-time, outdoor-play, exercise, unplugged downtime and sleep. Make your plan HERE.
  • Treat media as you would any other environment in your child's life. The same parenting guidelines apply in both real and virtual environments. Set limits; kids need and expect them. Know your children's friends, both online and off. Know what platforms, software, and apps your children are using, what sites they are visiting on the web, and what they are doing online.
  • Set limits and encourage playtime. Media use, like all other activities, should have reasonable limits. Unstructured and offline play stimulates creativity. Make unplugged playtime a daily priority, especially for very young children.
  • Screen time shouldn't always be alone time. Co-view, co-play and co-engage with your children when they are using screens - it encourages social interactions, bonding, and learning. Play a video game with your kids. It's a good way to demonstrate good sportsmanship and gaming etiquette. Watch a show with them; you will have the opportunity to introduce and share your own life experiences and perspectives, and guidance. Don't just monitor children online, interact with them - you can understand what they are doing and be a part of it.
  • Be a good role model. Teach and model kindness and good manners online. Because children are great mimics, limit your own media use. In fact, you'll be more available for and connected with your children if you're interacting, hugging and playing with them rather than simply staring at a screen. 
  • Know the value of face-to-face communication. Very young children learn best through two-way communication. Engaging in back-and-forth "talk time" is critical for language development. Conversations can be face-to-face or, if necessary, by video chat with a traveling parent or far-away grandparent. Research has shown that it's that "back-and-forth conversation" that improves language skills—much more so than "passive" listening or one-way interaction with a screen.
  • Limit digital media for your youngest family members. Avoid digital media for toddlers younger than 18 to 24 months other than video chatting. For children 18 to 24 months, watch digital media with them because they learn from watching and talking with you. Limit screen use for preschool children, ages 2 to 5, to just 1 hour a day of high-quality programming. Again co-viewing is best when possible and for young children they learn best when they are re-taught in the real world what they just learned through a screen. So, if Ernie just taught the letter D, you can reiterate this later when you are having dinner or spending time with your child.
  • Create tech-free zones. Keep family mealtimes, other family and social gatherings, and children's bedrooms screen free. Turn off televisions that you aren't watching, because background TV can get in the way of face-to-face time with kids. Recharge devices overnight—outside your child bedroom to help avoid the temptation to use them when they should be sleeping. These changes encourage more family time, healthier eating habits, and better sleep.
  • Don't use technology as an emotional pacifier. Media can be very effective in keeping kids calm and quiet, but it should not be the only way they learn to calm down. Children need to be taught how to identify and handle strong emotions, come up with activities to manage boredom, or calm down through breathing, talking about ways to solve the problem, and finding other strategies for channeling emotions.
  • Apps for kids – do your homework. More than 80,000 apps are labeled as educational, but little research has demonstrated their actual quality. Products pitched as "interactive" should require more than "pushing and swiping." Look to organizations like Common Sense Media (www.commonsensemedia.org) for reviews about age-appropriate apps, games and programs to guide you in making the best choices for your children.
  • It's OK for your teen to be online. Online relationships are part of typical adolescent development. Social media can support teens as they explore and discover more about themselves and their place in the grown-up world. Just be sure your teen is behaving appropriately in both the real and online worlds. Many teens need to be reminded that a platform's privacy settings do not make things actually "private" and that images, thoughts, and behaviors teens share online will instantly become a part of their digital footprint indefinitely. Keep lines of communication open and let them know you're there if they have questions or concerns.
  • Warn children about the importance of privacy and the dangers of predators and sexting. Teens need to know that once content is shared with others, they will not be able to delete or remove it completely and includes texting of inappropriate pictures. They may also not know about or choose not to use privacy settings, and they need to be warned that sex offenders often use social networking, chat rooms, e-mail, and online gaming to contact and exploit children.
  • Remember: Kids will be kids. Kids will make mistakes using media. Try to handle errors with empathy and turn a mistake into a teachable moment. But some indiscretions, such as sexting, bullying, or posting self-harm images, may be a red flag that hints at trouble ahead. Parents must observe carefully their children's behaviors and, if needed, enlist supportive professional help, including the family pediatrician.
Media and digital devices are an integral part of our world today. The benefits of these devices, if used moderately and appropriately, can be great. But, research has shown that face-to-face time with family, friends, and teachers plays a pivotal and even more important role in promoting children's learning and healthy development. Keep the face-to-face up front, and don't let it get lost behind a stream of media and tech. 


Balance Your Child's Online and Offline Lives
Media, like food, must be consumed at a reasonable rate. Creating a healthy media diet will ensure that your children grow up to become responsible adults who know how to use screen time media in an appropriate and balanced manner. 
Make sure to offer your child alternative options that are fun and active so they have multiple choices. Drastic changes to their media diet can be tough on a kid so be patient and let them try out new activities or new places to visit like a local park. 


click HERE to access the checklist


Now that you have a plan why not share that plan with your child with a printable screentime checklist. Sunny Day Family is offering a FREE editable screentime checklist that you can customize to fit your family's rules. Make sure to post it somewhere that your kids will be able to see as a great reminder to them what rules you have established for screentime. 


Friday, October 4, 2019

The Best Halloween Games, Crafts & Candy Free Treats For Kids

Don't let the scary Halloween ghouls and ghosts scare you away from having some fun with your kids this year.  A "fright free" Halloween can be enjoyed by kids of all ages.


If you are looking for some fun Halloween activities for your youngster you have come to the right place! You won't find any scary monsters here but you will find fun Halloween themed crafts, a challenging scavenger hunt, some tasty treats and many more ideas for your family to enjoy together.

This post contains affiliate links which means if you click on a link and make a purchase I may receive a small commission at no additional cost to you. For more information please see my disclaimer page. Thanks!

Fun But Not Scary Halloween Activities & Treats For Kids


HALLOWEEN GAMES

Halloween Scavenger Hunt


Everyone loves a fun (and not spooky) Halloween scavenger hunt! The best part about this cool Halloween Scavenger Hunt from Sunny Day Family is that all the work is done for you  - all you have to do is print, cut and play! The Halloween Scavenger Hunt set comes with 4 total pages - there are 12 pre-printed clues plus instructions. There is also a page of blank cards for you to create your own custom adventure if you'd like. (click HERE to purchase your own pre-made Halloween Scavenger Hunt)


Mummy challenge


Divide your family or group into teams (3-4 people per team). Give each team a roll of toilet paper. Select one person per team to be the mummy. The rest of the teammates take turns wrapping the mummy up with toilet paper. The team with the beat mummy after 2 minutes wins the challenge.


Pumpkin Ring Toss


Toss rings onto the stems of several pumpkins. The person who gets the most rings on the pumpkin stems within 2 minutes wins. Check out the full tutorial here. (for plastic ring toss rings click HERE)

Pumpkin Memory Game
You will need 12 orange paper plates or if you can't find orange plates either paint or color plain paper plates orange. Using black paint or black construction paper create 6 matching sets of pumpkin faces. Glue on the faces or paint on the faces to the orange plates. Mix up the plates and lay them face down in a random order. Take turns trying to find matching faces. When a match is found remove it from the game. 

The winner is the person with the most matching plates. The complete tutorial can be found at Simple Play Ideas. 

Lollipop Ghost Hunt


Supplies needed: package of lollipop suckers, white tissue paper or white Kleenex, clear tape, black marker.

Hold a lollipop sucker, candy side down in the middle of a tissue. Gather the tissue around the sucker so that the round part is completely covered. Wrap a piece of tape securely around the tissue just under the sucker so that the sucker doesn't fall out. Draw eyes and a mouth on each ghost. 

Secretly hide the ghosts around your house and let the kids find them. Finders keepers!


HALLOWEEN CRAFTS

Mini Marshmallow Ghost Poppers


For this craft you will need white paper cups, large balloons, sharper markers, white cardstock (optional), hot glue and hot glue gun and mini marshmallows. 

Find the full tutorial and video instructions at The Craft Train. Either pom-poms or mini marshmallows can be used in these fun poppers! Pull down on the balloon and let the fun fly!!

Paint A Pumpkin


Supplies needed: mini pumpkins, tempra or acrylic craft paint, plastic place mats, paintbrushes, small cups or bowls of water, paper towels.

Gather enough mini pumpkins (small orange gourds) for each person to have their own. Using tempra or acrylic paint let your children paint anything they want on their mini pumpkin. You might want to suggest the drip painting method and see how colors mix as the colors run together down the pumpkin. Make sure you put the pumpkins on top of a plastic place mats so you don't get paint on any surfaces that shouldn't be painted.

For a step by step tutorial visit Glued to My Crafts blog! 

Spooky Spider Web
Supplies needed: Popsicle sticks, white or silver acrylic craft paint, paint brush, hot glue and glue gun, 6-8' of orange, black or white yarn, mini plastic spiders.

For a complete tutorial on how to make these amazing Popsicle stick spider webs go to Consumer Crafts Blog


HALLOWEEN TREATS


Candy Corn Krispie Treats


via: Pint Sized Treasures

Everyone loves Krispie treats! They whip up super fast and look amazing especially when dipped in chocolate. Cut the treats into triangle shapes to resemble the shape of candy corn then dip the tips of the triangle into melted white chocolate and the bottom into melted milk chocolate to make these party favorites. 

Vampire Donuts


via: Sisterhood Of The Sensible Moms

Here is another Halloween treat that is perfect when you are short on time and need a treat for the kiddos. These little monsters can be put together in less than 10 minutes and turn out super cute and taste great! The bonus is that each child can have their own set of vampire teeth to take home with them. You can find a great pack of vampire teeth HERE.

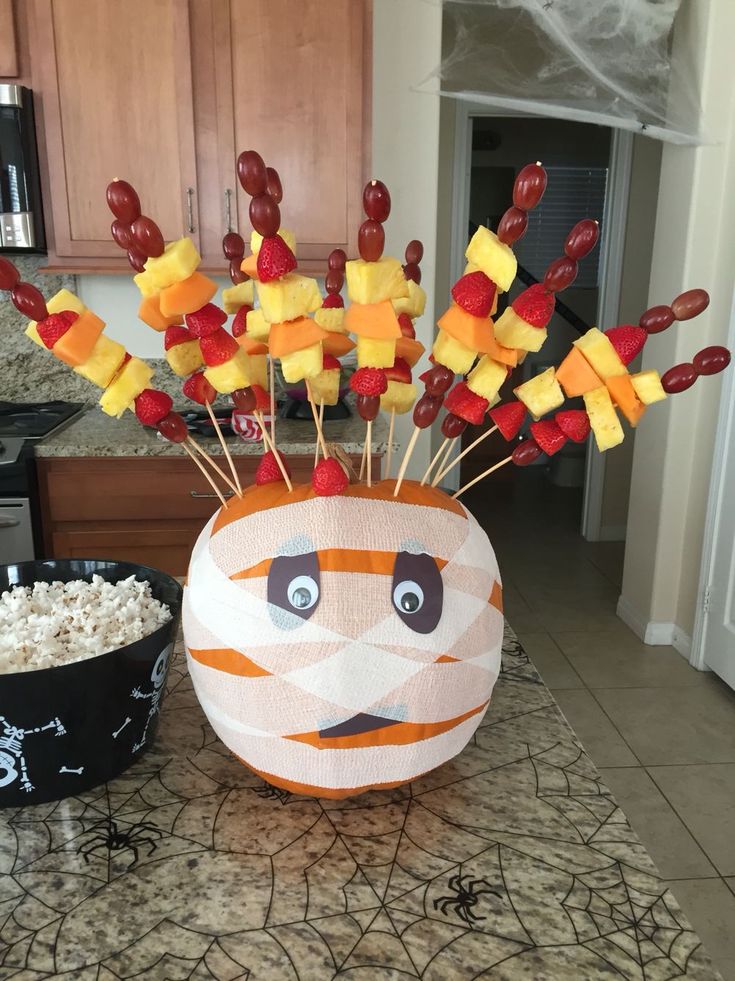
Fruit Kabobs


Halloween is always packed with sweets and candy and it can be hard to sneak a healthy treat in but I think these fruit kabobs are sure to get kids eating at least one healthy snack!

Decorate a medium to small size pumpkin by wrapping crepe paper around it to look like a mummy. Draw eyes and a mouth on the crepe paper or cut out eye shapes from black and white construction paper and attach to the pumpkin's front face area and you are all done decorating it.

Next grab 20-30 wooden skewers (find some here) and begin sliding red and green grapes in an alternating pattern onto the wood skewer. Top the end with a strawberry. Push the sharp point of the skewer into the top of the pumpkin and continue filling in the top with more fruit kabob skewers. 

click HERE for the Halloween Planner

Before you go I wanted to show you this great Halloween Party Planner and Halloween Coupon Book. If you struggle with keeping holiday activities, snacks, costumes and all the other busyness that comes with holiday celebrations this printable planner is a must-have! Don't be that mom who is rushing to the grocery store at 5pm on October 31 to buy Halloween candy or costumes - plan ahead to keep your sanity. 


The Halloween coupon book is a terrific bonus that comes with the planner. The coupons can be customized so you can make them specific for each child. Use them as special rewards for your child for a special treat like date with mom or dad! This is a great sweet free treat that won't disappoint. 


Happy Fun (and not scary) Halloween!


Thursday, September 19, 2019

What To Do If Your Child Has Lice

Has your child been scratching their head A LOT and complaining that their head feels itchy? Chances are if your child has a consistently itchy head they might have a case of head lice. 

LICE! 

Don't panic - take a deep breath and know that you can and will overcome this. 


As you read this I'm sure you're fighting the urge to rip off bedding, wash EVERYTHING, vacuum and clean the house until it shines all while scheduling your child for an expensive trip to the local salon for a lice treatment. Or maybe you sent your husband out to buy every single louse removal product your local drugstore carries. 

I know that this was my first reaction the first time one of my kids got lice. Unfortunately, I was one of those parents who did do many of these things which only left me exhausted and frustrated, wondering when our lice problem would go away. After calming down and doing a little research I learned a lot about how to fight a lice infestation and began approaching it in a much more effective way. (I'm sure my washing machine is thankful!) 

If you find yourself in these same shoes here are a few tips and tricks I want to share with you so you don't freak out and can fight lice the right way. 

Lice love a warm hairy head and can't survive for very long away from this environment which is why cleaning like crazy is not necessary. If you must clean I recommend vacuuming the bedroom where the person sleeps and then throwing their pillow or special stuffed animals that sleep near their head into the dryer on hot for about 15-30 minutes. The hot air will kill any bugs or nits quickly. 

It's also a good idea to sanitize hairbrushes and combs too. To do this boil a pan of water then dip the brush and combs into the boiling water for a few seconds. Or you could put the brush and comb in a Ziploc bag, seal it, and put it in the freezer for 24 hours. Both methods are quite effective. 

Recommended Tools & Expert Advice

One of the best websites I found that educated me about lice and helped me to fight head lice is The Nice Lice Lady. Because she has 14 years of experience removing lice and was able to explain her process so clearly, I felt confident that I too could win the battle against lice. She recommends wet combing which requires a good lice comb and a cheap bottle of conditioner to start the process of removing any lice bugs and nits. The Nice Lice Lady reassured me that I wouldn't have to spend a lot of money to conquer this problem and all I needed were some simple supplies and a little perseverance.


This is my favorite lice comb. Find it HERE


Nits are the eggs that the lice lay on a strand of hair. They are tiny (like a single grain of salt), white, and glued onto the strand of hair by the adult lice bug. If you find a lice bug they are dark in color with six legs that stick out towards the front of its body by its head. They have an oval/elongated body.

Stop The Stereotyping

Unfortunately, head lice carry a negative stereotype in our culture because everyone assumes only dirty (unclean) people get lice. Let me correct the lie right now and tell you that anyone - rich, poor, clean, dirty, old, or young can get lice! Lice prefer a clean head of hair however it doesn't mean you can't get lice if you use hair products. 

Don't let lice define you or your child. Recently while "nit-picking" through my daughter's hair with the lice comb I mumbled under my breath "how gross it was". I was not calling her gross at all, just the lice. She heard me mumble and reminded me that "Yes, the bugs are gross but I am not gross". I am so glad that her identity and how she sees herself was not changed or defined by the lice crawling in her hair. It was just a temporary condition and she understood that with some hard work she would be lice-free soon. She is the same sweet, creative and fun young girl she was before lice even entered her universe. Needless to say, I was still so proud of her! 

The process of completely eliminating the lice from her hair has been a tedious one due to the numerous wet comings and nit picking but it has allowed me to spend a lot of one on one time with her which has been a true blessing. You don't just get lice overnight and like the Nice Lice Lady says "beating it will require an intentional but manageable effort over the next few weeks". Lice removal is a marathon and not a sprint - keep going, you can do this!

Here are the methods I followed to rid my daughter's head of lice and nits. I hope this method works well for you too.

How To Get Rid Of Lice

  1. Wet your child's head and hair completely. I had my daughter hold her head under the kitchen sink while I used the sprayer to spray all of her hair. Ring out hair so it isn't dripping wet. 
  2. Begin massaging conditioner (cheapest bottle you can find) throughout the hair making sure to get the roots. Comb hair out gently to get out all of the tangles.
  3. Section off the hair into manageable sections. I use a few large hair clips to hold sections together while I work one section at a time. Be thorough and don't miss any sections.
  4. Grab your lice comb, and pick a section of hair to begin combing through. I suggest starting with a small portion of the section you choose and working through one section bit by bit. 
  5. Regularly wipe or rinse your lice comb off on a tissue or towel especially if you are combing out lice bugs. I found it helpful to rinse the lice comb regularly so that the conditioner doesn't build up and drip all over the comb. 
  6. Keep combing and combing until each section is combed out. 
  7. If there are a lot of lice and nits you may have to comb out your child's hair more often possibly daily until you see a drastic reduction in bugs. I have found it best to comb out my child's hair every other day unless she is really itchy - that's when I know a comb-out needs to be done ASAP.


You will want to do the comb out in a well-lit area or grab a light that you can shine near the hair sections you are working on - those little nits are tiny and can be hard to see!

Commit to doing a full head wet coming at least every other day for about 2 full weeks until you don't see any nits or bugs. If you find a nit after the 2 weeks start over and continue the wet combing schedule. 

I know this may seem a bit overwhelming and time-consuming but don't panic it is totally doable and manageable. For more tips and detailed instructions on how to comb properly please visit The Nice Lice Lady's blog. There are so many useful tips and advice to help you win this battle!

Has your family battled lice? Maybe you are in the middle of the battle as you read this - please feel free to reach out if you need a little encouragement! 

Wednesday, August 28, 2019

How To Teach Your Child About Money Using Fun and Easy Games

Do you ever wonder when the right time to teach your children about money is? It might seem like a daunting task but rest assured taking a gradual, age appropriate path will make talking about money much easier for both of you.


This post contains affiliate links which means if you click on a link and make a purchase I may make a small commission at no additional cost to you. For more information please read my disclaimer page. Thanks!

Taking cues from your curious child is a great way to know when to start having conversations and teaching them about money. Years ago when my oldest was only 5 we were all in the car heading to a minor league baseball game. Before heading to the ball field my husband made a quick stop at the ATM to get a little cash for the evening out. From the back seat my little girls shouts "Daddy, when can I go to the money store?"

My husband glanced over at me with a confused look asking, "Money store?"

Then realization hit - oh, she means the bank! This curious child thought that the bank was a money store and she wanted to get some money, just like daddy from the money store. Of course at age 5 she had no idea that this really isn't an actual store but it did give us a little motivation to begin teaching her about money, banking, saving and giving. 

The time was right and she was ready.


FUN AND EASY GAMES TO TEACH KIDS ABOUT MONEY


-SORTING
Since her attention span at this age was short, and her understanding of money was limited we had to start from scratch and begin with the basics. Introducing her to coins and paper money (the real kind not the fake play kind) was the first step. We gathered up piles of different coins and encouraged her to sort them, study them and discuss with us what she observed about the different coins. This was fun and to her it was a game she loved to play.

-COUNTING
After she had finished sorting the coins I encouraged her to count them. We started with pennies since each penny is worth 1 cent. Introducing the word "cent" to her was the beginning of learning the value or worth of money.

Since she was in kindergarten and almost ready for first grade skip counting was an important math skill I had been teaching her. Skip counting with nickels and then dimes is also a fun way to learn how to count and associate the value or worth of different coins.

Our skip count game involved a lot of physical activity on her part. Sitting still for long periods of time was boring to her and she struggled to learn while fighting the urge to move. I came up with a skip counting hopping game that kept her interest long enough for her to learn how to skip count by 5's and 10's. Let me tell you how we played it!


SKIP COUNTING GAME - BY 5's & 10's

Supplies:


To teach skip counting by 5's start with two sets of different colored sticky notes. The colors help visually remind the child that every other number when skip counting by 5's will have a "5" at the end of the number. (i.e. 5, 15, 25...)

Start by writing the number 0 on the first blue sticky note. Now use the orange colored sticky note and write a number 5 on it. Continue alternating between the blue and orange sticky notes making sure all the orange sticky notes are the numbers that include the 5 in them (i.e. 5, 15, 25, 35...) and the blue sticky notes have the 0's on them (i.e. 0, 10, 20, 30...). I recommend going to 100 since 100 cents is the value of $1 which you can introduce later after they have figured out skip counting.

Now that the sticky notes are all labeled pick an open area in your home and place the sticky notes, in order and spread out, to make a path. 

Have your child start at the number 0, say "zero cents" then hop to the sticky note that should have a "5" on it. The child should say the number and hop to the next sticky note repeating this as they go along all the way to 100 cents.

The more twisty and long the path is the more fun it is for the child! Be creative and let your kiddo have fun.

Once they get the hang of the skip counting by fives you can remove the sticky notes with 5's on them and you are left with all the 10's (10, 20, 30...). Repeat the game with the 10's until they have learned how to skip count by 10's. They will probably have to leap further now since half of the sticky note path is gone! Challenge them to see how far they can jump with these bigger gaps!

-COUNTING WITH REAL COINS
After your child has practiced their skip counting and has it learned and memorized it is time to use the real coins to count by 5's and 10's. Grab twenty nickels, lay them out in a row and have your child skip count by fives as you point to each coin along the row. Repeat this with dimes having your child skip count by tens.  Remember to say the word "cents" after each number in order to reinforce teaching the value of money. We want the child to learn the value of the coins as they skip count.

Don't panic if this whole skip counting concept takes your child awhile to learn and understand. Repetitive play is an effective tool for teaching your child. Have fun with this and let them enjoy different games like sorting, the skip counting hopping game (above) and using real coins.

-COUNTING QUARTERS
Mastering pennies, nickels and dimes is a must before introducing quarters. By now your child should be able to visually distinguish between pennies, nickels and dimes and count them properly. It's now time to move to the next coin, the quarter! A quick trip to your bank to get a roll of quarters is all you need to start teaching your child about quarters. 

To begin encourage your child to explore the shape, size and pictures stamped onto a quarter. Ask questions that require them to compare pennies, nickels and dimes to the quarter. 

  • Can you put the coins in order of size?
  • Which coin(s) have ribbing along the outside edge?
  • Which coin(s) have a person's picture on the front?
  • Which coin(s) are the same color?


PIGGY BANK GAME

A game my children liked to play as they learned how to skip count by 25's was what we called the "Piggy Bank Game". This is super simple, repetitive and still lots of fun! All you need is a piggy bank and your roll of quarters. I start off my modeling them game and playing it myself which consists of me dropping quarters into the bank one at a time and saying "25 cents, 50 cents, 75 cents, 100 cents". Let your child start dropping coins into the piggy bank while they repeat skip counting using up the rest of the roll of quarters. Empty the piggy bank and let them do it again. 


TALKING ABOUT MONEY - START WITH THE BASICS

In addition to teaching your child how to count money, talking to them about where money comes from, how we get money and why we need money are some very important basic questions you should discuss with your child. To get this conversation started Wikibuy.com has provided these amazing FREE conversation starter cards for you to print and use. Keep reading to get all 56 free printable conversation starters! 

click here for FREE printable

Some basic sample questions include:

  • What does money do?
  • Can you get anything you want with money?
  • Why do we need money?


WHAT MAKES A DOLLAR?

So your child has mastered skip counting by 5's, 10's and 25 all the way to 100! Congratulations, they have just mastered a very big step in learning the value of money!! 

Introducing the dollar can be somewhat confusing at first but don't worry they will catch on quickly. Before you grab a new crisp one dollar bill, get your coins back out making sure to have $1 worth of pennies, $1 in nickels, $1 in dimes and $1 in quarters. Let your child pile the like coins in neat stacks, if they can, next to the other like coins so you can discuss and compare what $1 looks like. 

My kids always had a hard time comparing the small stack of 4 quarters with the big stack of 100 pennies. At first when I ask which pile is worth more they always got stuck because visually the penny stack looks like more! 

After your child is done comparing stacks of different coins that all equal $1 in value it is time to grab that crisp $1 bill and lay it next to the four separate stacks of coins. Explain that this too equals one dollar and that all of the piles equal the same value even though the quantity of each pile is different. Discuss why people prefer to carry paper money over coins (weight!). 

One of my sons learned this lesson first hand! He liked to bring his own money to his dad's softball games so he could buy a treat at the concession stand. He would stuff his pockets full of coins to the point of the coins just about spilling out. As he walked the weight of the coins would cause his pants to start falling down. He would hike up his pants only to find that they kept slipping down due to the weight of all of those coins. It was such a funny sight to watch him walk around the ball park with his heavy coin stuffed pockets hiking up his pants every so often!


TALKING ABOUT MONEY - MAKING MONEY FOR KIDS

At some point in your child's life they will begin to ask you for ideas or jobs they can do to make some of their own money. They know that your job as their parent is to provide for their basic needs but what about those fun "wants" or desire to buy something for themselves - how do they go about earning money so they can buy their own stuff? Now is a great time to teach your child about work! Instilling a strong work ethic so they know that starting and finishing a job and doing it well is very important and if they don't complete it they won't get paid! 


link to FREE printable

Check out these FREE printable conversation prompts from Wikibuys.com that takes the next step in the money discussion with your child. 

Questions like:

  • Why do we need to make money?
  • What are some ways you can earn money?
  • How much money do you want to make in one day?


TALKING ABOUT MONEY - SAVING, SPENDING, BUDGETING AND FINANCIAL CONCEPTS

There is no right or wrong age to begin talking to your child about these financial concepts. Introducing financial vocabulary to a young child is a start even though they don't understand the concept - yet. Talk opening with your spouse about how much your family budgets each week for your necessities like groceries, gas or other expenditures. If an unplanned event or opportunity presents itself don't be afraid to discuss with your child that you may have to skip it this time since it wasn't budgeted for or let them know that money has been budgeted for and set aside so you can take part in these unplanned experiences. Either way you are teaching your child how money is managed properly in the real world. 

Here are some more great conversation starter tools you can print and use to teach your child about saving, spending, budgeting and more financial concepts. 


click for FREE printable


Some sample questions include:

  • What is a budget?
  • What does it mean to "spend within your means"?
  • What is one thing you regret spending money on?
  • What is a loan?
  • What are taxes?

My hope is that by starting the conversation early, introducing financial vocabulary to your young child and teaching them how to count and use money, your child will become a financially responsible young adult in the future!


Free Printable

Wondering how you, as a parent, can invest in your child's future? Check out this post for Four Ways You Can Invest in Your Child's Future That Won't Cost You Money!

click HERE to read more...


Please follow my blog so you don't miss out on more great parenting tips and tricks! Parenting is hard - let's navigate it together.