Sunday, November 15, 2020

Easy DIY Gnome Christmas Ornament

Making Christmas crafts for fun or for giving as gifts is one of my favorite ways to celebrate during the holiday season. Today I'm going to show you how to make a Gnome Christmas ornament that is super simple, perfect for teens and tweens, and takes only about thirty minutes to make. 

I love these little guys! Don't they look like grumpy old men? Or maybe ZZ Top dressed for Christmas?  So adorable, right? 


This post contains affiliate links which means if you click on a link and make a purchase I may receive a small commission at no additional cost to you. For more information please see my Disclaimer page. Thanks!


The supplies you need for this craft are mostly found around your home but if you don't have them on hand a quick trip to the craft store (or one day shipping from Amazon) will provide you with all that is needed. 


Let's get started making this craft shall we?


Easy DIY Gnome Christmas Ornament


Supply List:

You will need to gather the following supplies to make a gnome ornament:


(Here is the faux fur I love using to make these gnomes)

Step One:
Cut the cardboard into a triangle that is roughly 2" per size and about 3" along the bottom. Don't worry if you aren't exact these are super forgiving! 


Step Two:
Lay the cardboard triangle on top of the piece of felt or fabric. Cut the fabric about 1/2" wider than the triangle all around. Fold the fabric over the cardboard and hot glue it down, tucking the corners in as you go. 


Step Three:
Flip the fabric-covered triangle over and hot glue any trim you want to in order to make the little gnome's hat decorative. I chose ric-rac and lace trim for mine! Add a pom-pom to the top of his little hat too if you choose. Make sure to wrap the edge of the trim to the backside of the had and glue it down. 


Step Four:
Turn the gnome hat so the back is facing up. Cut the faux fir piece to fit the length of the hat's brim (bottom edge). I liked to shape the beard before gluing it down but you could trim the shape after gluing - it is up to you. Place a thick line of hot glue along the bottom back edge of the hat then press the faux fir, right side facing down, onto the glue. 


Step Five:
Cut a small piece of fabric just smaller than the gnome's hat and glue it down over the back of the hat to hide the folded fabric and back of the gnome's beard. This step is optional however it does give the gnome a more finished look. 


Step Six:
Next cut a piece of yarn or thin twine about 5-6" long. Fold it in half and tie a knot where the two ends meet. Glue it to the top backside of the gnome's hat. This little loop can be used to hang the ornament.


Step Seven:
Flip the gnome over and put a bead of blue on the faux fir at the center of the hat's brim and press the pink pom-pom into the glue to make his nose. 


You are all done! See, wasn't that easy? Now go make a whole little family of gnomes! 


Easy DIY Christmas Crafts To Make This Year


If you loved making the little gnome crafts I think you are going to love these other Christmas-themed craft projects too. Click on the link to find the full tutorial.


Whew, that's a lot of Christmas crafting projects, isn't it? Share with me your Christmas craft projects in the comments! 

Make sure to PIN this tutorial and follow me on Pinterest to see more great holiday crafts. I post all of my craft tutorials on Pinterest.

Thursday, November 5, 2020

10 Creative Ways to Display A Quilt

Quilts are a work of art worthy to be proudly displayed in your home. Whether you are a maker of quilts or a receiver of a lovely handmade quilt, I think you will agree that a quilt is a beautiful thing. 


Quilters pour their hearts and souls into each quilt they make no matter the size. Each quilt is unique and one of a kind which is what makes them so special. Don't you want to display your quilts rather than stuff them into your linen closet! 


This post contains affiliate links which means if you click on a link and make a purchase I may receive a small commission at no additional cost to you. For more information please see my Disclaimer page. Thanks!


But how do you display a handmade quilt?


I've put together a great list of ideas I hope will be helpful to you as you decide the best way to display your quilt or quilts. Check them out! Also, be sure to pin this post so you can refer back to it and make sure to follow me so you don't miss any future posts.


10 Creative Ways To Display A Quilt


1 - Quilt Ladder

Hanging a few quilts from the rungs of a ladder is a popular way to display quilts or blankets. Quilt ladders look great and are practical too, making it easy for anyone to take a quilt off of the ladder, snuggle up with it while watching their favorite show or reading a good book then neatly folding it and putting it back on the ladder rung when they are done using it. 

A quilt ladder is the perfect addition to a guest room or family room providing something beautiful to look at that is totally functional too! 


via: blue is bleu


2 - Modern Quilt Rack        

This quilt rack designed and built by Ana White serves two purposes - first as a quilt rack and secondly as a functional piece of furniture to put drinks on, decor or serve as a entry way catchall. 

Are you a DIY'er? If so you are going to love that this amazing modern quilt rack from Ana White.com comes with complete plans to build your own any costs next to nothing to make! 


via: Ana White


3 - Reclaimed Window Quilt Display

I love finding new ways to use old things like old windows. Using an old window to display a mini quilt or a large quilt block is one way to breathe new life back into it. I'm sure you could easily find an old window at a garage sale or salvage yard, clean it up and use it as a quilt display. You can even change out the quilts for different holidays and seasons too!

Check out this amazing quilt display idea from Carried Away Quilting! I love how she used a wide piece of neutral colored fabric to wrap around the length of the window frame and then clipped mini quilts to the fabric. 


via: Carried Away Quilting


4 - Hanging Quilt Headboard

Using a quilt as a headboard in a guest room or even a child's room is a wonderful way to display a quilt. All you need to do is mount a drapery rod and then hang the quilt over it. For full instructions on how to do this check out Good Housekeeping.com.


via: Good Housekeeping

5 - Quilt Cabinet        

There are so many different options of quilt cabinets that all come with varying price points. If you are looking for an economical budget friendly option how about turning an old gun cabinet into a quilt cabinet? Home Comfort and Love did exactly that and now uses the old gun cabinet as a great place to display quilts made by her grandmother and great grandmother. 


via: Home Comfort and Love


6 -  Quilt Table Topper

I love the idea of displaying a quilt as a table topper. I don't mean using the quilt as a table cloth but rather as a topper when you aren't using your kitchen table. If you have a formal dining room that you don't use often but have a dining table in it this would be a perfect way to display a quilt! 


via: Bear Creek Quilting Company


7 - Quilt Hanger Mounted On A Wall

This is one of my favorite ideas of creative ways to display a quilt. A quilt hanger mounted to any wall instantly turns the your quilt into a piece of wall art! This is a perfect idea for that hard to decorate small wall in any room of your house.


via: Lisa Bongean / Primitive Gatherings


8 - Quilts In A Basket

Fold your quilt in half and roll it up then tuck it into an antique basket, tin tub or even an old milk crock. By rolling the quilt it allows for you to see some of the beautiful colors and patterns on the quilt. This kind of display would look lovely next to a fireplace or in a reading nook. My favorite is this extra large woven basket


9 - Coat Rack Quilt Display

Coat racks can be used for more than coats. Mount a rustic (or modern) coat rack on any wall and hang your favorite handmade quilts from the hooks. I love how this display gives your wall a pop of color and texture through a variety of quilts. 


10 -  Quilt Frame TV Cover

Having the option to "hide" your wall mounted TV when not in use might seem appealing especially if the TV doesn't quite fit with your room's decor. A quilt frame TV cover is the perfect solution to temporarily covering your TV when not in use. Guess what? You can make your own for next to nothing easily! Full instructions can be found at House Louise. 


via: House Louise


Beginner Quilt Project


If you are new to quilting I have a great tutorial for a simple starter quilt called a rag strip quilt I know you can make! Once you build your confidence you can start working your way into some more difficult quilt blocks. Quilting is such a rewarding and satisfying craft. I find it relaxes me and lets me express myself in an artistic and practical way. 

Another great way to expose yourself to new quilt blocks to try without having to do all the leg work yourself like matching fabric is to subscribe to a monthly quilt club. Annie's Creative Quilter's Fabric Club sends you a fully stocked kit each month with step-by-step instructions, video links, fabric and patterns so all you have to do is start sewing. Here are some fabulous projects they offer through their monthly quilting kit club that I think are so amazing!


Annie's Creative Quilter's Fabric Club


Annie's Creative Quilter's Fabric Club


Helpful Supplies For The Beginner

There are some must have supplies every quilter (and sewer) needs to get started. I put together a post on must have supplies for the beginning sewer that I think applies, for the most part, to a beginning quilter. I hope this is helpful for you as you get started quilting and sewing. I know this list was helpful when I first started out!


Read More Here


Cut Time, Quilt More


Friday, October 23, 2020

Awesome Magic Paper Towel Trick

My kids just love a good magic trick, especially ones that they can do over and over. This magic paper towel trick is the perfect activity to do with kids of any age! Even my teen daughter a gave it a try and loved it too. 


This post contains affiliate links which means if you click on a link and make a purchase I may receive a small commission at no additional cost to you. For more information please see my Disclaimer page. Thanks.


This is by far the easiest magic trick to do and requires no pre-planning to pull it together. A few simple supplies, which you probably already have at home is all you need. 

Here are the supplies you need in order to do this super fun paper towel magic trick:


Awesome Magic Paper Towel Trick


Here is how to start making the magic paper towels. First, take one sheet of paper towel and fold it in half. Draw a shape or design on the top layer of the paper towel. Press the marker firmly so some of the color bleeds through to the second layer beneath it. Open up the paper towel and fill in the area outlined by the marker that bled through. See my pictures and video for some creative ideas and inspiration. 


Fill the plastic container or Pyrex dish with about an inch of water and set it on a hard flat surface like a kitchen table or countertop. 

Next, take the decorated paper towel keeping it folded in half with the outlined side facing up and set it into the water. Now watch the "magic" happen as the water soaks the paper towel revealing the hidden colors and pictures on the underneath layer.


This trick could be considered a combination science project meets art lesson too if you are using it in your homeschool activities like we did. Here are some educational ideas and questions you could introduce for the science and art lessons related to the magic trick:

1. What happens to the colors if you change the temperature of the water? Does warm or cold water make the colors 
mix faster or slower?

2. What are primary and secondary colors? What happens when certain primary colors mix together in the water? Do you see any new colors?

3. Practice reading sight words by writing one or two letters on the top layer and the rest of the letters to the word on the second layer. Encourage your child to read the word once it is magically revealed. 

Inspiring Idea - Spiderweb & Spider/Bug


My kids absolutely loved this project and I know yours will too. Now it's your turn - leave a comment to tell me what type of drawings your family did! I cant wait to hear all about the fun your kids had with this project. 

Check back soon or follow me here so you don't miss any fun projects!


Looking for more fun & simple activities for kids? Check out these super easy, super fun and super exciting projects your kids will love!

Wednesday, October 21, 2020

15 Of Our Favorite Christmas Cookie Recipes

Nothing puts me in the Christmas mood more than holiday baking. The spicy smell of gingerbread, the sweet aroma of warm cinnamon rolls and other delicious holiday cookies freshly baked from the oven leaves me drooling and fully in the holiday spirit.  


Every family has their own traditional Christmas cookies they love and make each year. My mom always makes cherry biscotti and rugulach (what even is rugulach? - see below for a great recipe) at Christmas which is something the whole family looks forward to! 

Years ago I started a holiday cookie tradition with my kids we call Christmas cookie decorating day where we make and decorate gingerbread and sugar cookies cut into Christmas themed shapes. The kids divvy up the cookies and give them to friends and family as a pre-Christmas gift to help get everyone in the holiday spirit. They love this tradition and they love the cookies too! 

I thought it would be fun to share some of the best Christmas cookie recipes with you! Hopefully you feel inspired to make a few new kinds of Christmas cookies this year! 


This post contains affiliate links which means if you click on a link and make a purchase I may receive a small commission at no additional cost to you. For more information please see my Disclaimer page. Thanks!


Don't forget to Pin this post for later as well as follow me on Pinterest to see more great recipes and holiday crafts! 


15 of The Best Christmas Cookie Recipes for the Holidays


1. Gingerbread Cookies

Gingerbread cookies just HAD to be the first cookie I listed here because are the "poster boy" of Christmas cookies! Gingerbread is such a versatile cookie, baked into soft chewy round cookies, or cut into gingerbread men shapes or even made into a gingerbread house iced together and decorated to display as holiday decor. 

If you like a little spice in your cookies gingerbread is sure to please your taste buds as the spicy ginger mixes with the sweet molasses and sugar. Aline from Madeleine Kitchen does an excellent job teaching how to make perfect gingerbread cookies. She even includes some tips on how to use icing so your cookies look top-notch. Don't worry if you can't get them to look professionally perfect because I guarantee they won't last long anyway! 


Madeleine Kitchen


2. Thumbprint Cookies

If you haven't had a thumbprint cookie yet let me encourage you to try them - soon! Buttery shortbread cookie filled with a sweet fruity jam finished with an almond glaze make these cookies a special treat especially during the holidays. My husband's grandma makes these every year and they are always the first cookies gone from her cookie tray. Their fruit filled centers look so festive and inviting it is hard to eat just one. Jaclyn from Cooking Classy shares an amazing recipe for her raspberry thumbprint cookies on her blog that I highly recommend. 


Cooking Classy

3.  Peanut Butter Buckeye Balls

This no-bake cookie is a holiday favorite made with rich, creamy peanut butter balls dipped in chocolate. This is a great cookie to make with kids because they can help roll the peanut butter centers into the ball shapes. To make them extra festive sprinkle Christmas colored sprinkles onto them after you dip them in chocolate. These cookies make a great gift to bring to a friend or for a holiday cookie exchange! Follow this great recipe by Dinner at the Zoo.


Dinner at the Zoo


4. Classic Sugar Cookie

To make sugar cookies holiday ready you must have Christmas cookie cutters! I've accumulated quite a collection of Christmas cookies cutters but my son's favorite are the ninja gingerbread men! My girls prefer the Christmas tree cookie cutter because they love decorating each one differently. This is my go-to sugar cookie recipe from JoyFoodSunshine.com because it whips up fast and always tastes great.  If you don't like store bought frosting this recipe also includes a homemade version that is so yummy too! To color your frosting I highly recommend using food coloring gel instead of the liquid food coloring. The colors are more vibrant and gel isn't quite as messy as the liquid.


JoyFoodSunshine.com


5. Rugulach

Rugulach is a Yiddish word that means "little twists" and this sweet twisted cookie is hard to resist! The hardest part about this cookie recipe is choosing what flavor to use - fig, walnut, raspberry, apricot or chocolate. This cookie has several names so don't be surprised if you see them called butter horns too spelled rugula. Rugulach freezes well too so if you have some extra, which I doubt will happen, you can always pop them into an airtight container and freeze them until you get your next rugulach craving. Sally's Baking Addiction has the best recipe with TONS of pictures to follow along as you make your own cookies.  

Sally's Baking Addiction


6.  Santa's Snowball Cookies

These cookies go by several different names like Mexican wedding cookies or Russian tea cakes but what they all have in common is that they are all rolled in a coating of powdered sugar making them look like little snowballs. Pure vanilla extract is what boosts the flavor to these little snowballs encouraging you to keep "throwing" them into your mouth. Tracey from The Kitchen is My Playground offers an amazingly delicious recipe for snowball cookies on her blog - please check it out!


The Kitchen Is My Playground


7.  Peppermint Meringues

A holiday cookie that is easy to make, budget friendly and tastes amazing - peppermint meringues fits the bill here. They make a great treat to gift to friends and family around the holidays too. Plus they are just do darn cute, aren't they? Jamie from Love Bakes Good Cakes whips up a batch in no time and shares her tips and tricks along the way. Check out her recipe for these yummy cookie treats. 


Love Bakes Good Cakes


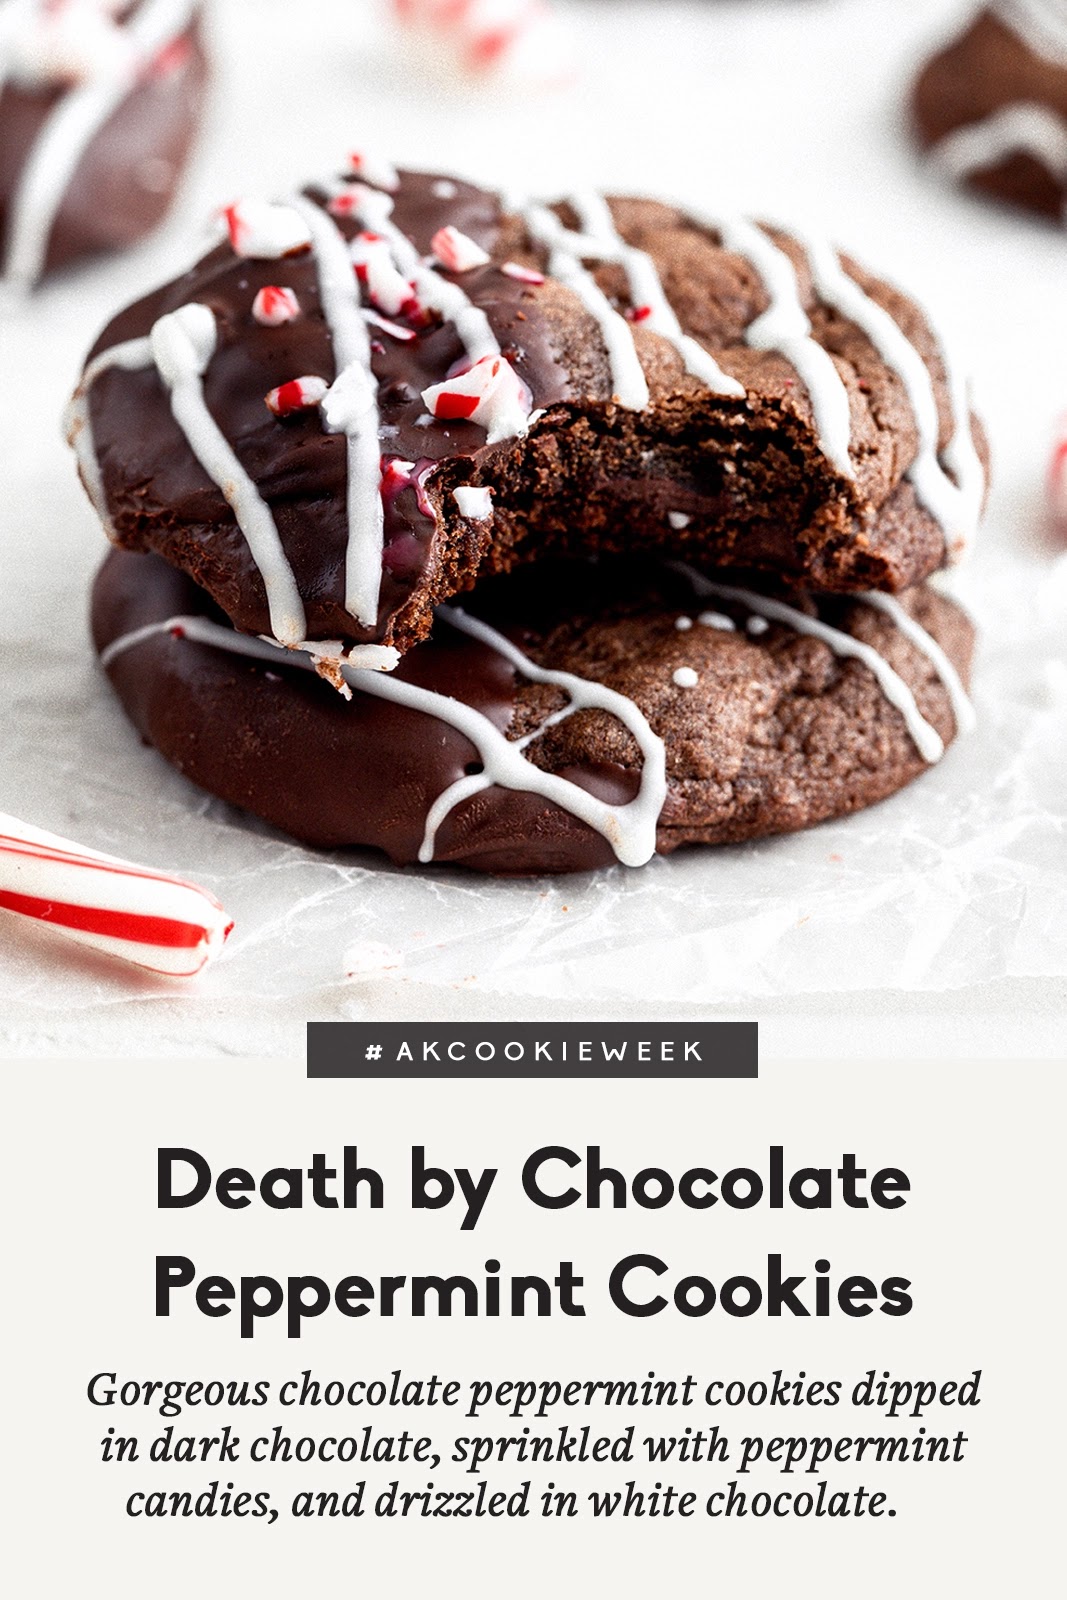
8. Chocolate Peppermint Cookies

Two of my favorite flavors in one cookie, chocolate and peppermint! White chocolate drizzled over these cookies with bits of peppermint give these cookies a cute holiday flare. Find the recipe for these goodies by Monique at Ambitious Kitchen


9. Candy Cane Kiss Cookies

By switching out a chocolate Kiss candy with a peppermint Kiss candy this cookies goes from everyday cookie to Christmas cookie in a flash. This is a great cookie to make with your kids too - they can be the official peppermint Kiss cookie decorator. Follow the full recipe from Hot Beauty Health.


Hot Beauty Health


10. Church Window Cookies

In our family Great Grandma Evans is famous for her no-bake church window cookies that she makes once a year during Christmas. When she serves them to her grandkids and great grandkids she always reminds them why we are celebrating Christmas - Jesus's birthday! 

Made with just five simple ingredients: chocolate, colorful mini-marshmallows, shredded coconut and walnuts this cookie recipe will soon become an annual favorite. Full recipe and video to show you how to make them can be found at The First Year Blog

The First Year Blog


11. Spritz Cookies

This classic cookie gets its name from the German word "spritzen"  meaning to squirt, which is exactly how these cookies are make - by squirting them out using a cookie press! (If you don't have one yet - get one - they are sooo much fun!)

When I was a child I remember my mom using her cookie press to make spritz cookies. I was fascinated with the cookie press and all of the shapes you could make by just changing out the shape discs. The dough can be colored too so that your cookies can be all different colors like red and green for Christmas. This buttery spritz cookie recipe from Life Love and Sugar is a great one to use if you are new to making spritz cookies. 


Life Love and Sugar


12. Candy Cane Cookies

Candy canes are a classic Christmas treat as well as a well known Christmas symbol. I've always been told that candy canes represent the shepherd's hook based on the Bible story of the angels visiting the shepherds while they were tending their sheep to tell of the birth of the Savior. These cookies would be a fun and memorable way to pass down this Bible story to your kids as you make them together.

These cookies are flavored with peppermint but you could use vanilla flavoring instead if you prefer. To make these cookies follow the step by step instructions and recipe provided by Number 2 Pencil


Number 2 Pencil.com

13. Peanut Butter Cookie Bars

Though not an actual cookie these cookie bars still need to be included because they are just that good! Cut the bars into squares, stack them up and display them on your fancy Christmas cookie platter to bring to a party or for your dessert table. The red and green M&M's and sprinkles really dress up these cookie bars for the holiday too. Find the complete recipe from Together As Family that includes all the easy steps and ingredients to make Santa's Peanut Butter Cookie Bars. 


Together As Family

14. Pizzelles

Pizzelles are a super thin, crunchy, wafter-like cookie with an Italian heritage. To make traditional pizzelles you need to use a special iron pizzelle press (or griddle) rather than baking them in the oven. The griddle looks a little like a waffle iron but has decorative plates that fry the batter into thin shaped wafers. Once the cookies are made they can be lightly dusted with powdered sugar or drizzled with dark or white chocolate. These happen to be my husband's favorite Christmas cookie! His grandma has a pizzelle press and makes an extra batch for him every year. Follow the recipe for pizzelle cookies at Baking A Moment.

Baking A Moment

15. Chocolate Crinkle Cookies

As a sworn chocolate lover these are one of my favorite holiday cookies. Rich, chewy chocolate covered in a dusting of powdered sugar to give it an extra zing of sweet makes my mouth water. These are easy to make especially if you follow the recipe and tips at The Life Jolie. These chocolate crinkle cookies will become a consistent cookie on your holiday cookie plate from now on I guarantee!


The Life Jolie


Bonus Recipe !! 

16. Buttery Shortbread Cookies

Soft, buttery and full of goodness these cookies are simple to make yet loved by all. With only three ingredients - yes you read that right, just three ingredients needed to make these little treats that whip up fast and turn out amazing. These buttery shortbread cookies can be made ahead of time and frozen so there is no need to scramble when holiday company comes for a visit. I recommend the recipe from Chew Out Loud to follow if you want to give these cookies a try!


Chew Out Loud


Your turn, what kinds of holiday cookies will you be making this year for your Christmas cookie trays? Got any favorites not included on this list? Leave me a comment or a link to your blog post so we can check them out. 

My Favorite Baking Supplies - 

Here are some of my favorite baking supplies I wanted to share with you - all of these I personally use and highly recommend!


More Holiday Recipes- 


Holiday cooking just got so much more exciting with these super delicious holiday ham recipes! Before you dig into the dessert trays loaded with all of those Christmas cookies be sure to serve a full ham dinner with all of the fixings! 


Merry Christmas!