Tuesday, March 8, 2022

How to Make A Simple Rag Quilt

Rag quilts are easy-to-make quilts, perfect for a beginning quilter or even for a seasoned pro who needs to make something quickly. I fell in love with rag quilts because of the soft edges created by the ragging process and how cuddly these types of blankets are!


This post contains affiliate links which means if you click on a link and make a purchase I may receive a small commission at no additional cost to you. Please see my disclaimer page for more information. Thanks!

One of my favorite gifts to give a new mom is a handmade baby quilt. I recently made a rag quilt for a new mom at our church. I had several yards of camo cotton print fabric I had been saving for the right project and this was it! 

My friend had a baby boy so it was fun using up this black/gray camo print in this quilt. I used a total of four different colors of fabrics from my stash on the front of the quilt and a solid oatmeal-colored cotton flannel for the back. The finished baby quilt measured about 42" x  54".


(You can find quilting fabric and quilting supplies for your project at Fat Quarter Shop.)

Shop at Quarter Shop


Rag Quilt Size Guide

The size of a rag quilt can be easily adjusted to fit your needs. To make a rag quilt larger simply increase the size of the fabric squares or add more squares along the perimeter of the quilt.  If you need a smaller size quilt do the opposite and decrease the size of the squares or don't add as many squares to the quilt. Make sense? Great!


Brainstorming Your Quilt Pattern

I like to sketch out some ideas on graph paper before I start cutting the fabric. This way I know what the finished quilt will kind of look like before I commit to cutting into the fabric. For this rag quilt, I wanted the camo print to be in the center and the remaining fabrics to fill in around it in a symmetrical pattern. 

After I finished sketching out my idea I was ready to cut all of the fabric into 7" squares. My rotary cutter and cutting mat came in handy for this project! If you don't have one yet - get one, they are totally worth it!


 Cut Time, Quilt More  


Batting - To Use Or Not To Use

Typically rag quilts have a middle layer of quilt batting sewn between the top and bottom fabric squares to give the quilt some weight and extra warmth. If you live in a warmer climate you might want to substitute quilt batting for a layer of cotton flannel so your quilt isn't so thick or too warm. You can even leave this middle layer out completely for a very lightweight quilt too. I chose to add quilt batting for the middle layer since I live in a colder climate. 

The middle layer of batting should be smaller than the top and bottom layers of fabric. I cut the batting into 6" squares. Once your batting squares are cut it is time to take all your top, bottom, and middle squares to your sewing machine. 


How To Make A Simple Rag Quilt

Follow along with these easy-to-follow steps to make your own rag quilt. 

Starting A  Rag Quilt - Complete Step-By-Step Tutorial

  • Using your sketch determine how many squares of fabric you will need from each of the fabrics you chose for the quilt top. My quilt was 7 rows by 9 rows for a total of 63 squares for the quilt top. 

Cut out all the squares from the quilt top fabric and then cut out the same number of fabric squares for the bottom of the quilt. For my quilt I had a combined total of 126 squares of fabric! 

  • Next, place one square of bottom fabric face down, then place one batting square on top of the bottom layer of fabric centering the batting in the middle of the bottom square. Lastly, place one quilt top fabric square face up on top of the batting. This is called a fabric sandwich - isn't it yummy! Repeat this step with all the fabric squares you cut out until they are all made into fabric sandwiches.


  • Starting sewing diagonally from one corner of the fabric sandwich to the opposite corner in a straight line. To make this step (and the next) go quicker you are going to want to chain stitch these square sandwiches. Chain stitching means you continue sewing one square sandwich after another without cutting the thread between them. 

How I like to chain stitch is to first sew across the square diagonally then when I reach the other side of the fabric I continue sewing a few stitches past the edge, lift up the presser foot and slide the corner of the next fabric sandwich under the needle, drop the presser foot and continue sewing from one corner to the next diagonally. Keep chain stitching until you sew all of the squares. 

Cut the threads between the chain stitched squares then chain stitch all of the squares across the opposite diagonal of each square until each square has an "X" sewn across it. Here is a picture of what I mean:


Sewing The Squares Together 

  • After I sew all the "X"s on the fabric squares, I lay out the squares on the floor (or another large area) into the pattern I sketched for the finished quilt. At this point, you will be sewing the squares together row by row. You want the seams to show on the top side of the quilt so start by placing two squares of fabric from the first row together with the wrong sides (backside) facing each other. Sew the squares together with a 1/2" seam allowance. Continue sewing until all of the squares are sewn together into rows.


Sewing The Rows Together

  • After sewing the squares into rows you are now going to sew the finished rows together. Stack the first two rows together, making sure the wrong sides (backside) face each other and the seam lines between each of the squares line up. To make sewing the rows together easier, it is helpful to "nest" the seams of each square along the rows then pin each row together so it doesn't shift when sewing. To nest the seams make sure all of the seam allowances for the squares on the top row face one direction and the seam allowance for the bottom row face the opposite direction. This way when you line up the rows the seams between the squares fit together snugly and there is no extra bulk due to doubled up seam allowances on top of each other.  

Sew the rows together using a 1/2" seam allowance again making sure the seams allowances show on the top of the quilt.


Here is my quilt all sewn together before I clip the seams: 


Your quilt should be all assembled and sewn at this point! But....we aren't done yet. Hang in there, we are almost done!

  • This is a very forgiving quilt however it is important to square up the entire quilt before the next step. I like to lay my quilt on my self-healing mat and trim any wonky edges with my rotary cutter. 
  • Next, sew around the entire perimeter of the quilt using a 1/2" seam allowance. (I actually like to sew around the perimeter twice but that is just personal preference.)


Start The Ragging Process

Grab a sharp pair of scissors or spring action rag quilting scissors, which I highly recommend if you think you might make more rag quilts in the future. These spring-action scissors are the bomb when it comes to rag quilting! 

Now, start cutting all of the seam allowances on the top of the quilt and around the perimeter. I usually make cuts about 1/4" to 1/2" apart as I cut the fabric. Be very careful when you are snipping the seam allowances - you DO NOT want to cut through any of the seams! When you finish cutting the seam allowances take the quilt outside and shake it out. Shake it really well and when you think you are done... shake it some more! There will be a lot of small bits of fabric flying everywhere. 

Washing Your Rag Quilt

After shaking the quilt out (forever) it is time to throw it into your washing machine with a few old towels for a quick wash then into your dryer. Do not use liquid fabric softener since it will gum up the ragged edges. Make sure you empty your lint trap because I guarantee it will be FULL when the dryer is done. 

I actually like to wash and dry a new rag quilt several times to encourage the ragging process and reduce the amount of lint produced after each wash/dry cycle. Every time you wash and dry a rag quilt the frayed edges will get softer and softer!

If you are gifting a rag quilt to someone who has never owned one it would be wise to let them know that the quilt will continue to give off lint but it should be drastically less as they use it and wash it.

What Kinds Of Fabric Are Best To Use For A Rag Quilt?

Fabric that frays like cotton or flannel is the best type of fabric to use for a rag quilt. For an extra soft rag quilt, you can combine cotton or flannel with non-fraying fabrics like jersey knit, Minky or fleece. The edges won't be as frayed and fuzzy but the softness of these other fabrics will still give the quilt a nice soft touch.

How Much Fabric Do I Need to Make a Rag Quilt?


The amount of fabric you will need to make a rag quilt will depend on the size of the quilt you want to make. The standard width of a bolt of fabric (WOF) is 42" so depending on the size of your squares you can easily calculate how many squares you can cut from a 42" long piece of fabric.  Remember that graph paper sketch you made earlier? Get it out and use it to help you figure out fabric requirements. Here is an example of how to figure out fabric requirements:

Example: 
Fabric for a baby size rag quilt measuring 30" x 40" requires 48 - 6" squares of your quilt top fabric. Assuming your fabric is 42" across (WOF) you can cut 7 squares for each 42" x 6" section of fabric (42/6 = 42). Therefore for the quilt top you will need about 1 1/4 yards of fabric. You will also need the same amount of fabric for the back of the quilt. If you choose to add batting you will need a 30" x 40" piece of batting of which you will cut 48 - 5" squares. 


Monday, March 7, 2022

How To Make Tie-Dye Coffee Filter Butterflies

Looking for an easy craft to make with your kids this Spring? Tie-dye coffee filter butterflies are fun and easy to make. From toddler to teen this craft project is sure to be a hit! 

Follow along with this tutorial to make your own tie-dye butterflies. These cuties make great decorations for a birthday party or even Easter! 


Your child is going to love watching the marker colors mix and spread on the coffee filter once they spritz it with water. Once dried they will have a beautiful and delicate-looking butterfly. I highly recommend doing this craft on a protected work surface so the markers don’t stain your table. 


Tie-Dye Coffee Filter Butterfly Tutorial

Supplies:
round coffee filters
variety of colored markers
pipe cleaner
spray bottle & water

How to Make a Coffee Filter Butterfly:


  • Lightly spray the entire colored coffee filter with water from a spray bottle until the entire surface is damp. The colors will begin to blend together. Let the coffee filter air dry completely.


  • Fold the coffee filters accordion style and stack them one on top of the other


  • Fold a pipe cleaner in half then place the center of the stacked coffee filter on the fold. Twist the pipe cleaner around the center of the coffee filters a few times to create the butterfly body. Gently curl the ends of the pipe cleaners into the butterfly antennae 


  • Open the coffee filters to create butterfly wings


Great Job! Now go make a whole bunch more!! 


Once your child has made one of these colorful butterflies they won’t want to stop crafting! Insert a wooden skewer into the pipe cleaner and stick the butterfly in a houseplant to make an indoor butterfly garden. 


Here are some more easy & fun craft projects I'm sure you will enjoy:


Thursday, February 17, 2022

10 Easy Butterfly Craft Projects for Kids

Butterflies, though small and delicate, have become a symbol of new life, transformation, and beauty captivating the hearts of both children and adults alike. Their colorful wings and graceful movement are the inspiration for crafters of all ages and abilities.


Butterfly crafts are the perfect way to kickstart your spring and summer kid’s craft projects. 


This post was written in partnership with Zulily. For more great posts click here


Every Spring my kids and I visit our local conservatory during their annual butterfly exhibit. The exhibit has hundreds of butterflies floating and flying through the indoor garden as well as butterflies hatching from their chrysalis. I always know that once we get home the kids will want to break out the craft supplies and make their own butterflies in order to mark this memorable field trip. 


10 Easy and Fun Butterfly Kids Craft Projects To Make This Summer


If you have a butterfly-loving child and are looking for a fun and easy butterfly-themed craft to do with them I made your job easy by putting together a list of 10 easy-to-make and fun butterfly crafts for kids. 


  1. PIPE CLEANER BEADED BUTTERFLY


Kids practice their fine motor skills as they string beads onto a pipe cleaner to make these butterflies. My kids love to make color-coordinated butterfly wings so we also use this craft to discuss patterns, color coordination, and counting. 


  • String colorful pony beads on two of the pipe cleaners leaving one inch empty at both ends of the pipe cleaners. 

  • Twist the empty ends of the pipe cleaner together creating a circle. With your fingers separate the beads in half dividing them onto opposite sides of the pipe cleaner circle. 

  • Next Twist the beaded pipe cleaner into a figure 8 shape. Repeat this step with the second pipe cleaner. 

  • Cut the third pipe cleaner in half then bend one of the shorter pieces in half matching cut end to cut end. Put one bead on each of the cut ends and twist the pipe cleaner around the bead to secure it in order to make the butterfly’s antenna. 

  • Spread craft glue onto one flat side of the clothespin then sprinkle glitter over the glue. Let the glue dry completely. 

  • Pinch open the clothespin and insert both beaded figure-eight-shaped pipe cleaners into the clothespin at the center twisted section of the pipe cleaner. Before closing the pipe cleaner insert the bend side of the beaded antenna at the end of the clothespin. 


You may want to add a dab of hot glue to securely close the clothespin if your child will be playing with their butterfly. Add a small button magnet to the backside of the clothespin to turn your butterfly into a magnet to display proudly on the refrigerator. 


  1. COFFEE FILTER TYE DIE BUTTERFLY


Your child is going to love watching the marker colors mix and spread on the coffee filter once they spritz it with water. Once dried they will have a beautiful and delicate-looking butterfly. I highly recommend doing this craft on a protected work surface so the markers don’t stain your table. 


  • Lay the coffee filters flat then color all over the coffee filters with markers then lightly spray them with water so that the entire surface is damp. The colors will begin to blend together. Let the coffee filter air dry completely.

  • Fold the coffee filters accordion style and stack them one on top of the other

  • Fold the pipe cleaner in half then place the center of the stacked coffee filter on the fold. Twist the pipe cleaner around the center of the coffee filters a few times to create the butterfly body. Gently curl the ends of the pipe cleaners into the butterfly antennae 

  • Open the coffee filters to create butterfly wings


Once your child has made one of these colorful butterflies they won’t want to stop crafting! Insert a wooden skewer into the pipe cleaner and stick the butterfly in a houseplant to make an indoor butterfly garden. 


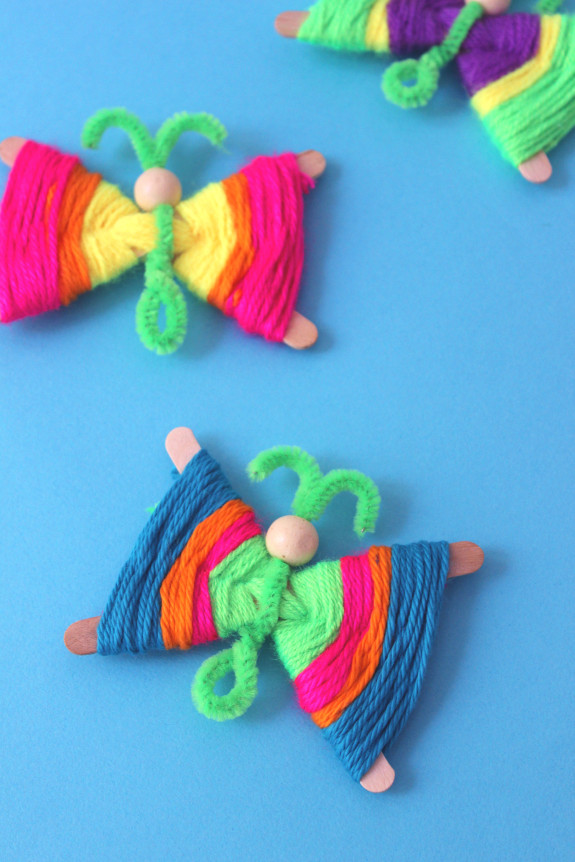
  1. WOVEN YARN WRAPPED BUTTERFLY


Yarn woven around a few craft sticks topped off with some beads results in a fabulous butterfly cute enough to give as a gift. 


  • Place one craft stick on top of another in an uneven “x” shape. Select one color of yarn and tape the end to the center of the craft sticks where they cross. 

  • Begin wrapping the yarn around the center of the craft sticks weaving around the sides so that they no longer can move. Start weaving outwards along the craft sticks in a figure-eight pattern. 

  • To add another color of yarn to your butterfly wings, cut the yarn of the first color then take the second color yarn and begin wrapping it where the cut piece is left off making sure to overlap the cut yarn to prevent it from unraveling. To tie off your weaving tie a double knot around the last woven loop, cut the yarn and tuck it into the weaving. 

  • To create the butterfly body fold the pipe cleaner in half and twice the fold around itself two times. Place the center of the woven butterfly into the center of the folded pipe cleaner above the twist. 

  • Thread 2-3 beads onto the bottom of the pipe cleaner and one large bead onto the top. Curl the two long ends of the pipe cleaner to make the antenna. 


My girls always drew faces onto the larger top bead of their butterflies and of course named them. These little insects flew with us all over town visiting the grocery store, friend’s houses, and even a quick trip to the ice cream parlor. 


  1. BUTTERFLY WINDSOCK


Time to raid your recycle bin for this craft. Empty toilet paper rolls star in this easy craft for kids. 


  • Paint the outside of the toilet paper roll and let it dry

  • To make the butterfly wings, fold a piece of construction paper in half and cut out a capital “B” shape along the fold. Next, using a different color cut out a skinny oval shape for the body. Glue the body onto the center of the wing. Cut out two circle shapes from two different colors of paper. Glue the circles in each section of the wings. 

  • Glue the butterfly body to the middle of the painted toilet paper roll. 

  • Attach lengths of the crepe paper streamer with glue to the inside bottom of the toilet paper roll. Cut the crepe paper streamers to all the same length.

  • At the top of the toilet paper roll punch two holes on opposite sides and thread the yarn through the holes. Tie the ends of the yarn together. 


Hang your finished butterfly windsock near an open window and watch the streamers flutter in the breeze. 


  1. CLAY BUTTERFLY ORNAMENTS


Introduce your children to homemade clay as an art medium for this craft project. The finished clay butterfly can be displayed as outdoor garden art if you seal it with a water-based sealer once the paint is dry. 


  • Prepare a batch of clay using this 3 ingredient clay recipe.

  • Roll out the clay until it is ¼” thick. Use your plastic knife to cut out a butterfly shape. Press the straw into the top of one wing to create a small hole.  Place the clay on a baking sheet and let it dry. 

  • Paint the dry clay butterfly in multiple colors and let the paint dry. Thread a piece of yarn through the hole for hanging.

  • (Optional) Spray the front and back of the painted butterfly with a water-based spray sealer and let it dry completely.


String your clay butterflies onto a length of twine to display around your garden this summer. Rain or shine these fun crafts will keep your child entertained and engaged as they make their very own butterfly.


  1. Handprint Butterfly


via: One Little Project


A beautiful craft project that turns into a family keepsake of your little one’s handprint! 


  • Fold a piece of colorful construction paper in half then trace your child’s hand onto the paper lining up the palm of their hand with the folded edge of the paper. Cut out the traced handprint, to reveal the wings. 

  • Decorate the wings with markers, sequins, and glitter. 

  • Glue a wood craft stick down the center of the wings then hot-glue small pom-pom balls down the center of the craft stick to form the butterfly body. 

  • Fold a 4-inch long pipe cleaner in half, tuck the folded end under the top of the craft stick and glue it in place then curl the ends of the pipe cleaner to form the butterfly’s antenna. 


  1. Nature Craft Butterfly


via: Crafts on Sea


Venture outside to gather up all the materials for this project. Bring nature into your home with this “green” butterfly craft. 


  • On a sheet of paper draw the outline of a butterfly shape leaving the center empty.

  • Gather large and small leaves, twigs, and wildflowers. Glue a small twig down the center of the butterfly shape to make the body. 

  • Next, fill in the wings with the large and small leaves gluing them down to the paper.

  • Decorate the wings with wildflowers, petals, and other natural treasures making sure to glue them to the leaves. 


  1. Egg Carton Butterfly


via: Crafty Morning


A fun upcycling project your kids will love to craft. 


  • Cut a cardboard egg carton into a 2 cup by 2 cup shape making sure to snip off the edges making them round around the cups. 

  • Paint the egg carton with bright colors making sure to cover all of the cardboard cups. 

  • Once the paint is dry take a long pipe cleaner, fold it in half, wrap it around the bottom center between the cups then twist it closed at the top center to make the butterfly’s antenna. 

  • Poke a hole through the top two egg cups and insert a string, knot it and hang up your beautiful butterfly.


Make several of these beauties and hang them along the top of a window as a spring or summer decoration.


  1. Sponge Butterfly Print


via: The Keeper Of The Cheerios


A sponge isn’t just for cleaning! This project is proof of that. Rinse out the sponge and try new colors to create a family of colorful butterflies. 


  • Tightly wrap a rubber band around the center of a regular-sized household cleaning sponge. 

  • Squeeze dabs of colorful paint along one side of the sponge then press both sides of the sponge together folding it at the center. 

  • Press both sides of the sponge onto a piece of paper, carefully lift up the sponge to reveal your symmetrically painted butterfly. 

  • With a marker draw a body down the center between the wings and add the antenna.


10. Bowtie Pasta Butterflies


These cute little butterflies would look great attached to a homemade card for someone special. 


  • Paint several pieces of bowtie pasta in bright colors with craft paint. Allow the paint to dry completely. 

  • Fold a piece of heavy cardstock paper in half to make a blank card. Then hot-glue three or four pasta pieces to the front of the card. 

  • With a marker draw the butterfly’s antenna as well as dotted looped lines behind each butterfly showing the path they are flying. 


Not only are these craft projects easy and fun but they also provide an opportunity for your children to improve their fine motor skills. Rain or shine, make great memories this summer with your children creating a beautiful butterfly. 


Did you know Zulily offers a huge selection of good quality arts and crafts supplies, kits, and books? Unlock your creativity at the Craft & DIY Shop!