Wednesday, February 9, 2022

How To Make A Unicorn Dreamcatcher

Everyone loves unicorns - those mythical horse-like creatures with a beautiful, long horn on their head! These cute and easy unicorn dreamcatchers are a fun and easy kid-friendly craft that is sure to put a smile on their face and a bit of magic into their room.


This post is brought to you in partnership with Zulily. While I may have been compensated, as always, all opinions are my own.


Unicorns bring kids’ (and adults’) imaginations to life transporting them to their own creative, fairy-tail fantasy land where unicorns live and thrive. 


One thing I love best about this cute kid’s craft project is how simple it is to make! If you love doing simple craft projects with your child this is the perfect craft for you. Not only is it simple but it doesn't cost much to make plus handmade crafts are always more special. 


Crafting Memories With Your Kids


Do you love making craft memories with your kids? Some of our favorite memories were “crafted” during family craft time! These magical unicorn dream catchers certainly will become a memorable craft for you and your kids. 


The unicorn dream catcher kid’s craft would make the perfect group project for a birthday party craft or sleepover activity to do with friends. Because it is inexpensive and doesn’t require mad crafting skills, kids, especially older elementary and middle school ages, can certainly make them without much supervision or help. 


For more amazing dreamcatcher-themed craft projects check out this post on The Find by Zulily.


How To Make A Unicorn Dreamcatcher

Gather up your crafting supplies and let’s get crafting these magical unicorn dream catchers!

WHAT YOU NEED:

  • Hot glue gun & glue sticks

  • Wood embroidery hoop 

  • Yarn 

  • Felt - pink & white

  • Glitter paper

  • Faux flowers

  • Ribbon

  • Scissors


Step-by-step Instructions

Step 1 - Securely tie yarn around the top of the embroidery hoop by the adjustment screw. Wrap the yarn tightly around the entire perimeter of the embroidery hoop until the whole hoop is completely covered with the yarn. The length of yarn you need to completely cover the hoop will vary depending on the size of the embroidery hoop you choose to use. 


Once the hoop is covered tie the yarn off at the same place you started. Dab a little bit of hot glue under the yarn to prevent it from unraveling. 


Step 2 -  Next, cut a 16” piece of yarn in a coordinating but different color from the yarn used to wrap the hoop. Securely tie the yarn to one side of the hoop then begin wrapping the yarn across the hoop in a criss-cross web-like pattern. Tie off the end of the yarn onto the hoop and dab a little hot glue under it to hold it firm. 


Step 3 - Take some faux flowers or other decorations and hot glue them to the top edge of the embroidery hoop so that the hoop adjuster is hidden behind the flowers. 

Step 4 - Cut two triangle-shaped ears with rounded edges from the white felt and two smaller shaped rounded edge triangle pieces from the pink to make the inner ear. Use the hot glue to secure the pink inner ear to the top of the white outer ear. Along the bottom flat side of the ear slightly pinch the ear to give it a 3-D appearance. Place a dab of glue inside the pinched felt to hold it together. Hot glue the ears to the back of the embroidery hoop on either side of the hoop adjuster making sure to leave room for the unicorn horn.

Step 5 - From the sparkly paper, cut out a horn-shaped triangle and hot glue it to the back of the embroidery hoop just behind the hoop adjuster. 

Step 6 - To add some extra fun and dimension to the dream catcher tie various colors of yarn and ribbon to the bottom. If you have thicker yarn you only need one strand but if you use thinner yarn I recommend using 4 to 5 strands of yarn bunched together. 

To make a six-inch-long yarn tassel cut the yarn 12” then fold it in half matching the cut end to the cut end. Insert the loop side of the yarn through the bottom of the embroidery hoop then thread the two cut ends through the yarn loop pulling them tight to secure the yarn to the hoop. Repeat this process with other colors of yarn and ribbon until you are happy with the results. 


Step 7 - The last step is to add a small loop of yarn to the back of the unicorn dream catcher so you can hang it up. Cut a 2” piece of yarn and tie the cut ends together in a tight knot. Then use hot glue to secure the knot to the back of the unicorn horn. 

Vibrant colors, textured yarn, and shiny ribbons combined with soft felt and faux flowers bring the unicorn dreamcatcher to life. Hang up the dream catcher in your child’s room or nursery for a pop of color. 


More Fun Kid's Crafts

Here are some more fun kid-friendly crafts you should check out!  

How To Make Slime - An Easy Homemade Slide Recipe

Awesome Magic Paper Towel Trick

Dala Horse Paper Craft For Kids

Do you love doing fun crafts with your kids? What are your favorite craft projects to do with your kids?

Check out other great kid-friendly crafts at The Find by Zulily!


Sunday, January 9, 2022

Winter Scavenger Hunt For Kids Printable

Winter can sometimes feel like it drags on one cold day after another but it doesn't have to be this way. Instead of dreading this cold, snowy season why not embrace some of the unique activities you can only do in the winter. 


This post contains affiliate links. If you click on a link and make a purchase I may receive a small commission at no additional cost to you. For more information please see my Disclaimer page. Thanks!

Cabin fever can quickly set in if you aren't prepared. Having a list of fun winter activities for kids can really help keep the winter blahs away. Since my kid's ages vary from elementary age to high school I find it helpful to have a variety of age-appropriate activities on my list. I really try to get all of my kids, including the high schoolers outside every day. A dose of fresh air is good for everyone - including mom! 

Winter Scavenger Hunt For Kids (of all ages)

Today I wanted to share with you a fun outdoor winter scavenger hunt that kids of all ages will love. Put on those warm winter boots and get outside to explore the winter wonderland with this fun scavenger hunt!  


There are a total of 30 scavenger hunt items listed on this printable  If you have younger kids, feel free to pick the items you think will be most interesting (and easy) for them to find. Or consider breaking up this scavenger hunt over a few days by challenging your kids to complete one row per day. Prizes like a cup of hot chocolate or a short sled ride after completing the hunt are always a bonus. 

Here is the link to the free printable and the embedded version of it too. 


After you complete the scavenger hunt check out these other fun winter activities! Here are 5 Fun Winter Activities to do with your kids this winter:

Read More Here

Get outside and enjoy the beauty of winter while it is here! What winter activities do you and your kids love to do? I'm always looking for more great outdoor activities - share your ideas in the comments.  


Wednesday, January 5, 2022

How To Write Course Descriptions For Your Homeschool High School Student

Writing detailed course descriptions for all of the high school-level classes your homeschooler took can be a bit overwhelming. Keeping track of grades and creating a high school transcript are big jobs but an even bigger job is writing course descriptions! It can make a homeschool mom's head spin!  


This post may contain affiliate links which means if you click on a link and make a purchase I may receive a small commission at no additional cost to you. For more information please see my Disclaimer page. Thanks!

A course description is a way to explain what your student covered in each course they took in high school and how they were evaluated. As more and more families choose to homeschool, college admission departments are becoming a lot more familiar with homeschooled student transcripts. Providing colleges with course descriptions will help them understand your student's level of academic achievement, course difficulty, and how they earned their grades. 

I have a confession to tell you about course descriptions. I admit I was one of those homeschool moms who waited until my child was in 11th grade before I got serious about writing course descriptions for all of the high school level classes she had taken! I really regret not starting them earlier because it would have saved me a lot of time and wouldn't have been so overwhelming. I ended up setting a goal to have them all written by the end of the summer so that when she started applying to colleges that fall they were done and ready to be submitted with her transcript. 

I'm telling you all this not to scare you but to encourage you to get started pulling together these vital course descriptions today. 


How To Write High School Course Descriptions For Your Homeschooler


In this post we are going to cover the following 3 things you need to know about course descriptions:

1. What is a student portfolio.

2. How to write a course description and what to include in a good course description

3. How to submit a course description to a college. 


Student Portfolio

Speaking of college - I'm proud to say that my daughter was accepted into every college she has submitted an application! I'm not sharing this to brag (ok, maybe a little) but to tell you that your homeschooled child can and will get into college because homeschooling does works!

Even though college admission staff are beginning to become more familiar with homeschoolers I still wanted to make sure there was no confusion when they got her application. Instead of just sending each college her official transcripts (grades only) I put together and submitted to each college what I called a "student portfolio". Her student portfolio included the following:

  • Official transcripts - make sure the words"Official Transcript" appear somewhere on the transcript you submit and that it is signed and dated)
  • Course descriptions for all classes taken 9th grade through 11th grade - updated class descriptions for her 12th-grade year will be sent once her classes have been selected.
  • Complete reading list of the books she was required to read in high school
  • List of activities, achievements, and volunteer opportunities she participated in or received in high school

 Maybe I went a little overboard, but not a single college admissions department has asked for additional information or clarification of her transcript. The portfolio speaks for itself and I consider this a success!

I came up with the idea to call this bundle of information a "student portfolio" so if you call and ask an admissions counselor if you should submit a student portfolio they might react a bit confused about this concept. This is a term I use in our homeschool so my kids (and husband) know what I'm talking about. 


How To Write A Course Description 

Don't let writing course descriptions scare you! Once you learn how to find course information you will be well on your way to getting the task done. This is a task you don't want to put off until your homeschooler's senior year. Instead, begin writing the course descriptions for each class your child takes starting their freshman year.

Today I wanted to share with you how I wrote course descriptions for my daughter's high school classes and what they actually look like. My hope is that this example will be a springboard to get you started writing course descriptions for your student today. What I included in the course descriptions are what I determined to be the "must-have information" which I am going to try to break down into small easy to follow sections:

#1. Course Title

The course title should match the title from your student's official transcript. I listed all of the courses in bold so that the college admissions department could easily find each course within the course descriptions. If the class had a lab component include the words "with lab" in the course title. I chose to group my course descriptions by subject rather than by school year. You choose what works best for you!

#2. Credits Earned and Academic Level of The Class

Again, the credits earned should be consistent between the official transcript and course description. It is also helpful to state if this was a high school or college-level course especially if your student took the course as a dual-enrolled student. Here is an example:

This is a 1.0 credit high school level course.
 
or

This is a 1.0 credit dual enrollment course taken at Grand Rapids Community College.

#3. Written description of the course.

 This part should include skills acquired, material covered as well as details describing lab work if applicable. In addition, you should include how the student was evaluated - tests, quizzes, oral discussion, and essays. Lastly, a list of the course textbook(s), supplemental materials, and if this was an online class or lecture.


Here are some examples of the course descriptions I wrote:


Remember, I am not a professional course description writer so I'm sure there are bound to be a few inconsistencies but I tried my best and I think it does the job! If anything this is a good springboard for you as you prepare your high schooler's student portfolio and write course descriptions. 


How To Submit Course Descriptions To Colleges

As a homeschool mom, a.k.a. high school guidance counselor, I took a proactive approach when submitting my daughter's transcripts to each college. I saw myself as a kind of translator who was responsible for translating my student's homeschooling career into an easy-to-understand language the admissions counselor would understand. What worked well for me was to email the full student portfolio as one pdf document directly to her assigned admissions counselor.  

Plan on the course description document alone to range anywhere from 10-15 pages in length. This combined with the transcript, reading list, and activities/volunteer record can make for a lengthy document. Don't panic! Most colleges would rather get more information than too little and it is up to their discretion if they need to dig through every page. Most colleges do read every page! Not only will your child's complete student portfolio be helpful but it will show how seriously your homeschool student took their education. 


BONUS - Free Course Description Download!!

Now that you are all ready to start on this course description writing journey I thought I would lend a hand and give you access to a free Google doc with the course descriptions I wrote for my homeschooled high school student! 

Hopefully with this in hand all you have to do is tweak a few things here and there, add classes your student completed and add it to your student portfolio. 

Click this link to Free Course Descriptions


I wish you the best of luck as you and your homeschooled high schooler begin to navigate the "next step" on their educational path! 

What has been the most challenging part of the college application process for you and your student? Leave a comment to share!


Tuesday, December 21, 2021

Gourmet Chocolate Popcorn Recipe

Do you love popcorn but are getting tired of the basic butter and salt combo? Popcorn doesn't have to be boring! Take your popcorn from boring to gourmet with a few simple ingredients. Go grab your favorite popcorn machine (mine is the Whirley Pop popcorn popper) and meet me here for an easy and delicious gourmet popcorn recipe you are going to love!


This post contains affiliate links which means if you click on a link and make a purchase I may receive a small commission at no additional cost to you. For more information please see my Disclaimer page. Thanks!

Decadent Chocolate Drizzle

Plain popcorn is actually a pretty healthy snack when you don't douse it in butter and salt but every now and then a little indulgence is ok. Gourmet chocolate popcorn combines the crunchy, flavorful goodness of salted popcorn with a sweet drizzle of chocolate. Speaking of chocolate, feel free to use semi-sweet, dark, white, or whatever kind of chocolate you have on hand to make this delicious recipe. 

Gourmet Mix-Ins

You could stop after adding the chocolate but why do that when you looking to indulge a little! Here are some great mix-in ideas to give this gourmet popcorn that extra boost to make it even more amazing -


The Best Gourmet Chocolate Popcorn


What You Will Need:

8 cups popped popcorn
sea salt
1/2 cup each dark , semi-sweet, milk, and white chocolate
mix-ins 
parchment paper
air-tight plastic container


How To Make:

1 - Make 8 cups popped popcorn lightly salted - or 2 bags microwave popcorn. Spread the popcorn out on a baking sheet covered with parchment paper. 

2 - Sprinkle the mix-in toppings into the popcorn to distribute it evenly. 

3 - Melt the chocolate in a double boiler or microwave safe bowl. If you are using several different kinds of chocolate melt it in different bowls.

4 - Drizzle the chocolate over the popcorn / mix-in mixture. Sprinkle a little sea salt all over the popcorn and chocolate. Allow the chocolate to completely cool. Using a big spatula gently flip the chocolate covered popcorn over then drizzle chocolate over it to coat this side too. Allow the chocolate to once again cool and harden. 

5 - Break up the gourmet chocolate covered popcorn into small bite-sized chunks and ENJOY! If you have any leftover, which I seriously doubt, make sure to store the chocolate covered popcorn in an air-tight container. 

Gourmet chocolate covered popcorn not only makes for a decadent dessert or snack but a great gift! Fill a clear celophane bag with it, add a ribbon and small card, then gift it to family and friends for birthdays, Christmas, or any other special occasion. 


More Popcorn Recipes To Check Out!

Make sure to check out my popular Caramel Corn and Homemade Kettle Corn recipes too! These recipes are not only delicious but very easy to make.


What kinds of popcorn recipes have you tried? Share your favorite popcorn mix-ins, recipes and ideas with me today!


Monday, December 20, 2021

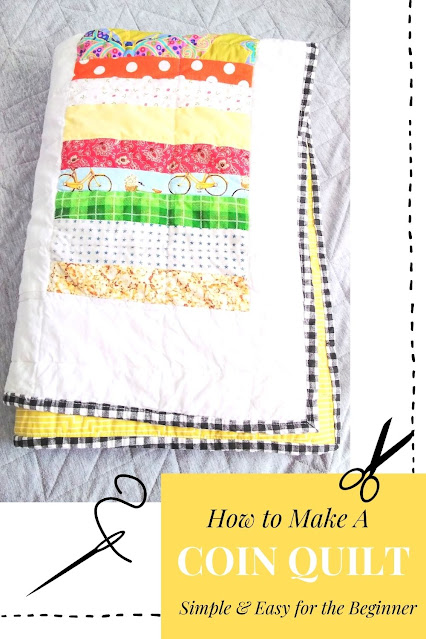
How To Make A Coin Quilt - An Easy Quilt For The Beginner

What is a coin quilt you ask? A coin quilt is a very simple quilt pattern that uses stacked rectangular-shaped pieces of fabric to mimic a stack of coins. Coin quilts are a great beginner quilting pattern because of their simplicity.  

The coin stacks are colorful and completely customizable too allowing you to mix solids with small print fabrics. They are also the perfect solution to an out-of-control fabric stash! I love projects that use up those smaller pieces of fabric from other projects that I just couldn't throw away. 


This post contains affiliate links which means if you click on a link and make a purchase I may receive a small commission at no additional cost to you. For more information please see my Disclaimer page. Thanks!

Choosing Fabric For Your Quilt

Another fabric option if your fabric stash doesn't have the colors you need is to use a jelly roll. Jelly rolls are precut strips of fabric that measure 2 1/2" x WOF (width of fabric). Most fabric shops (I love the Fat Quarter Shop!) as well as Amazon, carry a variety of jelly roll packs that are color coordinated so you don't have to do the hard work figuring out what fabrics match. 

Coin quilts can be made into any size quilt. The number of rows of coin stacks can be adjusted to meet your needs along with the sashing size. Sashing is the solid fabric pieces sewn between each long coin row. On my quilt, I used solid white for the sashing. 

Easy DIY Coin Quilt Tutorial

Today I am going to show you how to make a baby-size coin quilt. This is one of the easiest quilt patterns to make, perfect for a beginner, and still lots of fun for a seasoned quilter. Gather up the following supplies and follow the instructions below to get started.


Supplies:

Here's How To Make A Coin Quilt:

1 - Cut your fabric into strips that measure 2 1/2" x WOF. If using your stash fabrics then you might have a variety of lengths - that is OK as long as the strips are 2 1/2" wide! If you use jelly roll fabric cut the strips in half which will make them easier to work with. 

Tip - you might notice from the pictures of my quilt that my "coins" are not all 2 1/2" wide. I wanted the "coins" within the strips to be a little different for this quilt. This is another fun variation option you can play with on a coin quilt!

2 - Pick 4 strips of fabric and sew them together along the length of the strip using a 1/4" seam allowance alternating fabrics between dark and light-colored strips. Press the seams to one side with an iron. Repeat this step until all of your fabric strips are sewn into sets.


3 -  Next, use your rotary cutter to cut the strip sets into the desired length you want the coin stack to be. For the baby quilt I made, I cut my strip sets 8 1/2 inches wide. 

On a large flat surface like a table or the floor, lay the cut coin sets into rows until it is the length you want the coin strips to be for your quilt. Make sure to alternate the stack sets so the color combinations look good. Sew the coin sets together into several long rows and iron the seams flat. My quilt has 4 coin stack rows that measure about 30 1/2" long.

4 - For the sashing cut your solid fabric into strips the length of your coin stack rows. The width of your sashing will depend on how much space you want between your coin stack rows. I cut my sashing 3 1/2" wide by the length of my coin stack rows. Sew the sashing onto the coin stack rows with a 1/4" seam allowance then press the seams towards the coin stack rows. 

After the rows are sewn together measure and cut two pieces of sashing to sew to the top and bottom of the quilt. Congrats! Your quilt top is done!! My finished quilt top measured 36" x 51".


5 - Are you hungry  - because it is time to make a quilt sandwich! Cut your backing fabric and batting the same size as your quilt top. Place the backing fabric right side down on the floor. Then put the batting on top of the backing and finally put the quilt top on top of the batting right side facing up so you can see your pretty quilt top. I like to use big safety pins to pin the three layers together all over the quilt top so the layers stay put when I start quilting them. 

To keep this quilt simple I quilted the layers together with straight lines making sure to quilt in the ditch around the perimeter of the coin stack rows. If you like curvy squiggly quilting you might want to quilt with a stippling stitch.  To learn how to stipple a quilt check out Leah Day's video on Youtube.


6 - Lastly, to finish the quilt you need to bind it. I like to make my own binding because it is so easy to make and I can use whatever colorful cotton fabric I want (or have on hand!). If you don't have time to make your own you can purchase precut and folded binding at your local fabric store too. 

When I first started making quilts I found this amazing tutorial on how to bind a quilt with step-by-step instructions from Diary Of A Quilter. I highly recommend it! 

Congratulations! You just make a coin quilt! I'd love to hear how it turned out. 


Easy Beginner Quilts You Are Going To Want To Make


Friday, December 10, 2021

10 Festive Christmas Quilt Projects to Sew This Holiday Season

Decorating for Christmas is so much fun! My most precious holiday decorations are the handmade ones my children, family, and friends have created and given to me. A handmade Christmas quilt, table runner, or quilted wall hanging all make treasured presents to give to those you love. The problem is finding the perfect holiday quilt pattern that fits your level of skill. 

The problem of finding the right Christmas quilt block pattern has been solved! I scoured Pinterest looking for a variety of Christmas quilt patterns and I want to share what I found with you. Hopefully, this will save you time so you can get started sewing and quilting a handmade Christmas gift for the ones you love.


This post contains affiliate links which means if you click on a link and make a purchase I may receive a small commission at no additional cost to you. For more information please see my Disclaimer page. Thanks!

10 Festive Christmas Quilt Blocks

1. Christmas Tree Quilt Block

A Christmas tree, the most iconic symbol of this special holiday season makes for a wonderful quilt block. There are so many different ways to make a quilted Christmas tree but the one I liked best offers a simple tree pattern with swirling quilted stitches. I made this quilted Christmas tree into holiday ornaments that I gifted to friends and family. 

How To Make An Easy Quilted Christmas Tree Ornament from Me (mommysuburbia) 


2. Santa Belly Quilted Pillow 

Give a gift your loved one can cuddle with all winter long - a Santa Belly Quilted Pillow! This Christmas quilt pattern by My Quilt Infatuation is clearly Santa's belly - belt, beard, and red coat. Use a fun Christmas print for the backside of the pillow to keep the holiday cheer coming. 


My Quilt Infatuation

3. Christmas Wreath Quilt Pattern

Mini quilts make the best wall hanging. This Christmas wreath quilt is a great addition to your annual holiday decor. This pattern is simple to follow and easy to make. Find the full tutorial at Kelli Fanning Quilts. 


via: Kelli Fanning Quilts

4. Gift Box Quilt Block

Make this holiday-themed quilt and give a present for a present. This is a great beginner quilt since it is just squares sewn together and a few half-square triangles for the bow. Sew several of these blocks together to make the perfect Christmas table runner! The pattern for this block can be found at Scattered Thoughts of A Crafty Mom


via: scattered thoughts of a crafty mom

5.  Candy Cane Quilt Block

Half square triangles in holiday colors make this candy cane extra special. Whether you use white and red or red and green fabric, your candy cane quilt block is sure to look amazing. The finished block is 6" x 12" but you can adjust the size as you need for your project. Find the complete instructions at Inspired by Fabric. 


via: Inspired by Fabric


6. Angel Paper Pieced Quilt Block

This is a paper-pieced block that makes the most beautiful angel design. If you have never tried paper piecing don't let it scare you away! Once you start you are not going to want to stop! The Featherweight shop offers this pattern as an instant download after purchase that comes with complete easy to follow instructions. I wouldn't recommend this pattern for a beginner but once you have a few quilts under your belt give it a shot!  


via: Singer-Featherweight Shop


7. Gnome Mini Quilt  

Gnomes are all the rage at Christmas! Cute and adorable with an attitude everyone loves Christmas gnomes. Make this adorable gnome into a mug rug this holiday season to give as a gift - but don't forget to make one for yourself! The full pattern and tutorial can be found at Sew Can She


via: Sew Can She


8. Christmas Ornament Quilt Pattern

This fun pattern can be made as an individual ornament and turned into a holiday wall hanging or make several and make a beautiful lap quilt. Colorful Christmas themed fabric make this ornament the perfect holiday quilt pattern. The full tutorial for this quilt block can be found at My Quilt Infatuation.

via: My Quilt Infatuation

9. Christmas Candy Star

Here is a sweet treat for your Christmas decor - a Christmas Candy Star quilt block. Customize the colors to fit your decor. You can use this quilt block to make a lap quilt, wall hanging, pillow, or even a holiday table runner to display at your Christmas dinner party. The full tutorial can be found at Moda Fabrics.


via: Moda Fabrics


10. Christmas Candles Quilt Block

Candles make the holiday more festive and bright. This quilt block will not disappoint. You could even make this into an advent quilt block by making four candles, three in purple and one in pink. Follow the tutorial from Bonjour Quilts to make your own Christmas Candles quilt blocks. 


via; Bonjour Quilts


I wish you and your family a very merry and blessed Christmas! I hope you have some fun making these holiday quilts to give as gifts this Christmas season. Let me know which quilt block is your favorite!


More Fun Quilting & Sewing Projects

Check out these other fun quilting and sewing tutorials: